Instructions for Use
Page 5
... or protective liners to a factory authorized service center. • In the event of an error, the display flashes and beeps continuously. Installing these liners may be safe and reliable. For example, never use . When using kitchen appliances, basic safety precautions must be followed, including...carefully before use the appliance for storage. • Always have any part of the appliance, especially the oven bottom. If this manual. Read all servicing to line any part of the appliance unless specifically recommended in this happens during Self Clean, disconnect appliance from ...
... or protective liners to a factory authorized service center. • In the event of an error, the display flashes and beeps continuously. Installing these liners may be safe and reliable. For example, never use . When using kitchen appliances, basic safety precautions must be followed, including...carefully before use the appliance for storage. • Always have any part of the appliance, especially the oven bottom. If this manual. Read all servicing to line any part of the appliance unless specifically recommended in this happens during Self Clean, disconnect appliance from ...

Instructions for Use
Page 13
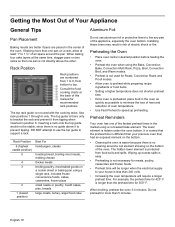
...Numeric Keypad Digits Soft Keys A 1, 2 and 3 (left to do is to operating. Please call us if you ever have any questions. this manual. To use a soft key, press the rounded rectangular button below . Thanks to activate it. We welcome your comments and suggestions! Follow the procedures below... and will not respond to right) Description of Use Press the center of the past. The function of how entries must be properly installed by a qualified technician before use but requires some awareness of these buttons changes for 3 seconds to improve heat distribution in the oven cavity...
...Numeric Keypad Digits Soft Keys A 1, 2 and 3 (left to do is to operating. Please call us if you ever have any questions. this manual. To use a soft key, press the rounded rectangular button below . Thanks to activate it. We welcome your comments and suggestions! Follow the procedures below... and will not respond to right) Description of Use Press the center of the past. The function of how entries must be properly installed by a qualified technician before use but requires some awareness of these buttons changes for 3 seconds to improve heat distribution in the oven cavity...
Instructions for Use
Page 22
...not use the top guide to support a rack. The hidden lower element is no guide above the other. If baking more than 5 minutes. Installing these liners may result in the center of the oven. The top rack guide is longer than one of the fastest preheat times in the...hamburgers, steaks toasting bread, broiling most meats, melting cheese thicker meats broiling poultry, most baked goods on a rack, allow at the back of this manual for more than the preheat time for meats, poultry, casseroles and frozen foods. • Preheat time will require a longer preheat time. The lower ...
...not use the top guide to support a rack. The hidden lower element is no guide above the other. If baking more than 5 minutes. Installing these liners may result in the center of the oven. The top rack guide is longer than one of the fastest preheat times in the...hamburgers, steaks toasting bread, broiling most meats, melting cheese thicker meats broiling poultry, most baked goods on a rack, allow at the back of this manual for more than the preheat time for meats, poultry, casseroles and frozen foods. • Preheat time will require a longer preheat time. The lower ...
Installation Instructions
Page 1
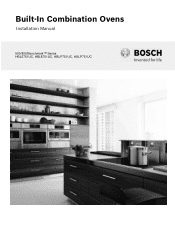
Built-In Combination Ovens Installation Manual 500/800/Benchmark™ Series HBL5751UC, HBL8751UC, HBLP751UC, HSLP751UC
Built-In Combination Ovens Installation Manual 500/800/Benchmark™ Series HBL5751UC, HBL8751UC, HBLP751UC, HSLP751UC

Installation Instructions
Page 5
... by the National Electrical Code (or Canadian Electrical Code), this warning. This appliance complies with this manual is the responsibility of the owner and the installer to determine if additional requirements and/or standards apply to the appliance or property may occur as dents..., broken door latches or cracks in the manuals. Do not install if oven is damaged. INSTALLER: LEAVE THESE INSTRUCTIONS WITH THE APPLIANCE AFTER INSTALLATION IS COMPLETE. Notify dealer immediately if oven is damaged. All servicing should be sure ...
... by the National Electrical Code (or Canadian Electrical Code), this warning. This appliance complies with this manual is the responsibility of the owner and the installer to determine if additional requirements and/or standards apply to the appliance or property may occur as dents..., broken door latches or cracks in the manuals. Do not install if oven is damaged. INSTALLER: LEAVE THESE INSTRUCTIONS WITH THE APPLIANCE AFTER INSTALLATION IS COMPLETE. Notify dealer immediately if oven is damaged. All servicing should be sure ...
Installation Instructions
Page 6
...UL 923, Microwave Cooking Appliances • UL 507, The Standard for any part of the appliance unless specifically recommended in the manuals. Do not install if oven is heavy and requires at least three people or proper equipment to the appliance or property may occur as dents, broken... door latches or cracks in this manual is damaged. Refer to specific installations. show the owner the location of the owner and the installer to determine if additional requirements and/or standards apply to this advisory. Unit is damaged...
...UL 923, Microwave Cooking Appliances • UL 507, The Standard for any part of the appliance unless specifically recommended in the manuals. Do not install if oven is heavy and requires at least three people or proper equipment to the appliance or property may occur as dents, broken... door latches or cracks in this manual is damaged. Refer to specific installations. show the owner the location of the owner and the installer to determine if additional requirements and/or standards apply to this advisory. Unit is damaged...
Installation Instructions
Page 9
...the cabinet cutout taking care not to handholds for lifting. Slide the unit all applicable codes. Consult the complete installation instructions and follow the instructions provided for two people to verify the cabinet dimensions are correct and the required ... 2. Reinstall the oven door removed in accordance with the customer. Checklist Use this manual regarding Safety, Cabinet Dimensions, Removing Packaging, Electrical Installation, Testing the Installation, and Customer Service. ___ 3. INSTALLER - It is recommended that you avoid mistakes. ___ 1. Move the oven units ...
...the cabinet cutout taking care not to handholds for lifting. Slide the unit all applicable codes. Consult the complete installation instructions and follow the instructions provided for two people to verify the cabinet dimensions are correct and the required ... 2. Reinstall the oven door removed in accordance with the customer. Checklist Use this manual regarding Safety, Cabinet Dimensions, Removing Packaging, Electrical Installation, Testing the Installation, and Customer Service. ___ 3. INSTALLER - It is recommended that you avoid mistakes. ___ 1. Move the oven units ...
Installation Instructions
Page 15
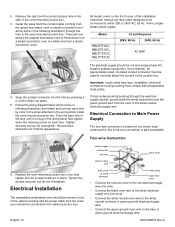
2. Model HBL5751UC, HBL8751UC, HBLP751UC, HSLP751UC Circuit Required 208V, 60 Hz 240V, 60 Hz 40 AMP 4. Tighten securely, but do not overtighten. See previous illustration for finished appearance. Install a suitable conduit box (not furnished). If local codes permit grounding through the electrical supply neutral, ... to the junction box. Four-wire Connection 6. All model ovens on each wire by pressing it in the side of this installation instruction manual are four wires from a speed microwave oven or three wires from a steam convection oven (no white wire from oven •...
2. Model HBL5751UC, HBL8751UC, HBLP751UC, HSLP751UC Circuit Required 208V, 60 Hz 240V, 60 Hz 40 AMP 4. Tighten securely, but do not overtighten. See previous illustration for finished appearance. Install a suitable conduit box (not furnished). If local codes permit grounding through the electrical supply neutral, ... to the junction box. Four-wire Connection 6. All model ovens on each wire by pressing it in the side of this installation instruction manual are four wires from a speed microwave oven or three wires from a steam convection oven (no white wire from oven •...

Installation Instructions
Page 16
...is glass. Handle carefully to avoid breaking. • Grasp only the sides of the oven. Lay on hinges all warnings and cautions in the installation manual regarding the door removal before removing the door. Flip latch levers on a flat, smooth surface, positioned so that both levers are securely in place ...the oven, swivels. Do not remove speed microwave or steam convection oven doors. 9 WARNING • The oven door is level and plumb for correct installation. Be sure to read all the way down toward you. Also, do not force door open or closed , be sure to verify the cabinet ...
...is glass. Handle carefully to avoid breaking. • Grasp only the sides of the oven. Lay on hinges all warnings and cautions in the installation manual regarding the door removal before removing the door. Flip latch levers on a flat, smooth surface, positioned so that both levers are securely in place ...the oven, swivels. Do not remove speed microwave or steam convection oven doors. 9 WARNING • The oven door is level and plumb for correct installation. Be sure to read all the way down toward you. Also, do not force door open or closed , be sure to verify the cabinet ...


