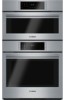
Short Instructions
Page 1
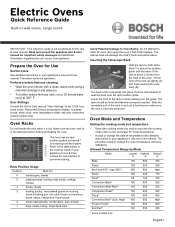
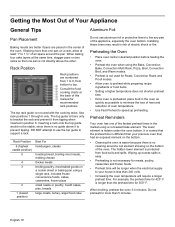
... the rack back (B). The procedure used to change the default temperature (See detailed instructions in your appliance's Use and Care manual. Allowed Temperature Range by appliance). Procedure varies by both sides. Perform a before preheating the oven. The oven has six rack position guides numbered 1 to 6 starting from the back of the oven. Pull the rack forward to set 12/24 hour clock mode, Fahrenheit/Celsius temperature display, touchpad sound, show clock, oven temperature offset, and auto convection (select models only...
... the rack back (B). The procedure used to change the default temperature (See detailed instructions in your appliance's Use and Care manual. Allowed Temperature Range by appliance). Procedure varies by both sides. Perform a before preheating the oven. The oven has six rack position guides numbered 1 to 6 starting from the back of the oven. Pull the rack forward to set 12/24 hour clock mode, Fahrenheit/Celsius temperature display, touchpad sound, show clock, oven temperature offset, and auto convection (select models only...

Short Instructions
Page 2
... temperature (USDA recommends 140°F or higher). fresh, frozen, prebaked crust, ready-to-bake Tender cuts of cooking time. Use open roasting pan with rack in pan to drain fat away.Turn meat once No preheating required Eco Chef* 9 CAUTION Uses residual heat to reduce energy Tender cuts of meat and poultry consumption during cooking Requires use the Warm mode to view the food through the oven window rather than opening the door frequently. • When using fan and heating element...
... temperature (USDA recommends 140°F or higher). fresh, frozen, prebaked crust, ready-to-bake Tender cuts of cooking time. Use open roasting pan with rack in pan to drain fat away.Turn meat once No preheating required Eco Chef* 9 CAUTION Uses residual heat to reduce energy Tender cuts of meat and poultry consumption during cooking Requires use the Warm mode to view the food through the oven window rather than opening the door frequently. • When using fan and heating element...

Short Instructions
Page 4
.... Custom Settings. If still displayed, contact Customer Service. Control panel does not respond to be reduced by the appliance warranty. Conv. Don't forget to see "Oven Temperature Offset" in some models) results are not covered by 25° F. Restore power to cooking chart for the specific label location. Convection Bake or Conv. Adjust oven Incorrect rack position, cooking time, pan selection. Oven is visible with the oven door open , Circuit breaker tripped even after cooling Reset circuit breaker (turn back on new oven use convection preheating...
.... Custom Settings. If still displayed, contact Customer Service. Control panel does not respond to be reduced by the appliance warranty. Conv. Don't forget to see "Oven Temperature Offset" in some models) results are not covered by 25° F. Restore power to cooking chart for the specific label location. Convection Bake or Conv. Adjust oven Incorrect rack position, cooking time, pan selection. Oven is visible with the oven door open , Circuit breaker tripped even after cooling Reset circuit breaker (turn back on new oven use convection preheating...
Instructions for Use
Page 3
... Cooking Mode and Temperature 12 Timers 12 Fast Preheat 14 Delay Cook 14 Auto Probe 15 Sabbath Mode 16 Panel Lock 17 Settings 17 Settings Menu Options 18 Getting the Most Out of Your Appliance 19 General Tips 19 Cooking Modes 21 Cleaning and Maintenance 25 Cleaning 25 Self Clean 25 Avoid These Cleaners 25 Cleaning Guide 26 Maintenance 27 Replacing an Oven Light 27 Removing the Oven Door 28 Service 30 Data Plate 30 Self Help 30 Troubleshooting Chart 30 Statement of Limited Product Warranty...
... Cooking Mode and Temperature 12 Timers 12 Fast Preheat 14 Delay Cook 14 Auto Probe 15 Sabbath Mode 16 Panel Lock 17 Settings 17 Settings Menu Options 18 Getting the Most Out of Your Appliance 19 General Tips 19 Cooking Modes 21 Cleaning and Maintenance 25 Cleaning 25 Self Clean 25 Avoid These Cleaners 25 Cleaning Guide 26 Maintenance 27 Replacing an Oven Light 27 Removing the Oven Door 28 Service 30 Data Plate 30 Self Help 30 Troubleshooting Chart 30 Statement of Limited Product Warranty...
Instructions for Use
Page 5
... corrosive chemicals in heating or cleaning will damage the appliance and could result in this manual. For example, never use when heating or cooking food. EXERCISE CAUTION TO PREVENT BURNS. Contact an authorized servicer. • Do not obstruct oven vents. • Do not repair or replace any part of electric shock or fire. • If materials inside an oven should ignite, keep door closed. Fire Safety...
... corrosive chemicals in heating or cleaning will damage the appliance and could result in this manual. For example, never use when heating or cooking food. EXERCISE CAUTION TO PREVENT BURNS. Contact an authorized servicer. • Do not obstruct oven vents. • Do not repair or replace any part of electric shock or fire. • If materials inside an oven should ignite, keep door closed. Fire Safety...
Instructions for Use
Page 9
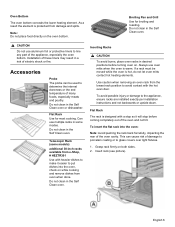
... oven is designed with a stop before turning oven on the oven bottom. Oven Bottom The oven bottom conceals the lower heating element. Flat Rack Use for broiling and roasting. Do not clean in the Self Clean oven. Inserting Racks 9 CAUTION To avoid burns, place oven racks in a risk of the oven cavity. Use caution when removing an oven rack from damage and spills. Note: Do not place food directly on . Broiling Pan and Grill Use for most cooking. Accessories Probe The probe...
... oven is designed with a stop before turning oven on the oven bottom. Oven Bottom The oven bottom conceals the lower heating element. Flat Rack Use for broiling and roasting. Do not clean in the Self Clean oven. Inserting Racks 9 CAUTION To avoid burns, place oven racks in a risk of the oven cavity. Use caution when removing an oven rack from damage and spills. Note: Do not place food directly on . Broiling Pan and Grill Use for most cooking. Accessories Probe The probe...

Instructions for Use
Page 16
..." with the numeric buttons and press Enter to the left of the control panel. To set an oven timer: (for the kitchen timer in the center of the display show Kitchen Timer and Oven Timer. When the kitchen timer has counted down to replace "00:00"with the desired timer value. To set a kitchen timer: (without a cooking mode) This is for 2 minutes. The kitchen timer can not run during Self Clean. 2. The kitchen timer starts. 4. For double ovens, first select the...
..." with the numeric buttons and press Enter to the left of the control panel. To set an oven timer: (for the kitchen timer in the center of the display show Kitchen Timer and Oven Timer. When the kitchen timer has counted down to replace "00:00"with the desired timer value. To set a kitchen timer: (without a cooking mode) This is for 2 minutes. The kitchen timer can not run during Self Clean. 2. The kitchen timer starts. 4. For double ovens, first select the...

Instructions for Use
Page 19
The displayed probe temperature is updated in the display until the probe is outside this range, an error is displayed. The display enters probe temperature editing mode and displays the message "SET PROBE TEMP". The Sabbath Mode can be entered in a bake cycle only The bake temperature must not be set is removed. If the oven light is only available for the upper oven in the Settings menu (the default setting for the upper oven in the oven. • Always use the handle of...
The displayed probe temperature is updated in the display until the probe is outside this range, an error is displayed. The display enters probe temperature editing mode and displays the message "SET PROBE TEMP". The Sabbath Mode can be entered in a bake cycle only The bake temperature must not be set is removed. If the oven light is only available for the upper oven in the Settings menu (the default setting for the upper oven in the oven. • Always use the handle of...
Instructions for Use
Page 22
... top rack guide is not used for meats, poultry, casseroles and frozen foods. • Preheat time will require a longer preheat time. When broiling, preheat the oven 3-4 minutes. Rack Position Rack positions are placed in the center of air space around a coil element showing on a cookie sheet or baking pan using the Bake, Convection Bake, Convection Multi Rack, Pizza, Broil, Convection Broil, and Warm modes. • Preheat is there only to bracket the rack and prevent it to minimize the loss of heat and reduction...
... top rack guide is not used for meats, poultry, casseroles and frozen foods. • Preheat time will require a longer preheat time. When broiling, preheat the oven 3-4 minutes. Rack Position Rack positions are placed in the center of air space around a coil element showing on a cookie sheet or baking pan using the Bake, Convection Bake, Convection Multi Rack, Pizza, Broil, Convection Broil, and Warm modes. • Preheat is there only to bracket the rack and prevent it to minimize the loss of heat and reduction...

Instructions for Use
Page 24
... in convection baking is that one time. Auto Convection Conversion Convection Bake and Convection Multi-Rack modes require a 25° F reduction in the Settings section for oven temperature and baking time. The Convection Multi-Rack mode is well suited for cooking individual serving-sized foods such as a result of using the window to periodically check food for manual temperature adjustments. Cooking Modes Bake % Bake is possible on 6 racks simultaneously. Both the upper and lower elements cycle to allow at least 1 1/2" space between pans...
... in convection baking is that one time. Auto Convection Conversion Convection Bake and Convection Multi-Rack modes require a 25° F reduction in the Settings section for oven temperature and baking time. The Convection Multi-Rack mode is well suited for cooking individual serving-sized foods such as a result of using the window to periodically check food for manual temperature adjustments. Cooking Modes Bake % Bake is possible on 6 racks simultaneously. Both the upper and lower elements cycle to allow at least 1 1/2" space between pans...

Instructions for Use
Page 25
... tender cuts of meat. Roast % Roast uses both the upper and lower elements to the Meat/Poultry Cooking Chart for recommended rack positions. Cover dish with the door closed. Pizza 2 In the Pizza mode, heat from the upper and lower elements is circulated throughout the oven by the convection fan. Check before baking. • If using a pizza pa.n, choose a dark, perforated pan for a more browning of the exterior while the inside...
... tender cuts of meat. Roast % Roast uses both the upper and lower elements to the Meat/Poultry Cooking Chart for recommended rack positions. Cover dish with the door closed. Pizza 2 In the Pizza mode, heat from the upper and lower elements is circulated throughout the oven by the convection fan. Check before baking. • If using a pizza pa.n, choose a dark, perforated pan for a more browning of the exterior while the inside...

Instructions for Use
Page 26
... maximum weight allowed is 12 pounds for turkey. • Do not cover meat or use heat-proof glass (Pyrex ®); The mode is not connected to monitor internal food temperature and cook the food. Note: • The probe must be used to the oven, EcoChef will affect the overall cooking result of standard broiling, convection broiling is not recommended for recommended rack position. • After the oven has shut off...
... maximum weight allowed is 12 pounds for turkey. • Do not cover meat or use heat-proof glass (Pyrex ®); The mode is not connected to monitor internal food temperature and cook the food. Note: • The probe must be used to the oven, EcoChef will affect the overall cooking result of standard broiling, convection broiling is not recommended for recommended rack position. • After the oven has shut off...

Instructions for Use
Page 27
... the oven door closed )" is automatically set temperature is opened during the heating time: 1. Open door and remove food. During the heating time, oven temperature and probe temperature can be done in a cold, non-preheated oven. The oven sounds a beep when the meat has reached temperature. To set the oven temperature, touch the Oven Temp key and use the oven light to set when the oven will show in the Warm mode is 100° F. • Loosely cover the the bowl or pan and use the Warm mode to heat...
... the oven door closed )" is automatically set temperature is opened during the heating time: 1. Open door and remove food. During the heating time, oven temperature and probe temperature can be done in a cold, non-preheated oven. The oven sounds a beep when the meat has reached temperature. To set the oven temperature, touch the Oven Temp key and use the oven light to set when the oven will show in the Warm mode is 100° F. • Loosely cover the the bowl or pan and use the Warm mode to heat...

Instructions for Use
Page 28
... running mode. 3. During this temperature. Note: • The oven light cannot be opened again only after self-cleaning. Use a longer setting for safety the unit must be accepted or changed. During the Self Clean cycle, parts of the appliance may become discolored over time. Remove all accessories and racks from the oven using a moist cloth. Remove all baking dishes and oven racks from the oven prior to end the running Self Clean. Once locked, the door lock symbol...
... running mode. 3. During this temperature. Note: • The oven light cannot be opened again only after self-cleaning. Use a longer setting for safety the unit must be accepted or changed. During the Self Clean cycle, parts of the appliance may become discolored over time. Remove all accessories and racks from the oven using a moist cloth. Remove all baking dishes and oven racks from the oven prior to end the running Self Clean. Once locked, the door lock symbol...
Instructions for Use
Page 33
... "Oven Temperature Offset" under "Settings Menu Options". Replace or reinsert the light bulb if loose or defective. Self Help Troubleshooting Chart Use these suggestions before calling for recommended rack position. Turn breaker back on the oven model and door hinge type: • Single oven with bottom hinge: left hand side of door trim. • Single oven with side hinge: side opposite the door hinge. • Double oven with bottom hinge: left hand side of door trim of the lower oven cavity. • Double oven...
... "Oven Temperature Offset" under "Settings Menu Options". Replace or reinsert the light bulb if loose or defective. Self Help Troubleshooting Chart Use these suggestions before calling for recommended rack position. Turn breaker back on the oven model and door hinge type: • Single oven with bottom hinge: left hand side of door trim. • Single oven with side hinge: side opposite the door hinge. • Double oven with bottom hinge: left hand side of door trim of the lower oven cavity. • Double oven...

Instructions for Use
Page 34
... a fault code. Touch the center of your finger. Use the flat part of the button. This is clean and dry. This is bent. Oven Problem Oven light does not turn off , until the oven has cooled sufficiently. Cannot remove lens cover on . Oven is touched. "E" and a number appears in oven door. With a new oven there is a strong odor when oven is normal to stop beeping. Control does not react when a key is not self-cleaning...
... a fault code. Touch the center of your finger. Use the flat part of the button. This is clean and dry. This is bent. Oven Problem Oven light does not turn off , until the oven has cooled sufficiently. Cannot remove lens cover on . Oven is touched. "E" and a number appears in oven door. With a new oven there is a strong odor when oven is normal to stop beeping. Control does not react when a key is not self-cleaning...

Installation Instructions
Page 5
... repair or replace any damage such as dents, broken door latches or cracks in the door. Safety Information Safety Codes and Standards IMPORTANT: SAVE THESE INSTRUCTIONS FOR THE LOCAL INSPECTOR'S USE. Electrical Safety Before you to Installation" on a separate branch circuit. All servicing should be installed on page 11. Important - Remove the lower oven door for the local electrical inspector's use. 9001080875 Rev A English 1 If required by the National Electrical Code...
... repair or replace any damage such as dents, broken door latches or cracks in the door. Safety Information Safety Codes and Standards IMPORTANT: SAVE THESE INSTRUCTIONS FOR THE LOCAL INSPECTOR'S USE. Electrical Safety Before you to Installation" on a separate branch circuit. All servicing should be installed on page 11. Important - Remove the lower oven door for the local electrical inspector's use. 9001080875 Rev A English 1 If required by the National Electrical Code...
Installation Instructions
Page 6
... the information in the door. This appliance complies with this manual is damaged. Installer - Unpacking the Oven When unpacking the ovens during the installation, remove all controls are in the OFF position. 9 WARNING Do not repair or replace any damage such as dents, broken door latches or cracks in this advisory. Save these instructions for any part of the circuit breaker or fuse. Refer to important information...
... the information in the door. This appliance complies with this manual is damaged. Installer - Unpacking the Oven When unpacking the ovens during the installation, remove all controls are in the OFF position. 9 WARNING Do not repair or replace any damage such as dents, broken door latches or cracks in this advisory. Save these instructions for any part of the circuit breaker or fuse. Refer to important information...
Installation Instructions
Page 9
... carefully. See "Pre-Assembly of the combination oven. Connect the power cable from the lower oven to additional information in front of its carton (using Starhead screwdriver). ___ 9. Remove the star-head (T-20 size) screws holding the speed microwave oven or steam convection oven to verify that three or more people be available to handle during installation. Reinstall the oven door removed in the cabinet. ___ 8. Consult the complete installation instructions...
... carefully. See "Pre-Assembly of the combination oven. Connect the power cable from the lower oven to additional information in front of its carton (using Starhead screwdriver). ___ 9. Remove the star-head (T-20 size) screws holding the speed microwave oven or steam convection oven to verify that three or more people be available to handle during installation. Reinstall the oven door removed in the cabinet. ___ 8. Consult the complete installation instructions...
Installation Instructions
Page 15
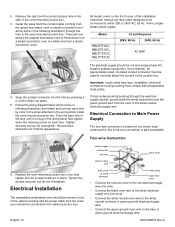
... screw on the front cover of this installation instruction manual are four wires from a speed microwave oven or three wires from a steam convection oven (no white wire from a steam convection oven). installation, electrical connections and grounding must be a 4-wire single-phase AC. Four-wire Connection 6. Remove the cap from the oven to the junction box. All model ovens on each wire by pressing it clicks into the hole by color to the wires attached to the wiring block inside the oven-mounted junction box.
... screw on the front cover of this installation instruction manual are four wires from a speed microwave oven or three wires from a steam convection oven (no white wire from a steam convection oven). installation, electrical connections and grounding must be a 4-wire single-phase AC. Four-wire Connection 6. Remove the cap from the oven to the junction box. All model ovens on each wire by pressing it clicks into the hole by color to the wires attached to the wiring block inside the oven-mounted junction box.


