
Installation Instructions
Page 5
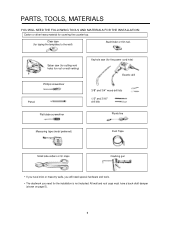
...and the mounting area must meet the 150 lbs. Not Actual Size 10- 8" Upper-cabinet template Roof-venting installation B C D centerline 12" 6" 11 4" 10- 3 16 8- PARTS, TOOLS, MATERIALS THE FOLLOWING PARTS ARE SUPPLIED WITH THE OVEN: NOTE: Depending on your ventilation requirements, you may not use all of these... parts. Actual Size (for the cord hole in a metal upper cabinet) Four 1/4" x 2" lag screws - Actual Size (for attaching the damper duct connector) One upper cabinet...
...and the mounting area must meet the 150 lbs. Not Actual Size 10- 8" Upper-cabinet template Roof-venting installation B C D centerline 12" 6" 11 4" 10- 3 16 8- PARTS, TOOLS, MATERIALS THE FOLLOWING PARTS ARE SUPPLIED WITH THE OVEN: NOTE: Depending on your ventilation requirements, you may not use all of these... parts. Actual Size (for the cord hole in a metal upper cabinet) Four 1/4" x 2" lag screws - Actual Size (for attaching the damper duct connector) One upper cabinet...
Installation Instructions
Page 6
... 5). 6 Saber saw (for cutting vent holes for roof or wall venting) Phillips screwdriver Pencil Flat blade screwdriver Keyhole saw (for the installation is not included. PARTS, TOOLS, MATERIALS YOU WILL NEED THE FOLLOWING TOOLS AND MATERIALS FOR THE INSTALLATION: Carton or other heavy material for taping the templates to the wall...
... 5). 6 Saber saw (for cutting vent holes for roof or wall venting) Phillips screwdriver Pencil Flat blade screwdriver Keyhole saw (for the installation is not included. PARTS, TOOLS, MATERIALS YOU WILL NEED THE FOLLOWING TOOLS AND MATERIALS FOR THE INSTALLATION: Carton or other heavy material for taping the templates to the wall...
Installation Instructions
Page 10
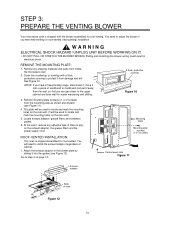
...UNPLUG UNIT BEFORE WORKING ON IT. • DO NOT PULL OR STRETCH THE BLOWER WIRING! At this point, remove any shipping materials and parts from damage and dirt. Attach the exhaust adaptor to locate and mark the mounting holes on page 13. Cover the countertop or cooktop with the... that you have a free-standing range, disconnect it, move it onto a piece of oven Figure 12 10 STEP 3: PREPARE THE VENTING BLOWER Your microwave oven is shipped with a thick, protective covering to install the exhaust adaptor regardless of cabinet. 1. You need to protect it into the guides (see...
...UNPLUG UNIT BEFORE WORKING ON IT. • DO NOT PULL OR STRETCH THE BLOWER WIRING! At this point, remove any shipping materials and parts from damage and dirt. Attach the exhaust adaptor to locate and mark the mounting holes on page 13. Cover the countertop or cooktop with the... that you have a free-standing range, disconnect it, move it onto a piece of oven Figure 12 10 STEP 3: PREPARE THE VENTING BLOWER Your microwave oven is shipped with a thick, protective covering to install the exhaust adaptor regardless of cabinet. 1. You need to protect it into the guides (see...
Installation Instructions
Page 11
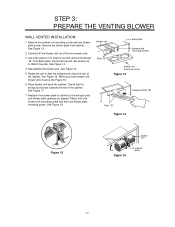
... with one blower unit mounting screw and then one blower plate screw. blower unit back plate blower plate mounting screws Parts "B" blower unit mounting screw Figure 13 Parts "B" Knockout Parts "B" Figure 14 Figure 15 blower unit Figure 16 exhaust ports 11 Discard knockouts. See Figure 15. 5. Place blower.... Rotate the unit so that the exhaust ports face towards the rear of the cabinet. Carefully lift the blower unit out of the microwave oven. 3. Be careful not to cabinet so the exhaust ports and blower plate opening are aligned. Reattach the blower plate to distort the...
... with one blower unit mounting screw and then one blower plate screw. blower unit back plate blower plate mounting screws Parts "B" blower unit mounting screw Figure 13 Parts "B" Knockout Parts "B" Figure 14 Figure 15 blower unit Figure 16 exhaust ports 11 Discard knockouts. See Figure 15. 5. Place blower.... Rotate the unit so that the exhaust ports face towards the rear of the cabinet. Carefully lift the blower unit out of the microwave oven. 3. Be careful not to cabinet so the exhaust ports and blower plate opening are aligned. Reattach the blower plate to distort the...
Use & Care Manual
Page 2
TABLE OF CONTENTS SAFETY 3-5 Precautions To Avoid Possible Exposure To Excessive Microwave Energy 3 Important Safety Instructions 4-5 Grounding Instructions 5 UNDERSTANDING YOUR MICROWAVE OVEN 6-9 Cookware Guide 6 Tips For Microwave Cooking 7 Parts And Accessories 8 Control Panel 8-9 USING YOUR MICROWAVE OVEN 10-29 Learn About Your Microwave Oven 10 Help 10 Clock 10 Kitchen Timer 10 Control Set-Up 10 Vent...
TABLE OF CONTENTS SAFETY 3-5 Precautions To Avoid Possible Exposure To Excessive Microwave Energy 3 Important Safety Instructions 4-5 Grounding Instructions 5 UNDERSTANDING YOUR MICROWAVE OVEN 6-9 Cookware Guide 6 Tips For Microwave Cooking 7 Parts And Accessories 8 Control Panel 8-9 USING YOUR MICROWAVE OVEN 10-29 Learn About Your Microwave Oven 10 Help 10 Clock 10 Kitchen Timer 10 Control Set-Up 10 Vent...
Use & Care Manual
Page 3
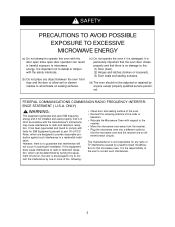
...soil or cleaner residue to accumulate on sealing surfaces. (c) Do not operate the oven if it is no guarantee that the microwave oven and the receiver are designed to provide reasonable protection against such interference in a residential installation. The manufacturer is not responsible... for ISM Equipment pursuant to part 18 of FCC Rules, which can result in harmful exposure to microwave energy. It is no damage to the: (1) Door (bent), (2) Hinges and latches (broken or loosened...
...soil or cleaner residue to accumulate on sealing surfaces. (c) Do not operate the oven if it is no guarantee that the microwave oven and the receiver are designed to provide reasonable protection against such interference in a residential installation. The manufacturer is not responsible... for ISM Equipment pursuant to part 18 of FCC Rules, which can result in harmful exposure to microwave energy. It is no damage to the: (1) Door (bent), (2) Hinges and latches (broken or loosened...
Use & Care Manual
Page 7
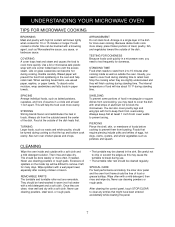
...paper towels. To absorb extra moisture, wrap sandwiches and fatty foods in the sink. This should be cleaned in paper towels. REMOVABLE PARTS The turntable and turntable roller rest are clean, rinse well and dry with a mild detergent; then rinse and wipe dry. After ... chicken or bacon. Never use . • The turntable roller rest should be difficult to prevent arcing. UNDERSTANDING YOUR MICROWAVE OVEN TIPS FOR MICROWAVE COOKING BROWNING Meat and poultry with high fat content will finish cooking during standing time. STIRRING Stirring blends flavors and redistributes...
...paper towels. To absorb extra moisture, wrap sandwiches and fatty foods in the sink. This should be cleaned in paper towels. REMOVABLE PARTS The turntable and turntable roller rest are clean, rinse well and dry with a mild detergent; then rinse and wipe dry. After ... chicken or bacon. Never use . • The turntable roller rest should be difficult to prevent arcing. UNDERSTANDING YOUR MICROWAVE OVEN TIPS FOR MICROWAVE COOKING BROWNING Meat and poultry with high fat content will finish cooking during standing time. STIRRING Stirring blends flavors and redistributes...
Use & Care Manual
Page 8
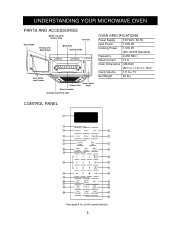
... 17 19 18 20 21 25 23 22 24 27 28 26 • See page 9 for control panel features. 8 Net Weight 60 lbs. Ft. UNDERSTANDING YOUR MICROWAVE OVEN PARTS AND ACCESSORIES Model and Serial Number Plate Vent Grill Door Handle Window with Metal Shield Metal Rack Cooking Guide Door Safety Lock System Oven... W Cooking Power 1,000 W (IEC 60705 Standard) Frequency 2,450 MHz Rated Current 13 A Outer Dimensions (WxHxD) Cavity Volume 2915⁄16" x 167⁄16"x 155⁄8" 1.8 Cu.
... 17 19 18 20 21 25 23 22 24 27 28 26 • See page 9 for control panel features. 8 Net Weight 60 lbs. Ft. UNDERSTANDING YOUR MICROWAVE OVEN PARTS AND ACCESSORIES Model and Serial Number Plate Vent Grill Door Handle Window with Metal Shield Metal Rack Cooking Guide Door Safety Lock System Oven... W Cooking Power 1,000 W (IEC 60705 Standard) Frequency 2,450 MHz Rated Current 13 A Outer Dimensions (WxHxD) Cavity Volume 2915⁄16" x 167⁄16"x 155⁄8" 1.8 Cu.
Use & Care Manual
Page 22
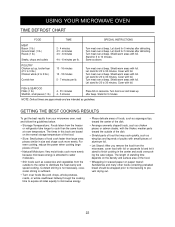
... Fillets (1 lb.) Shellfish, small pieces (1 lb.) 4 - 51⁄2 minutes 4 - 5 minutes Place fish in size and shape cook more evenly because microwave energy is sufficient. • Turn over at beep. Let stand for 20 to 30 minutes. Shield warm areas with foil or casserole lid and let... as chicken pieces or salmon steaks, with the thicker, meatier parts toward the outside to the center to 3 lbs.) Cornish hen 13 - 16 minutes 15 - 18 minutes 5 - 7 minutes per lb. Same as guidelines. USING YOUR MICROWAVE OVEN TIME DEFROST CHART FOOD TIME SPECIAL INSTRUCTIONS MEAT Bacon (1 ...
... Fillets (1 lb.) Shellfish, small pieces (1 lb.) 4 - 51⁄2 minutes 4 - 5 minutes Place fish in size and shape cook more evenly because microwave energy is sufficient. • Turn over at beep. Let stand for 20 to 30 minutes. Shield warm areas with foil or casserole lid and let... as chicken pieces or salmon steaks, with the thicker, meatier parts toward the outside to the center to 3 lbs.) Cornish hen 13 - 16 minutes 15 - 18 minutes 5 - 7 minutes per lb. Same as guidelines. USING YOUR MICROWAVE OVEN TIME DEFROST CHART FOOD TIME SPECIAL INSTRUCTIONS MEAT Bacon (1 ...
Use & Care Manual
Page 23
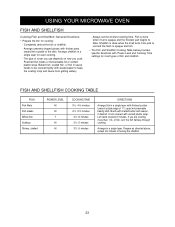
...unevenly shaped pieces with thickest portion toward the outside edge of the dish. Arrange shellfish in a single layer with thicker parts toward outside of 11⁄2 quart microwavable baking dish. The type of fish and shellfish. Fish is opaque and firm. • The Fish and Shellfish Cooking...and the flesh is done when it turns opaque and the thickest part begins to keep the coating crisp and sauce from getting watery. - If you cook. Always set the shortest cooking time. USING YOUR MICROWAVE OVEN FISH AND SHELLFISH Cooking Fish and Shellfish: General Directions •...
...unevenly shaped pieces with thickest portion toward the outside edge of the dish. Arrange shellfish in a single layer with thicker parts toward outside of 11⁄2 quart microwavable baking dish. The type of fish and shellfish. Fish is opaque and firm. • The Fish and Shellfish Cooking...and the flesh is done when it turns opaque and the thickest part begins to keep the coating crisp and sauce from getting watery. - If you cook. Always set the shortest cooking time. USING YOUR MICROWAVE OVEN FISH AND SHELLFISH Cooking Fish and Shellfish: General Directions •...
Use & Care Manual
Page 32
... NULL AND VOID. All replaced and/or repaired parts shall assume the identity of the original part for any reason whatsoever. For safety and property damage concerns, Bosch highly recommends that you choose to you , the first using a BoschĆauthorized service provider during normal business hours. ... and responsibility hereunder is to you in the unlikely event of a safety notice or product recall. All removed parts and components shall become the property of Bosch at all times only been used for an additional charge). If reasonable attempts to repair the Product have no...
... NULL AND VOID. All replaced and/or repaired parts shall assume the identity of the original part for any reason whatsoever. For safety and property damage concerns, Bosch highly recommends that you choose to you , the first using a BoschĆauthorized service provider during normal business hours. ... and responsibility hereunder is to you in the unlikely event of a safety notice or product recall. All removed parts and components shall become the property of Bosch at all times only been used for an additional charge). If reasonable attempts to repair the Product have no...

Use & Care Manual
Page 33
... under no event shall Bosch have any liability or responsibility whatsoever for damage to install the product in strict conformity with the Product; Products on external surfaces and exposed parts; correction of installation problems (you with any applicable state, local, city, or county electrical..., including without limitation cabinetry, walls, floors, shelving, etc.); in any such event, if you request, Bosch would still pay for labor and parts and ship the parts to the nearest authorized service provider, but you how to make the service call. D Ordinary wear and tear...
... under no event shall Bosch have any liability or responsibility whatsoever for damage to install the product in strict conformity with the Product; Products on external surfaces and exposed parts; correction of installation problems (you with any applicable state, local, city, or county electrical..., including without limitation cabinetry, walls, floors, shelving, etc.); in any such event, if you request, Bosch would still pay for labor and parts and ship the parts to the nearest authorized service provider, but you how to make the service call. D Ordinary wear and tear...
Service Manual
Page 3
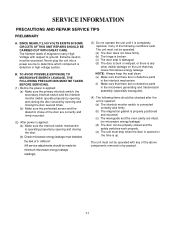
Failure to adhere to the Microwave Energy normally contained within the oven cavity. CHECKOUT PROCEDURES...7-18 C. TABLE OF CONTENTS (Page) SAFETY PRECAUTIONS ...Inside front page ...GENERAL INFORMATION FOR SERVICE 6-1 GENERAL PRECAUTIONS IN USE ...6-1 TRIAL OPERATION ...6-1 FEATURES AND SPECIFICATIONS FEATURES 6-1 SERVICE INFORMATION ...7-1 PRECAUTIONS AND REPAIR SERVICE TIPS 7-1 MICROWAVE LEAKAGE TEST ...7-2 POWER OUTPUT MEASUREMENT ...7-3 DISASSEMBLY INSTRUCTIONS ...7-4 INTERLOCK SYSTEM ...7-12 INTERLOCK CONTINUITY TEST ...7-14 TEST AND CHECKOUT PROCEDURES AND TROUBLE SHOOTING 7-15 A....
Failure to adhere to the Microwave Energy normally contained within the oven cavity. CHECKOUT PROCEDURES...7-18 C. TABLE OF CONTENTS (Page) SAFETY PRECAUTIONS ...Inside front page ...GENERAL INFORMATION FOR SERVICE 6-1 GENERAL PRECAUTIONS IN USE ...6-1 TRIAL OPERATION ...6-1 FEATURES AND SPECIFICATIONS FEATURES 6-1 SERVICE INFORMATION ...7-1 PRECAUTIONS AND REPAIR SERVICE TIPS 7-1 MICROWAVE LEAKAGE TEST ...7-2 POWER OUTPUT MEASUREMENT ...7-3 DISASSEMBLY INSTRUCTIONS ...7-4 INTERLOCK SYSTEM ...7-12 INTERLOCK CONTINUITY TEST ...7-14 TEST AND CHECKOUT PROCEDURES AND TROUBLE SHOOTING 7-15 A....

Service Manual
Page 5
... BE SERVICED ONLY BY PROPERLY QUALIFIED SERVICE PERSONNEL. 2-1 Though it is high-voltage and high-current equipment. All input and output microwave connections, waveguide, flange, and gasket must discharge the high voltage capacitor by shorting across the two terminals with no load. •...8226; NEVER TOUCH any oven components or wiring during operation. • BEFORE TOUCHING any parts of the oven, always remove the power plug from the magnetron or other appliances, the microwave oven is properly installed. • Be sure that the magnetron be exposed to the waveguide...
... BE SERVICED ONLY BY PROPERLY QUALIFIED SERVICE PERSONNEL. 2-1 Though it is high-voltage and high-current equipment. All input and output microwave connections, waveguide, flange, and gasket must discharge the high voltage capacitor by shorting across the two terminals with no load. •...8226; NEVER TOUCH any oven components or wiring during operation. • BEFORE TOUCHING any parts of the oven, always remove the power plug from the magnetron or other appliances, the microwave oven is properly installed. • Be sure that the magnetron be exposed to the waveguide...

Service Manual
Page 11
.... G. FEATURES AND SPECIFICATIONS FEATURES A. The safety systems incorporated in the display window. However, small pieces may cause arcing. B. Any aluminum foil used to cover some parts of the oven. C. Touch the START key. "1, 0, 0, 0" appears in this model are: (1) Primary interlock switch (2) Secondary interlock switch (3) Interlock monitor switch (4) Choke system (5) Magnetron thermal...
.... G. FEATURES AND SPECIFICATIONS FEATURES A. The safety systems incorporated in the display window. However, small pieces may cause arcing. B. Any aluminum foil used to cover some parts of the oven. C. Touch the START key. "1, 0, 0, 0" appears in this model are: (1) Primary interlock switch (2) Secondary interlock switch (3) Interlock monitor switch (4) Choke system (5) Magnetron thermal...
Service Manual
Page 12
...bent or warped, or there is completely repaired, if any of the above components removed or by opening and closing the door. (b) Check microwave energy leakage must bebelow the limit of 5 mW/cm2. (All service adjustments should be checked after the unit is repaired: (a) The interlock.... (b) The magnetron gasket is properly positioned and mounted. (c) The waveguide and the oven cavity are no defective parts in the interlock mechanism. (f) Make sure that may cause microwave energy leakage. SINCE NEARLY 2,100 VOLTS EXISTS IN SOME CIRCUITS OF THIS UNIT REPAIRS SHOULD BE CARRIED OUT WITH ...
...bent or warped, or there is completely repaired, if any of the above components removed or by opening and closing the door. (b) Check microwave energy leakage must bebelow the limit of 5 mW/cm2. (All service adjustments should be checked after the unit is repaired: (a) The interlock.... (b) The magnetron gasket is properly positioned and mounted. (c) The waveguide and the oven cavity are no defective parts in the interlock mechanism. (f) Make sure that may cause microwave energy leakage. SINCE NEARLY 2,100 VOLTS EXISTS IN SOME CIRCUITS OF THIS UNIT REPAIRS SHOULD BE CARRIED OUT WITH ...
Service Manual
Page 14
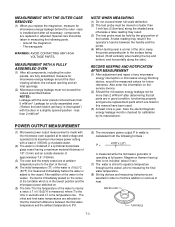
...waveguide WARNING: AVOID CONTACTING ANY HIGH VOLTAGE PARTS. MEASUREMENT WITH THE OUTER CASE REMOVED (1) When you replace the magnetron, measure for microwave energy leakage around the door viewing window, the exhaust opening and air inlet openings. (2) Microwave energy leakage must not exceed the values ...moved no faster than 2 mW/cm2 after all parts are in good condition, functioning properly and genuine replacement parts which is in the lowest position and the microwave power switched on the service invoice. (2) Should the microwave energy leakage not be taken in a slightly opened...
...waveguide WARNING: AVOID CONTACTING ANY HIGH VOLTAGE PARTS. MEASUREMENT WITH THE OUTER CASE REMOVED (1) When you replace the magnetron, measure for microwave energy leakage around the door viewing window, the exhaust opening and air inlet openings. (2) Microwave energy leakage must not exceed the values ...moved no faster than 2 mW/cm2 after all parts are in good condition, functioning properly and genuine replacement parts which is in the lowest position and the microwave power switched on the service invoice. (2) Should the microwave energy leakage not be taken in a slightly opened...

Service Manual
Page 15
WHEN RECONNECTING THE WIRE LEADS TO ANY PART, MAKE SURE THE WIRING CONNECTIONS AND LEAD COLORS ARE CORRECTLY MATCHED ACCORDING TO THE OVERALL CIRCUIT DIAGRAM. (ESPECIALLY SWITCHES AND HIGH VOLTAGE CIRCUIT.) A. Power Transformer (...
WHEN RECONNECTING THE WIRE LEADS TO ANY PART, MAKE SURE THE WIRING CONNECTIONS AND LEAD COLORS ARE CORRECTLY MATCHED ACCORDING TO THE OVERALL CIRCUIT DIAGRAM. (ESPECIALLY SWITCHES AND HIGH VOLTAGE CIRCUIT.) A. Power Transformer (...

Service Manual
Page 19
...8226; When removing the magnetron, make sure that its dome does not hit any adjacent parts, or it may be damaged. • When replacing the magnetron, be made for microwave energy leakage with a survey meter Check microwave energy leakage must be below the limit of 5 mW/cm 2 . (All service ...magnetron gasket in the correct position and be sure that the gasket is in good condition. • After replacing the magnetron, check for minimum microwave energy leakage readings.) Figure 11 Door Vent Grille Mount,All (1 or 2 screws) Mounting Plate Out Case Controller Figure 12 (3 screws) Figure...
...8226; When removing the magnetron, make sure that its dome does not hit any adjacent parts, or it may be damaged. • When replacing the magnetron, be made for microwave energy leakage with a survey meter Check microwave energy leakage must be below the limit of 5 mW/cm 2 . (All service ...magnetron gasket in the correct position and be sure that the gasket is in good condition. • After replacing the magnetron, check for minimum microwave energy leakage readings.) Figure 11 Door Vent Grille Mount,All (1 or 2 screws) Mounting Plate Out Case Controller Figure 12 (3 screws) Figure...

Service Manual
Page 25
..., make the necessary adjustment or replace the switch with an audible click. WARNING : FOR CONTINUED PROTECTION AGAINST EXCESSIVE RADIATION EMISSION, REPLACE ONLY WITH IDENTICAL REPLACEMENT PARTS. TYPE NO. PRIMARY INTERLOCK SWITCH TEST When the door is abnormal, make sure that they are connected correctly. When the secondary switch operation is opened...
..., make the necessary adjustment or replace the switch with an audible click. WARNING : FOR CONTINUED PROTECTION AGAINST EXCESSIVE RADIATION EMISSION, REPLACE ONLY WITH IDENTICAL REPLACEMENT PARTS. TYPE NO. PRIMARY INTERLOCK SWITCH TEST When the door is abnormal, make sure that they are connected correctly. When the secondary switch operation is opened...

