Installation Instructions
Page 2
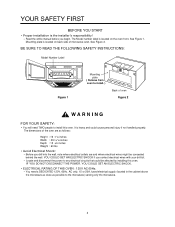
...START • Proper installation is located on the oven front. Mounting plate is the installer's responsibility! - It is located on back side of microwave oven. The dimensions of oven Figure 2 WARNING FOR YOUR SAFETY: • You will need a DEDICATED 120V, 60Hz, AC only, 15 or...install. ) Back of the oven are and where electrical wires might be affected by installing this oven. See Figure 2. Read the entire manual before you contact electrical wires with your drill bit. - BE SURE TO READ THE FOLLOWING SAFETY INSTRUCTIONS: Model Number Label Figure 1 Mounting...
...START • Proper installation is located on the oven front. Mounting plate is the installer's responsibility! - It is located on back side of microwave oven. The dimensions of oven Figure 2 WARNING FOR YOUR SAFETY: • You will need a DEDICATED 120V, 60Hz, AC only, 15 or...install. ) Back of the oven are and where electrical wires might be affected by installing this oven. See Figure 2. Read the entire manual before you contact electrical wires with your drill bit. - BE SURE TO READ THE FOLLOWING SAFETY INSTRUCTIONS: Model Number Label Figure 1 Mounting...
Installation Instructions
Page 18
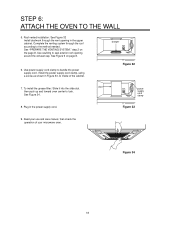
...the method needed. Figure 34 18 Complete the venting system through the vent opening around the exhaust cap. Use caulking to inside of your microwave oven. Install the power supply cord clamp, using a screw as shown in Figure 33, to seal exterior roof opening in the power ...32 7. STEP 6: ATTACH THE OVEN TO THE WALL 5. See Figure 6 on the page 8. Plug in the upper cabinet. Read your use and care manual, then check the operation of the cabinet. See "PREPARE THE VENTING SYSTEM," step 2 on page 8. 6. Roof vented installation: See Figure 32 Install ductwork ...
...the method needed. Figure 34 18 Complete the venting system through the vent opening around the exhaust cap. Use caulking to inside of your microwave oven. Install the power supply cord clamp, using a screw as shown in Figure 33, to seal exterior roof opening in the power ...32 7. STEP 6: ATTACH THE OVEN TO THE WALL 5. See Figure 6 on the page 8. Plug in the upper cabinet. Read your use and care manual, then check the operation of the cabinet. See "PREPARE THE VENTING SYSTEM," step 2 on page 8. 6. Roof vented installation: See Figure 32 Install ductwork ...

Use & Care Manual
Page 1
Household Appliances OWNER: Please retain these instructions for the owner. INSTALLER: Please leave these instructions for the local electrical inspector's use. Over-the-Range Microwave Use and Care Manual For Models: HMV9302, HMV9305, HMV9306, HMV9307 PLEASE READ ENTIRE INSTRUCTIONS BEFORE PROCEEDING IMPORTANT: Save these Installation Instructions with this unit for future reference.
Household Appliances OWNER: Please retain these instructions for the owner. INSTALLER: Please leave these instructions for the local electrical inspector's use. Over-the-Range Microwave Use and Care Manual For Models: HMV9302, HMV9305, HMV9306, HMV9307 PLEASE READ ENTIRE INSTRUCTIONS BEFORE PROCEEDING IMPORTANT: Save these Installation Instructions with this unit for future reference.
Use & Care Manual
Page 4
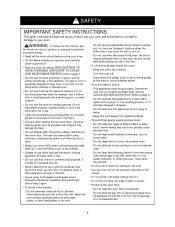
...be grounded. Connect the oven only to your oven is made for commercial purposes. See the electrical GROUNDING INSTRUCTIONS on special microwave-cooking packages to use this manual. • Do not run the oven empty, without close supervision. • Read and follow the specific PRECAUTIONS TO ...AVOID POSSIBLE EXPOSURE TO EXCESSIVE MICROWAVE ENERGY found on HIGH when cooking foods that touch the door, use only mild, non-abrasive soaps or...
...be grounded. Connect the oven only to your oven is made for commercial purposes. See the electrical GROUNDING INSTRUCTIONS on special microwave-cooking packages to use this manual. • Do not run the oven empty, without close supervision. • Read and follow the specific PRECAUTIONS TO ...AVOID POSSIBLE EXPOSURE TO EXCESSIVE MICROWAVE ENERGY found on HIGH when cooking foods that touch the door, use only mild, non-abrasive soaps or...
Service Manual
Page 1
MICROWAVE OVEN SERVICE MANUAL MODEL: HMV9302 HMV9303 HMV9305 HMV9306 HMV9307 CAUTION BEFORE SERVICING THE UNIT, READ THE SAFETY PRECAUTIONS IN THIS MANUAL.
MICROWAVE OVEN SERVICE MANUAL MODEL: HMV9302 HMV9303 HMV9305 HMV9306 HMV9307 CAUTION BEFORE SERVICING THE UNIT, READ THE SAFETY PRECAUTIONS IN THIS MANUAL.
Service Manual
Page 2
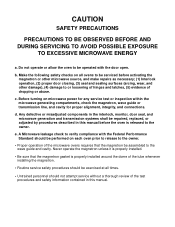
...assembled to or loosening of hinges and latches, (5) evidence of the test procedures and safety information contained in this manual before activating the magnetron or other microwave source, and make repairs as necessary; (1) Interlock operation, (2) proper door closing, (3) seal and sealing surfaces..., integrity, and connections. Any defective or misadjusted components in this manual. CAUTION SAFETY PRECAUTIONS PRECAUTIONS TO BE OBSERVED BEFORE AND DURING SERVICING TO AVOID POSSIBLE EXPOSURE TO EXCESSIVE MICROWAVE ENERGY a. Make the following safety checks on all times. •...
...assembled to or loosening of hinges and latches, (5) evidence of the test procedures and safety information contained in this manual before activating the magnetron or other microwave source, and make repairs as necessary; (1) Interlock operation, (2) proper door closing, (3) seal and sealing surfaces..., integrity, and connections. Any defective or misadjusted components in this manual. CAUTION SAFETY PRECAUTIONS PRECAUTIONS TO BE OBSERVED BEFORE AND DURING SERVICING TO AVOID POSSIBLE EXPOSURE TO EXCESSIVE MICROWAVE ENERGY a. Make the following safety checks on all times. •...
Service Manual
Page 3
...PRECAUTIONS IN USE ...6-1 TRIAL OPERATION ...6-1 FEATURES AND SPECIFICATIONS FEATURES 6-1 SERVICE INFORMATION ...7-1 PRECAUTIONS AND REPAIR SERVICE TIPS 7-1 MICROWAVE LEAKAGE TEST ...7-2 POWER OUTPUT MEASUREMENT ...7-3 DISASSEMBLY INSTRUCTIONS ...7-4 INTERLOCK SYSTEM ...7-12 INTERLOCK CONTINUITY TEST ...7-14 TEST AND CHECKOUT ...21 EXPLODED VIEW ...8-1 REPLACEMENT PARTS LIST ...8-8 FOREWORD Read this Manual may result in exposing yourself to or observe the information in this Manual carefully. Failure to adhere to the Microwave Energy normally contained within the oven cavity.
...PRECAUTIONS IN USE ...6-1 TRIAL OPERATION ...6-1 FEATURES AND SPECIFICATIONS FEATURES 6-1 SERVICE INFORMATION ...7-1 PRECAUTIONS AND REPAIR SERVICE TIPS 7-1 MICROWAVE LEAKAGE TEST ...7-2 POWER OUTPUT MEASUREMENT ...7-3 DISASSEMBLY INSTRUCTIONS ...7-4 INTERLOCK SYSTEM ...7-12 INTERLOCK CONTINUITY TEST ...7-14 TEST AND CHECKOUT ...21 EXPLODED VIEW ...8-1 REPLACEMENT PARTS LIST ...8-8 FOREWORD Read this Manual may result in exposing yourself to or observe the information in this Manual carefully. Failure to adhere to the Microwave Energy normally contained within the oven cavity.
Service Manual
Page 4
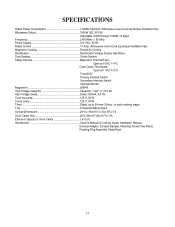
Accessories Owner's Manual & Cooking Guide, Installation Manual, Exhaust Adapter, Exhaust Damper, Mounting Kit and Two Filters, Rotating Ring Assembly, Metal Rack. 1-1 SPECIFICATIONS Rated Power Consumption 1,500W maximum (Microwave oven+Cook top lamps+Ventilation fan) Microwave Output 1000W (IEC 60705) Adjustable 100W through 1000W, 10 steps Frequency 2,450 MHz 50 MHz Power Supply 120 VAC, 60... cooking stage) Tray Tempered Safety Glass Overall Dimensions 2915/16"(W)x167/16"(D)x155/8"(H) Oven Cavity Size 223/8"(W)x10"(D)x1419/32"(H) Effective Capacity of Oven Cavity 1.8 Cu.ft.
Accessories Owner's Manual & Cooking Guide, Installation Manual, Exhaust Adapter, Exhaust Damper, Mounting Kit and Two Filters, Rotating Ring Assembly, Metal Rack. 1-1 SPECIFICATIONS Rated Power Consumption 1,500W maximum (Microwave oven+Cook top lamps+Ventilation fan) Microwave Output 1000W (IEC 60705) Adjustable 100W through 1000W, 10 steps Frequency 2,450 MHz 50 MHz Power Supply 120 VAC, 60... cooking stage) Tray Tempered Safety Glass Overall Dimensions 2915/16"(W)x167/16"(D)x155/8"(H) Oven Cavity Size 223/8"(W)x10"(D)x1419/32"(H) Effective Capacity of Oven Cavity 1.8 Cu.ft.
Service Manual
Page 14
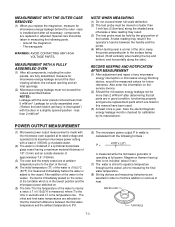
...otherwise a false reading may result if the operator's hand is between the final water temperature and the ambient temperature is 5°K. (6) The microwave power output P in a cylindrical borosilicate glass vessel having a maximum material thickness of 1/8" (3 mm) and an outside diameter of approximately ...are listed in this manual have been used. (3) At least once a year, have the electromagnetic energy leakage monitor checked for calibration by its maximum microwave power setting with a load of (1000±5) g of any microwave energy interruption or microwave energy blocking device, ...
...otherwise a false reading may result if the operator's hand is between the final water temperature and the ambient temperature is 5°K. (6) The microwave power output P in a cylindrical borosilicate glass vessel having a maximum material thickness of 1/8" (3 mm) and an outside diameter of approximately ...are listed in this manual have been used. (3) At least once a year, have the electromagnetic energy leakage monitor checked for calibration by its maximum microwave power setting with a load of (1000±5) g of any microwave energy interruption or microwave energy blocking device, ...

Service Manual
Page 43
#EV# INSTALLATION 6008 6011 6010 6009 OWNERS MANUAL *01 SERVICE MANUAL *02 INSTALLATION *04 MANUAL COOKING GUIDE LABEL *05 TEMPLATE *06 8-7
#EV# INSTALLATION 6008 6011 6010 6009 OWNERS MANUAL *01 SERVICE MANUAL *02 INSTALLATION *04 MANUAL COOKING GUIDE LABEL *05 TEMPLATE *06 8-7