Installation Instructions
Page 2
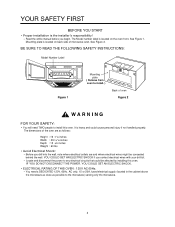
... 120V, 60Hz, AC only, 15 or 20A, fused electrical supply (located in the cabinet above the microwave as close as follows: Height : 16 7/16 inches Width : 29 15/16 inches Depth : 15 5/8 inches Weight : 60 lbs. • Avoid Electrical Shock! - Before you drill into the wall, note where ... with your drill bit. - See Figure 2. The Model number label is the installer's responsibility! - You need TWO people to the microwave) serving only the microwave. 2 YOUR SAFETY FIRST BEFORE YOU START • Proper installation is located on back side of the oven are and where electrical wires ...
... 120V, 60Hz, AC only, 15 or 20A, fused electrical supply (located in the cabinet above the microwave as close as follows: Height : 16 7/16 inches Width : 29 15/16 inches Depth : 15 5/8 inches Weight : 60 lbs. • Avoid Electrical Shock! - Before you drill into the wall, note where ... with your drill bit. - See Figure 2. The Model number label is the installer's responsibility! - You need TWO people to the microwave) serving only the microwave. 2 YOUR SAFETY FIRST BEFORE YOU START • Proper installation is located on back side of the oven are and where electrical wires ...
Installation Instructions
Page 4
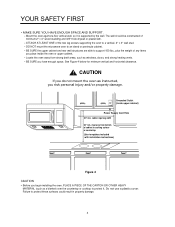
...Failure to an island or peninsula cabinet. - BE SURE the upper cabinet and rear wall structures are able to support 150 lbs., plus the weight of cabinet to cooking surface or countertop (Use templates included with installation instructions) Figure 4 CAUTION • Before you place inside upper cabinet)... Cord Hole 30" min. Grounded Outlet (inside the oven or upper cabinet. - Do not use a plastic cover. DO NOT mount the microwave oven to protect these surfaces could result in property damage. 4 The wall should be constructed of the two lag screws supporting the oven to protect...
...Failure to an island or peninsula cabinet. - BE SURE the upper cabinet and rear wall structures are able to support 150 lbs., plus the weight of cabinet to cooking surface or countertop (Use templates included with installation instructions) Figure 4 CAUTION • Before you place inside upper cabinet)... Cord Hole 30" min. Grounded Outlet (inside the oven or upper cabinet. - Do not use a plastic cover. DO NOT mount the microwave oven to protect these surfaces could result in property damage. 4 The wall should be constructed of the two lag screws supporting the oven to protect...

Installation Instructions
Page 5
... securing to the upper cabinet) OR Four spring toggle heads - Not Actual Size 10- 8" Upper-cabinet template Roof-venting installation B C D centerline 12" 6" 11 4" 10- 3 16 8- weight requirement. 5 PARTS, TOOLS, MATERIALS THE FOLLOWING PARTS ARE SUPPLIED WITH THE OVEN: NOTE: Depending on your ventilation requirements, you may not use all of these...
... securing to the upper cabinet) OR Four spring toggle heads - Not Actual Size 10- 8" Upper-cabinet template Roof-venting installation B C D centerline 12" 6" 11 4" 10- 3 16 8- weight requirement. 5 PARTS, TOOLS, MATERIALS THE FOLLOWING PARTS ARE SUPPLIED WITH THE OVEN: NOTE: Depending on your ventilation requirements, you may not use all of these...
Use & Care Manual
Page 2
... Precautions To Avoid Possible Exposure To Excessive Microwave Energy 3 Important Safety Instructions 4-5 Grounding Instructions 5 UNDERSTANDING YOUR MICROWAVE OVEN 6-9 Cookware Guide 6 Tips For Microwave Cooking 7 Parts And Accessories 8 Control Panel 8-9 USING YOUR MICROWAVE OVEN 10-29 Learn About Your Microwave Oven 10 Help 10 Clock 10 Kitchen ... Or Subtracting Cook Time 15 Popcorn 15 Pizza 16 Potato 16 Vegetable 16 Cook 17 Reheat 17 Auto Defrost 18 Weight Conversion Chart 18 Defrosting Tips 18 Auto Defrost Chart 19-20 Time Defrost 21 Quick Defrost 21 Use Of The ...
... Precautions To Avoid Possible Exposure To Excessive Microwave Energy 3 Important Safety Instructions 4-5 Grounding Instructions 5 UNDERSTANDING YOUR MICROWAVE OVEN 6-9 Cookware Guide 6 Tips For Microwave Cooking 7 Parts And Accessories 8 Control Panel 8-9 USING YOUR MICROWAVE OVEN 10-29 Learn About Your Microwave Oven 10 Help 10 Clock 10 Kitchen ... Or Subtracting Cook Time 15 Popcorn 15 Pizza 16 Potato 16 Vegetable 16 Cook 17 Reheat 17 Auto Defrost 18 Weight Conversion Chart 18 Defrosting Tips 18 Auto Defrost Chart 19-20 Time Defrost 21 Quick Defrost 21 Use Of The ...
Use & Care Manual
Page 8
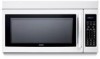
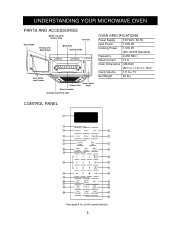
... 13 15 16 17 19 18 20 21 25 23 22 24 27 28 26 • See page 9 for control panel features. 8 Net Weight 60 lbs. UNDERSTANDING YOUR MICROWAVE OVEN PARTS AND ACCESSORIES Model and Serial Number Plate Vent Grill Door Handle Window with Metal Shield Metal Rack Cooking Guide Door Safety... W Cooking Power 1,000 W (IEC 60705 Standard) Frequency 2,450 MHz Rated Current 13 A Outer Dimensions (WxHxD) Cavity Volume 2915⁄16" x 167⁄16"x 155⁄8" 1.8 Cu. Ft.
... 13 15 16 17 19 18 20 21 25 23 22 24 27 28 26 • See page 9 for control panel features. 8 Net Weight 60 lbs. UNDERSTANDING YOUR MICROWAVE OVEN PARTS AND ACCESSORIES Model and Serial Number Plate Vent Grill Door Handle Window with Metal Shield Metal Rack Cooking Guide Door Safety... W Cooking Power 1,000 W (IEC 60705 Standard) Frequency 2,450 MHz Rated Current 13 A Outer Dimensions (WxHxD) Cavity Volume 2915⁄16" x 167⁄16"x 155⁄8" 1.8 Cu. Ft.
Use & Care Manual
Page 9
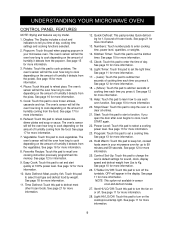
...Up: Touch this pad to cook depending on the cooktop/countertop light. NOTE: This option not available in your microwave oven for sound, clock, display speed and defrost weight from the pizza. Display: The Display includes a clock and indicators to cook depending on the amount of humidity ... See page 11 for more information. Light HI/LO/Off: Touch this pad to turn off . UNDERSTANDING YOUR MICROWAVE OVEN CONTROL PANEL FEATURES NOTE: Styling and features vary by weight. See page 17 for more information. 7. See page 11 for more information. 17. - (Less): Touch ...
...Up: Touch this pad to cook depending on the cooktop/countertop light. NOTE: This option not available in your microwave oven for sound, clock, display speed and defrost weight from the pizza. Display: The Display includes a clock and indicators to cook depending on the amount of humidity ... See page 11 for more information. Light HI/LO/Off: Touch this pad to turn off . UNDERSTANDING YOUR MICROWAVE OVEN CONTROL PANEL FEATURES NOTE: Styling and features vary by weight. See page 17 for more information. 7. See page 11 for more information. 17. - (Less): Touch ...
Use & Care Manual
Page 10
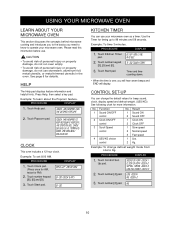
..., aluminum foil, metal utensils, or metal trimmed utensils in min pad. Touch number keypad [8], [0] and [0]. CONTROL SET-UP You can use your microwave oven. Touch number [2] pad. Example: To learn about the Popcorn feature. Example: To time 3 minutes. sound on/off touch 1 clock on/.... PROCEDURE DISPLAY 1. Example: To change the default values for beep sound, clock, display speed and defrost weight. (LBS/KG) See following chart for timing up to pop microwave popcorn the display will display. touch this keypad to 99 minutes and 59 seconds. Touch Kitchen Timer enter...
..., aluminum foil, metal utensils, or metal trimmed utensils in min pad. Touch number keypad [8], [0] and [0]. CONTROL SET-UP You can use your microwave oven. Touch number [2] pad. Example: To learn about the Popcorn feature. Example: To time 3 minutes. sound on/off touch 1 clock on/.... PROCEDURE DISPLAY 1. Example: To change the default values for beep sound, clock, display speed and defrost weight. (LBS/KG) See following chart for timing up to pop microwave popcorn the display will display. touch this keypad to 99 minutes and 59 seconds. Touch Kitchen Timer enter...
Use & Care Manual
Page 18
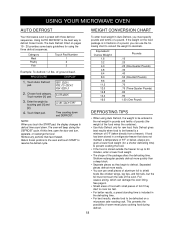
.... • For better results, a preset standing time is included in the defrosting time. • For best results, elevate food to be defrosted on a microwave safe roasting rack. Equivalent Ounce Weight 1.6 3.2 4.0 4.8 6.4 8.0 9.6 11.2 12.0 12.8 14.4 16.0 Pounds .10 .20 .25 (One-Quarter Pounds) .30 .40 .50 (One-Half... When you touch the START pad, the display changes to defrost time count down and DEFROST. USING YOUR MICROWAVE OVEN AUTO DEFROST WEIGHT CONVERSION CHART Your microwave oven is preset with small pieces of foil if they begin to defrost. of warm meat juices cooking food ...
.... • For better results, a preset standing time is included in the defrosting time. • For best results, elevate food to be defrosted on a microwave safe roasting rack. Equivalent Ounce Weight 1.6 3.2 4.0 4.8 6.4 8.0 9.6 11.2 12.0 12.8 14.4 16.0 Pounds .10 .20 .25 (One-Quarter Pounds) .30 .40 .50 (One-Half... When you touch the START pad, the display changes to defrost time count down and DEFROST. USING YOUR MICROWAVE OVEN AUTO DEFROST WEIGHT CONVERSION CHART Your microwave oven is preset with small pieces of foil if they begin to defrost. of warm meat juices cooking food ...
Use & Care Manual
Page 20
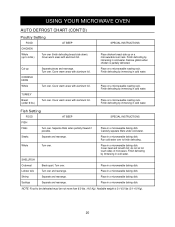
...microwavable... up on a microwavable roasting rack. Fish Setting FOOD AT BEEP ... let foil touch sides of microwave. Finish defrosting by immersing in a microwavable baking dish. NOTE: Food to... over . Place on a microwavable roast rack. Place on a microwavable roasting rack. Finish defrosting by immersing in a microwavable baking dish. Carefully separate fillets... Place in cold water. USING YOUR MICROWAVE OVEN AUTO DEFROST CHART (CONT'D) Poultry... in a microwavable baking dish. Finish defrosting by immersing in a microwavable baking dish. Place on a microwavable roasting rack....
...microwavable... up on a microwavable roasting rack. Fish Setting FOOD AT BEEP ... let foil touch sides of microwave. Finish defrosting by immersing in a microwavable baking dish. NOTE: Food to... over . Place on a microwavable roast rack. Place on a microwavable roasting rack. Finish defrosting by immersing in a microwavable baking dish. Carefully separate fillets... Place in cold water. USING YOUR MICROWAVE OVEN AUTO DEFROST CHART (CONT'D) Poultry... in a microwavable baking dish. Finish defrosting by immersing in a microwavable baking dish. Place on a microwavable roasting rack....
Service Manual
Page 8
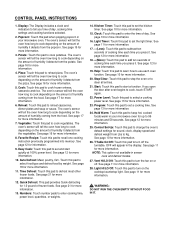
... this pad to turn off . Easy Cook: Touch this pad to set the light timer. The oven's sensor will appear in your microwave oven. Kitchen Timer: Touch this pad to set a cooking time. If you time of humidity coming from Lbs to recall one cooking instruction... Program: Touch this pad to set the kitchen timer. CONTROL PANEL INSTRUCTIONS 1. See page 11 for sound, clock, display speed and defrost weight from the food. Favorite Recipe: Touch this pad to change the oven's default settings for more information. Control Set-Up: Touch this pad...
... this pad to turn off . Easy Cook: Touch this pad to set the light timer. The oven's sensor will appear in your microwave oven. Kitchen Timer: Touch this pad to set a cooking time. If you time of humidity coming from Lbs to recall one cooking instruction... Program: Touch this pad to set the kitchen timer. CONTROL PANEL INSTRUCTIONS 1. See page 11 for sound, clock, display speed and defrost weight from the food. Favorite Recipe: Touch this pad to change the oven's default settings for more information. Control Set-Up: Touch this pad...