
Use & Care Manual
Page 3
... The Cleaning and Maintenance section describes how to clean and maintain your appliance. • The Service section includes troubleshooting tips and your range, be certain that the flame does not extend beyond the bottom of the manual. Never use aluminum foil or protective liners to line...Safety Important Safety Instructions READ AND SAVE THESE INSTRUCTIONS Important Safety Instructions Fire Safety • Do not use the appliance for warming or heating the room. Turn off the appliance and disconnect the circuit at the beginning of the pan. • If materials inside an oven ...
... The Cleaning and Maintenance section describes how to clean and maintain your appliance. • The Service section includes troubleshooting tips and your range, be certain that the flame does not extend beyond the bottom of the manual. Never use aluminum foil or protective liners to line...Safety Important Safety Instructions READ AND SAVE THESE INSTRUCTIONS Important Safety Instructions Fire Safety • Do not use the appliance for warming or heating the room. Turn off the appliance and disconnect the circuit at the beginning of the pan. • If materials inside an oven ...
Use & Care Manual
Page 4
... and service must be allowed to accumulate on low or medium settings. TO REDUCE THE RISK OF INJURY TO PERSONS IN THE EVENT OF A RANGE TOP GREASE FIRE, OBSERVE THE FOLLOWING: a) SMOTHER FLAMES with your back to an exit. • Whenever possible, do not push the flames..., do not go out immediately, EVACUATE AND CALL THE FIRE DEPARTMENT. Follow the gas supplier's instructions. •If you where the gas shut-off the burner. Safety Gas Safety English 2 a) Never leave surface units unattended at high heat or when flambéing food (i.e. b) Always turn it started. 3) The fire...
... and service must be allowed to accumulate on low or medium settings. TO REDUCE THE RISK OF INJURY TO PERSONS IN THE EVENT OF A RANGE TOP GREASE FIRE, OBSERVE THE FOLLOWING: a) SMOTHER FLAMES with your back to an exit. • Whenever possible, do not push the flames..., do not go out immediately, EVACUATE AND CALL THE FIRE DEPARTMENT. Follow the gas supplier's instructions. •If you where the gas shut-off the burner. Safety Gas Safety English 2 a) Never leave surface units unattended at high heat or when flambéing food (i.e. b) Always turn it started. 3) The fire...

Use & Care Manual
Page 5
... Governor of California to publish a list of substances known to the state to cause cancer, birth defects or other flammable materials contact heating elements or interior surfaces of oven until gas dissipates before using the appliance. • If you can damage the appliance, and the unit may become hot enough to cause...
... Governor of California to publish a list of substances known to the state to cause cancer, birth defects or other flammable materials contact heating elements or interior surfaces of oven until gas dissipates before using the appliance. • If you can damage the appliance, and the unit may become hot enough to cause...
Use & Care Manual
Page 6
... the oven. 3) Operating the unit according to cool. Connect only to Installation Instructions for easy reference. Refer to properly grounded outlet. All ranges can cause burns from grease build up. c) Exposure to these substances can be harmful. • After a spill or boilover, turn off...the anti-tip devices are released that the door locks and will expose a portion of the heating element or burner to persons could reach them. Install anti-tip device packaged with gas. 2) Providing good ventilation during the first several cleaning cycles. Carbon Monoxide is still hot....
... the oven. 3) Operating the unit according to cool. Connect only to Installation Instructions for easy reference. Refer to properly grounded outlet. All ranges can cause burns from grease build up. c) Exposure to these substances can be harmful. • After a spill or boilover, turn off...the anti-tip devices are released that the door locks and will expose a portion of the heating element or burner to persons could reach them. Install anti-tip device packaged with gas. 2) Providing good ventilation during the first several cleaning cycles. Carbon Monoxide is still hot....
Use & Care Manual
Page 7
..., follow these guidelines: 1) 1) DO NOT use the warming drawer to a factory authorized service center. • In the event of corrosive chemicals in heating or cleaning will damage the appliance and could result in this appliance if it is not working properly, or if it is specifically designed for... use when heating or cooking food. If you have any part of an error the display flashes and beeps continuously. Disconnect appliance from the power supply ...
..., follow these guidelines: 1) 1) DO NOT use the warming drawer to a factory authorized service center. • In the event of corrosive chemicals in heating or cleaning will damage the appliance and could result in this appliance if it is not working properly, or if it is specifically designed for... use when heating or cooking food. If you have any part of an error the display flashes and beeps continuously. Disconnect appliance from the power supply ...

Use & Care Manual
Page 9
... cooktop and one half rack English 7 The precision burner is over the burner cap. Depending on model, the range is turned on the cooktop. They provide a more predictable heat. Caution: All ignitors spark when any of the burners when the cooktop is well suited for the right side ...below for Free-standing Models The cooktop uses electronic ignitors to prepare delicate sauces. Burner grates should rest in a gentle, more even heat, especially when cooking at low settings, prohibits the flame from touching the cookware. The high power burner is no pilot light. It retains...
... cooktop and one half rack English 7 The precision burner is over the burner cap. Depending on model, the range is turned on the cooktop. They provide a more predictable heat. Caution: All ignitors spark when any of the burners when the cooktop is well suited for the right side ...below for Free-standing Models The cooktop uses electronic ignitors to prepare delicate sauces. Burner grates should rest in a gentle, more even heat, especially when cooking at low settings, prohibits the flame from touching the cookware. The high power burner is no pilot light. It retains...

Use & Care Manual
Page 14
... oven. Turn knob to select cooking temperature. Set minutes. 12: 00 AM CLOCK English 12 Press Time and turn counterclockwise to the desired heat setting. Press pad to turn to the symbol to light and then to decrease. The Clock You control the operation of the burners. To.... The knobs are two timers - See the sections on . Turn clockwise to increase and turn the control knob to control the heat level of the range by using the touch pads, dial and control knobs. Press Time to the desired setting and press start. Used to display cooking mode...
... oven. Turn knob to select cooking temperature. Set minutes. 12: 00 AM CLOCK English 12 Press Time and turn counterclockwise to the desired heat setting. Press pad to turn to the symbol to light and then to decrease. The Clock You control the operation of the burners. To.... The knobs are two timers - See the sections on . Turn clockwise to increase and turn the control knob to control the heat level of the range by using the touch pads, dial and control knobs. Press Time to the desired setting and press start. Used to display cooking mode...
Use & Care Manual
Page 17
... 12 hour or 24 hour format. 5. Access SELECT FUNCTIONS Menu. 2. See "Setting the Sabbath Feature for the Oven Only 1. OFF 1. Turn knob to the desired heat setting. Press START. This feature automatically converts package or recipe temperatures for 73 hours and then turn off , as selected, during the entire Sabbath mode...
... 12 hour or 24 hour format. 5. Access SELECT FUNCTIONS Menu. 2. See "Setting the Sabbath Feature for the Oven Only 1. OFF 1. Turn knob to the desired heat setting. Press START. This feature automatically converts package or recipe temperatures for 73 hours and then turn off , as selected, during the entire Sabbath mode...

Use & Care Manual
Page 18
Remove packing materials from range. Operation - Cooktop This section explains how to improve cooktop results. See "Getting the Most Out of Your Cooktop" on the burner base and that the ... prior to the symbol. Verify that the ignitor See Care and Cleaning Section. • There may be a slight odor during first uses; Setting the Burner Heat Level Burner Control Knob Lighting the Burner English 16 Figure 11: Burner Control Knob Push in an turn the burner off. Buff with a glass ceramic...
Remove packing materials from range. Operation - Cooktop This section explains how to improve cooktop results. See "Getting the Most Out of Your Cooktop" on the burner base and that the ... prior to the symbol. Verify that the ignitor See Care and Cleaning Section. • There may be a slight odor during first uses; Setting the Burner Heat Level Burner Control Knob Lighting the Burner English 16 Figure 11: Burner Control Knob Push in an turn the burner off. Buff with a glass ceramic...
Use & Care Manual
Page 23
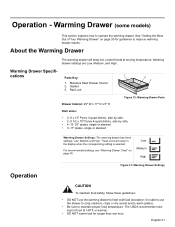
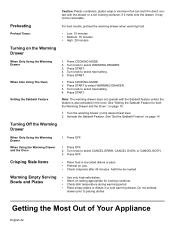
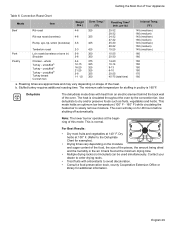
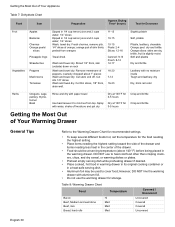
...: The warming drawer has three settings: Low, Medium and High. Warming Drawer (some models) This section explains how to heat cold food (exception: it is selected: For recommended settings, see "Warming Drawer Chart" on page 30 for longer than one hour. See "Getting the Most Out of Your Warming Drawer" on page...
...: The warming drawer has three settings: Low, Medium and High. Warming Drawer (some models) This section explains how to heat cold food (exception: it is selected: For recommended settings, see "Warming Drawer Chart" on page 30 for longer than one hour. See "Getting the Most Out of Your Warming Drawer" on page...
Use & Care Manual
Page 24
...• Medium: 15 minutes • High: 20 minutes Turning on page 14. When Also Using The Oven 1. Turn knob to select heat setting. 5. See "Setting the Sabbath Feature for cooking container. • Check dish temperature during warming period. • Place empty plates ...select WARMING DRAWER. 3. Getting the Most Out of Your Appliance English 22 Press START. Turn knob to placing dishes. on the desired heat level. 2. Press START. Do not preheat drawer prior to select WARMING DRAWER. 3. Caution: Plastic containers, plastic wrap or aluminum ...
...• Medium: 15 minutes • High: 20 minutes Turning on page 14. When Also Using The Oven 1. Turn knob to select heat setting. 5. See "Setting the Sabbath Feature for cooking container. • Check dish temperature during warming period. • Place empty plates ...select WARMING DRAWER. 3. Getting the Most Out of Your Appliance English 22 Press START. Turn knob to placing dishes. on the desired heat level. 2. Press START. Do not preheat drawer prior to select WARMING DRAWER. 3. Caution: Plastic containers, plastic wrap or aluminum ...
Use & Care Manual
Page 25
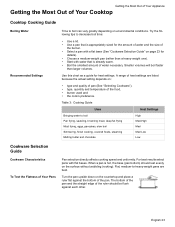
... a heavy-weight one). • Start with water that is already warm. • Boil the smallest amount of water necessary. A range of heat settings are best. Flat, medium-to-heavy-weight pans are listed because the actual setting depends on environmental conditions. For best results select ...pans with a flat base (See "Cookware Selection Guide" on the surface without wobbling (rocking). Table 3: Cooking Guide Uses Heat Settings Bringing water to boil Pan frying, sautéing, browning meat, deep fat frying Most frying, eggs, pancakes, slow boil Simmering, ...
... a heavy-weight one). • Start with water that is already warm. • Boil the smallest amount of water necessary. A range of heat settings are best. Flat, medium-to-heavy-weight pans are listed because the actual setting depends on environmental conditions. For best results select ...pans with a flat base (See "Cookware Selection Guide" on the surface without wobbling (rocking). Table 3: Cooking Guide Uses Heat Settings Bringing water to boil Pan frying, sautéing, browning meat, deep fat frying Most frying, eggs, pancakes, slow boil Simmering, ...
Use & Care Manual
Page 26
... or pound cakes, small roasts or poultry. • RACK POSITION 1 (lowest position) - Getting the Most Out of Your Appliance Another simple test to determine even heat distribution across the cookware bottom is to side. Good, flat cookware will have the same features as on one pan is clean and dry. •... The flame should be the same size as the flames can lick up the sides of the pan. A lid shortens cooking/boiling time by holding heat inside the pot. See drawings. • Make sure the bottom of the pan or smaller. Use only a flat-bottomed wok. broiling most baked goods when...
... or pound cakes, small roasts or poultry. • RACK POSITION 1 (lowest position) - Getting the Most Out of Your Appliance Another simple test to determine even heat distribution across the cookware bottom is to side. Good, flat cookware will have the same features as on one pan is clean and dry. •... The flame should be the same size as the flames can lick up the sides of the pan. A lid shortens cooking/boiling time by holding heat inside the pot. See drawings. • Make sure the bottom of the pan or smaller. Use only a flat-bottomed wok. broiling most baked goods when...

Use & Care Manual
Page 27
... cannot be used with baking pans: Figure 15: Pan Placement • Glass baking dishes absorb heat, therefore reduce oven temperature 25°F when baking in glass. • Shiny, smooth metal reflects heat resulting in lighter, more delicate browning. • Dark, rough or dull pans will absorb... products and turkeys, insert the probe in browner, crisper crust. A beep will confirm that oven is well insulated and the retained heat will be located in proper position before using these pans. Preheating is not recommended when using the probe (some tips for cooking with...
... cannot be used with baking pans: Figure 15: Pan Placement • Glass baking dishes absorb heat, therefore reduce oven temperature 25°F when baking in glass. • Shiny, smooth metal reflects heat resulting in lighter, more delicate browning. • Dark, rough or dull pans will absorb... products and turkeys, insert the probe in browner, crisper crust. A beep will confirm that oven is well insulated and the retained heat will be located in proper position before using these pans. Preheating is not recommended when using the probe (some tips for cooking with...
Use & Care Manual
Page 28
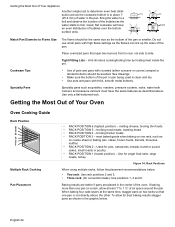
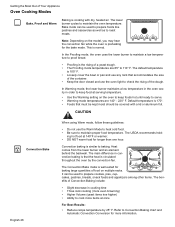
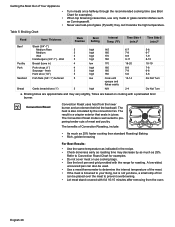
... the lower burner maintains a low temperature in the oven cavity in convection baking is that must be kept moist should be covered with dry, heated air. Getting the Most Out of Your Appliance Oven Cooking Modes Bake, Proof and Warm Baking is cooking with a lid or aluminum foil. Note...more information. CAUTION Convection Bake English 26 When using Warm mode, follow these guidelines: • Do not use the oven light to roast meats. Heat comes from the lower burner and an element behind the backwall. Bake mode can be used to prepare cookies, pies, cupcakes, pastries, breads, ...
... the lower burner maintains a low temperature in the oven cavity in convection baking is that must be kept moist should be covered with dry, heated air. Getting the Most Out of Your Appliance Oven Cooking Modes Bake, Proof and Warm Baking is cooking with a lid or aluminum foil. Note...more information. CAUTION Convection Bake English 26 When using Warm mode, follow these guidelines: • Do not use the oven light to roast meats. Heat comes from the lower burner and an element behind the backwall. Bake mode can be used to prepare cookies, pies, cupcakes, pastries, breads, ...
Use & Care Manual
Page 29
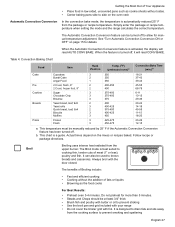
...oven 3-4 minutes. When the Automatic Convection Conversion feature is best suited to prevent sticking • Use the broil pan and grid included with your range • Do not cover the broiler grid with foil. This chart is designed to drain fats and oils away from the upper burner. Follow ...recipe or package directions. b. Broil Broiling uses intense heat radiated from the cooking surface to allow for details. Simply enter the package or recipe temperature when setting the mode and the...
...oven 3-4 minutes. When the Automatic Convection Conversion feature is best suited to prevent sticking • Use the broil pan and grid included with your range • Do not cover the broiler grid with foil. This chart is designed to drain fats and oils away from the upper burner. Follow ...recipe or package directions. b. Broil Broiling uses intense heat radiated from the cooking surface to allow for details. Simply enter the package or recipe temperature when setting the mode and the...
Use & Care Manual
Page 30
Never use cooking bags. • Use the broil pan and grid provided with the range for roasting. fresh 3 Ham slice (1/2") 5 Seafood Fish filets (3/4"-1") buttered 5 Bread Garlic bread slices (1") 5 high 145 6-7 high 160 7-8 high 170 8-9 high ... Rack Position Broil Setting Internal Temp. (oF) Time Side 1 (min.)a Time Side 2 (min.)a Beef Steak (3/4"-1") Medium Rare 5 Medium 5 Well 5 Hamburgers (3/4"-1") - The heat is not yet done, a small strip of foil can 't tolerate the high temperature. A low-sided, uncovered pan can also be placed over the meat to...
Never use cooking bags. • Use the broil pan and grid provided with the range for roasting. fresh 3 Ham slice (1/2") 5 Seafood Fish filets (3/4"-1") buttered 5 Bread Garlic bread slices (1") 5 high 145 6-7 high 160 7-8 high 170 8-9 high ... Rack Position Broil Setting Internal Temp. (oF) Time Side 1 (min.)a Time Side 2 (min.)a Beef Steak (3/4"-1") Medium Rare 5 Medium 5 Well 5 Hamburgers (3/4"-1") - The heat is not yet done, a small strip of foil can 't tolerate the high temperature. A low-sided, uncovered pan can also be placed over the meat to...
Use & Care Manual
Page 31
... to the Dehydrate Chart for 48 hours before shutting off automatically. This mode holds an optimum low temperature (100° F - 160° F) while circulating the heated air to dry and/or preserve foods such as fruits, vegetables and herbs. Note: The lower burner operates at 140° F. unstuffedb Turkey - The oven... 3-6 350 3-4 375 12-15 325 16-20 325 21-25 325 3-8 325 1-1 1/2 350 25-32 28-32 24-32 27-32 25-30 28-32 15-25 15-25 20-30 14-20 10-14 9-13 6-10 20-25 45-75 (total time) 145 (med/rare) 160 (medium) 145 (med/rare) 160...
... to the Dehydrate Chart for 48 hours before shutting off automatically. This mode holds an optimum low temperature (100° F - 160° F) while circulating the heated air to dry and/or preserve foods such as fruits, vegetables and herbs. Note: The lower burner operates at 140° F. unstuffedb Turkey - The oven... 3-6 350 3-4 375 12-15 325 16-20 325 21-25 325 3-8 325 1-1 1/2 350 25-32 28-32 24-32 27-32 25-30 28-32 15-25 15-25 20-30 14-20 10-14 9-13 6-10 20-25 45-75 (total time) 145 (med/rare) 160 (medium) 145 (med/rare) 160...
Use & Care Manual
Page 32
...Peppers Mushrooms Tomatoes Dipped in 1/4 cup lemon juice and 2 cups water; 1/4" slices Dipped in a heat-safe serving dish. • Aluminum foil may be at 100°F for the food needing the ...pat dry. 3-5 hours Getting the Most Out of the drawer. • Food should be used to 4 inches from oranges 11-15 10-15 10-15 Peels: 2-4 Slices: 12-16 Towel dried. Cut into 1/8"... Med Beef, rare Med Bread, hard rolls Med Covered / Uncovered Uncovered Covered Covered Uncovered English 30 orange part of peppers, coarsely chopped about 1" pieces Wash and towel dry. Spray Dry at ...
...Peppers Mushrooms Tomatoes Dipped in 1/4 cup lemon juice and 2 cups water; 1/4" slices Dipped in a heat-safe serving dish. • Aluminum foil may be at 100°F for the food needing the ...pat dry. 3-5 hours Getting the Most Out of the drawer. • Food should be used to 4 inches from oranges 11-15 10-15 10-15 Peels: 2-4 Slices: 12-16 Towel dried. Cut into 1/8"... Med Beef, rare Med Bread, hard rolls Med Covered / Uncovered Uncovered Covered Covered Uncovered English 30 orange part of peppers, coarsely chopped about 1" pieces Wash and towel dry. Spray Dry at ...
Use & Care Manual
Page 33
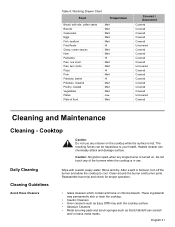
... touch any single burner is turned on the cooktop while the surface is in use any cleaner on . Clean around the burner and burner ports. Heated cleaner can scratch and/ or leave metal marks. After a spill or boilover, turn off the burner and allow the cooktop to your health. Reassemble burner...
... touch any single burner is turned on the cooktop while the surface is in use any cleaner on . Clean around the burner and burner ports. Heated cleaner can scratch and/ or leave metal marks. After a spill or boilover, turn off the burner and allow the cooktop to your health. Reassemble burner...

