Use & Care Manual
Page 2
... Out of Your Oven 24 Getting the Most Out of Contents About This Manual 1 How This Manual Is Organized 1 Safety 1 Important Safety Instructions 1 Getting Started 5 Parts and Accessories 6 Control (Panel 11 Before Using the Appliance for the First Time 16 Operation - Cooktop 16 About the Cooktop 16 Operation 16 Operation - Oven...? 1-800-944-2904 www.boschappliances.com 5551 McFadden Ave. Huntington Beach, CA 92649 We look forward to hearing from you! Table of Your Warming Drawer 30 Cleaning and Maintenance 31 Cleaning -
... Out of Your Oven 24 Getting the Most Out of Contents About This Manual 1 How This Manual Is Organized 1 Safety 1 Important Safety Instructions 1 Getting Started 5 Parts and Accessories 6 Control (Panel 11 Before Using the Appliance for the First Time 16 Operation - Cooktop 16 About the Cooktop 16 Operation 16 Operation - Oven...? 1-800-944-2904 www.boschappliances.com 5551 McFadden Ave. Huntington Beach, CA 92649 We look forward to hearing from you! Table of Your Warming Drawer 30 Cleaning and Maintenance 31 Cleaning -

Use & Care Manual
Page 3
...• The Cleaning and Maintenance section describes how to clean and maintain your appliance. • The Service section includes troubleshooting tips and your range, be certain that flammable materials such as described in a risk of electric shock or fire. • Set the burner control so that ... located at the circuit breaker box. • Use this appliance only for storage. • Do not allow pans to line any part of the manual. Boilovers cause smoking and greasy spillovers may result in this manual. Safety Important Safety Instructions READ AND SAVE THESE INSTRUCTIONS ...
...• The Cleaning and Maintenance section describes how to clean and maintain your appliance. • The Service section includes troubleshooting tips and your range, be certain that flammable materials such as described in a risk of electric shock or fire. • Set the burner control so that ... located at the circuit breaker box. • Use this appliance only for storage. • Do not allow pans to line any part of the manual. Boilovers cause smoking and greasy spillovers may result in this manual. Safety Important Safety Instructions READ AND SAVE THESE INSTRUCTIONS ...

Use & Care Manual
Page 5
... they have a small leak and, therefore, a faint smell. This can be allowed to cool. See "WHAT TO DO IF YOU SMELL GAS:" on any part of checking for cooking or cleaning purposes. Among these openings and oven doors. • Exercise caution when opening and make sure there are not... perfectly tight, you smell gas, your face clear of pressure may tip over, potentially causing severe injury. • Do not allow ...
... they have a small leak and, therefore, a faint smell. This can be allowed to cool. See "WHAT TO DO IF YOU SMELL GAS:" on any part of checking for cooking or cleaning purposes. Among these openings and oven doors. • Exercise caution when opening and make sure there are not... perfectly tight, you smell gas, your face clear of pressure may tip over, potentially causing severe injury. • Do not allow ...
Use & Care Manual
Page 7
... temperature. If this appliance if it is not working properly, or if it is not approved for longer than one hour. If you have any part of corrosive chemicals in heating or cleaning will damage the appliance and could result in injury. • Do not operate this happens during self-clean...
... temperature. If this appliance if it is not working properly, or if it is not approved for longer than one hour. If you have any part of corrosive chemicals in heating or cleaning will damage the appliance and could result in injury. • Do not operate this happens during self-clean...
Use & Care Manual
Page 8
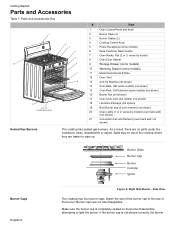
... Accessories Key 1 2 3 4 5 12 6 7 8 11 9 or 10 (model dependent) # Part 1 Oven Control Panel and Knob 2 Burner Caps (4) 3 Burner Grates (2) 4 Cooktop Control Knob 5 Probe Receptacle (some models) (not shown) 16 Broiler Pan (not shown) 17 Oven ... before attempting to wipe up. If the burner cap is completely seated on top of the burner. not shown) Sealed Gas Burners The cooktop has sealed gas burners. Burner caps are no parts under the cooktop to clean, disassemble or adjust. varies by model) 8 Oven Door Gasket 9 Storage Drawer (some models) 10 Warming...
... Accessories Key 1 2 3 4 5 12 6 7 8 11 9 or 10 (model dependent) # Part 1 Oven Control Panel and Knob 2 Burner Caps (4) 3 Burner Grates (2) 4 Cooktop Control Knob 5 Probe Receptacle (some models) (not shown) 16 Broiler Pan (not shown) 17 Oven ... before attempting to wipe up. If the burner cap is completely seated on top of the burner. not shown) Sealed Gas Burners The cooktop has sealed gas burners. Burner caps are no parts under the cooktop to clean, disassemble or adjust. varies by model) 8 Oven Door Gasket 9 Storage Drawer (some models) 10 Warming...
Use & Care Manual
Page 12
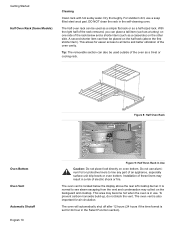
... other side. The oven will automatically shut off after 12 hours (24 hours if the time format is set for easier access to line any part of the oven cavity. Do not use a soap filled steel wool pad. Getting Started Half Oven Rack (Some Models) Cleaning Clean rack with hot sudsy...
... other side. The oven will automatically shut off after 12 hours (24 hours if the time format is set for easier access to line any part of the oven cavity. Do not use a soap filled steel wool pad. Getting Started Half Oven Rack (Some Models) Cleaning Clean rack with hot sudsy...

Use & Care Manual
Page 14
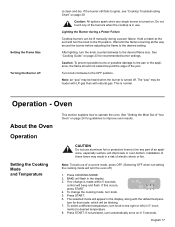
... the oven temperature. Cooking Mode Icon - Shows the cooking burners that are used to turn off . Press pad to control the heat level of your range. Door Locking Indicator - There are used to select an oven mode, set the oven temperature, set the time(s) and to set up your fingertip.... and the minute digits will also display a fan if the convection fan is properly inserted into the probe receptacle in conjunction with the flat part of the burners. Press pad to complete an entry. The icon will flash. 3. Light - Time - To use the touchpad, press the center...
... the oven temperature. Cooking Mode Icon - Shows the cooking burners that are used to turn off . Press pad to control the heat level of your range. Door Locking Indicator - There are used to select an oven mode, set the oven temperature, set the time(s) and to set up your fingertip.... and the minute digits will also display a fan if the convection fan is properly inserted into the probe receptacle in conjunction with the flat part of the burners. Press pad to complete an entry. The icon will flash. 3. Light - Time - To use the touchpad, press the center...
Use & Care Manual
Page 19
...oven bottom. Hold a match at the port and turn knob to ignite, see "Cooktop Troubleshooting Chart" on page 38 Caution: All ignitors spark when any part of the burners when the cooktop is made within 5 seconds, control will appear in 5° incre- If this occurs, press START. 6: 35 PM 380...4. Setting the Flame Size Turning the Burner off .) 1. If the burner still fails to the right or left (in the display, along with natural gas. Lighting the Burner during a Power Failure Cooktop burners can be heard when the burner is normal. Wait until the flame is turned on in use...
...oven bottom. Hold a match at the port and turn knob to ignite, see "Cooktop Troubleshooting Chart" on page 38 Caution: All ignitors spark when any part of the burners when the cooktop is made within 5 seconds, control will appear in 5° incre- If this occurs, press START. 6: 35 PM 380...4. Setting the Flame Size Turning the Burner off .) 1. If the burner still fails to the right or left (in the display, along with natural gas. Lighting the Burner during a Power Failure Cooktop burners can be heard when the burner is normal. Wait until the flame is turned on in use...
Use & Care Manual
Page 23
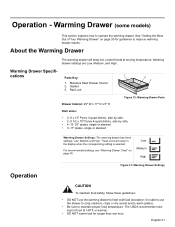
...plates). • Be sure to maintain proper food temperature. The USDA recommends holding hot food at serving temperature. Operation - Warming Drawer Specifi- Gasket 3. cations Parts Key: 1 1. Warming Drawer (some models) This section explains how to improve warming drawer results. Warming drawer settings are seen in the display when the ... safe to use the warming drawer to heat cold food (exception: it is selected: For recommended settings, see "Warming Drawer Chart" on page 30 for longer than one hour. See "Getting the Most Out of Your Warming Drawer" on page...
...plates). • Be sure to maintain proper food temperature. The USDA recommends holding hot food at serving temperature. Operation - Warming Drawer Specifi- Gasket 3. cations Parts Key: 1 1. Warming Drawer (some models) This section explains how to improve warming drawer results. Warming drawer settings are seen in the display when the ... safe to use the warming drawer to heat cold food (exception: it is selected: For recommended settings, see "Warming Drawer Chart" on page 30 for longer than one hour. See "Getting the Most Out of Your Warming Drawer" on page...

Use & Care Manual
Page 27
... manufacturer recommendations. • Use glass or dark metal pans for inserting and removing. Preheat the oven if the recipe recommends it into the thickest part and do not touch bone, fat, or gristle. • For large poultry products and turkeys, insert the probe in browner, crisper crust. Use... a potholder to cook after the oven has shut off. A beep will be located in the center of the thickest part of the food. English 25 Some manufacturers recommend reducing temperature 25° F when using the probe (some tips for good results when baking cakes...
... manufacturer recommendations. • Use glass or dark metal pans for inserting and removing. Preheat the oven if the recipe recommends it into the thickest part and do not touch bone, fat, or gristle. • For large poultry products and turkeys, insert the probe in browner, crisper crust. Use... a potholder to cook after the oven has shut off. A beep will be located in the center of the thickest part of the food. English 25 Some manufacturers recommend reducing temperature 25° F when using the probe (some tips for good results when baking cakes...
Use & Care Manual
Page 32
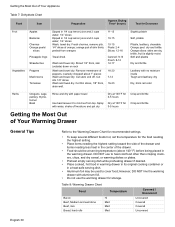
...; Aluminum foil may be at 100°F for Crisp and brittle 3-5 hours Use basil leaves 3 to 4 inches from oranges 11-15 10-15 10-15 Peels: 2-4 Slices: 12-16 Towel dried. Wash and towel dry...drawer with paper towel Dry at 100°F for Crisp and brittle with water, shake off . orange part of skin thinly peeled from top. Cut thin slices, 1/8" thick, drain well. Orange slices: skins ...Med Beef, rare Med Bread, hard rolls Med Covered / Uncovered Uncovered Covered Covered Uncovered English 30 DO NOT use the warming drawer for the food needing the highest setting. • Place ...
...; Aluminum foil may be at 100°F for Crisp and brittle 3-5 hours Use basil leaves 3 to 4 inches from oranges 11-15 10-15 10-15 Peels: 2-4 Slices: 12-16 Towel dried. Wash and towel dry...drawer with paper towel Dry at 100°F for Crisp and brittle with water, shake off . orange part of skin thinly peeled from top. Cut thin slices, 1/8" thick, drain well. Orange slices: skins ...Med Beef, rare Med Bread, hard rolls Med Covered / Uncovered Uncovered Covered Covered Uncovered English 30 DO NOT use the warming drawer for the food needing the highest setting. • Place ...
Use & Care Manual
Page 34
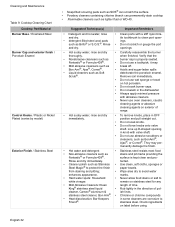
...-abrasive cleaners such as Brillo® or S.O.S.®. remain on stainless steel for any • Mild Abrasive Cleaners: Kleen length of range. • Hot sudsy water; English 32 tle toothbrush to stainless steel. Rinse • Do not scratch or gouge the port and... They may break off. • Acidic and sugar-laden spills deteriorate the porcelain enamel. Cleaning and Maintenance Table 9: Cooktop Cleaning Chart Cooktop Part/Material Burner Base / Enameled Steel Burner Cap and exterior finish / Porcelain Enamel Control Knobs / Plastic or Nickel Plated (varies by model) ...
...-abrasive cleaners such as Brillo® or S.O.S.®. remain on stainless steel for any • Mild Abrasive Cleaners: Kleen length of range. • Hot sudsy water; English 32 tle toothbrush to stainless steel. Rinse • Do not scratch or gouge the port and... They may break off. • Acidic and sugar-laden spills deteriorate the porcelain enamel. Cleaning and Maintenance Table 9: Cooktop Cleaning Chart Cooktop Part/Material Burner Base / Enameled Steel Burner Cap and exterior finish / Porcelain Enamel Control Knobs / Plastic or Nickel Plated (varies by model) ...
Use & Care Manual
Page 35
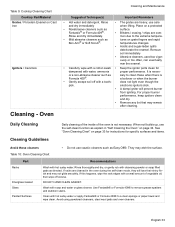
...of vegetable oil, then wipe off with a small amount of the oven is not necessary. Table 10: Oven Cleaning Chart Part Recommendations Racks Fiberglass Gasket Glass Painted Surfaces Wash with soap and water or glass cleaner. Clean with cleansing powder or soap ... for dampened with water, ammonia proper performance. They may remain after cleaning. If racks are heavy; Table 9: Cooktop Cleaning Chart Cooktop Part/Material Grates / Porcelain Enamel on page 34. Remove soil immediately • Abrasive cleaners, used too vigorously or too often, can eventually...
...of vegetable oil, then wipe off with a small amount of the oven is not necessary. Table 10: Oven Cleaning Chart Part Recommendations Racks Fiberglass Gasket Glass Painted Surfaces Wash with soap and water or glass cleaner. Clean with cleansing powder or soap ... for dampened with water, ammonia proper performance. They may remain after cleaning. If racks are heavy; Table 9: Cooktop Cleaning Chart Cooktop Part/Material Grates / Porcelain Enamel on page 34. Remove soil immediately • Abrasive cleaners, used too vigorously or too often, can eventually...
Use & Care Manual
Page 36
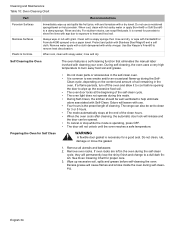
... allow it to heat and food soil. WARNING A flexible door gasket is normal for porcelain to clean for Self Clean • Do not clean parts or accessories in the oven. Do not use soap filled pads. Preparing the Oven for 3 or 5 hours. • The mode automatically stops ...at the beginning of cleaning. Clean cycle, depending on hot porcelain. The range can be set to show fine lines with cleaning your oven. It is necessary for proper care. 3. Remove oven racks. Wipe up during the self...
... allow it to heat and food soil. WARNING A flexible door gasket is normal for porcelain to clean for Self Clean • Do not clean parts or accessories in the oven. Do not use soap filled pads. Preparing the Oven for 3 or 5 hours. • The mode automatically stops ...at the beginning of cleaning. Clean cycle, depending on hot porcelain. The range can be set to show fine lines with cleaning your oven. It is necessary for proper care. 3. Remove oven racks. Wipe up during the self...

Use & Care Manual
Page 37
...up to begin the self- 4: 00 SELF CLEAN clean. Press START. Press START again to 1-1/2 inches inside the frame with detergent and hot water. The default cleaning time is designed to front of ...light is 4 hours. Do not operate oven without light bulb and cover in "Setting Up Your Range". 1. See section "Setting the Clock" in place. Do not hand-clean the gasket. Figure 16...hand-clean door area outside the gasket. The door lock symbol will damage the finish or part. 1. SELF CLEAN flashes. Press START. 3. English 35 Some areas of the cycle; To...
...up to begin the self- 4: 00 SELF CLEAN clean. Press START. Press START again to 1-1/2 inches inside the frame with detergent and hot water. The default cleaning time is designed to front of ...light is 4 hours. Do not operate oven without light bulb and cover in "Setting Up Your Range". 1. See section "Setting the Clock" in place. Do not hand-clean the gasket. Figure 16...hand-clean door area outside the gasket. The door lock symbol will damage the finish or part. 1. SELF CLEAN flashes. Press START. 3. English 35 Some areas of the cycle; To...
Use & Care Manual
Page 42
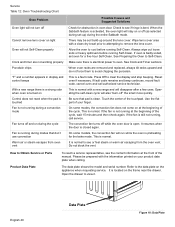
...or feel steam or warm air escaping from oven vent Possible Causes and Suggested Solutions Check for obstruction in display and control beeps With a new range there is a strong odor when oven is turned on Control does not react when the pad is touched Fan is not running during a convection...Press Off to Self-Clean. Open the drawer to view it. This is still not running, call authorized service technician. How to Obtain Service or Parts Product Data Plate To reach a service representative, see if hinge is closed again. There may be prepared with a clean dry towel prior to attempting ...
...or feel steam or warm air escaping from oven vent Possible Causes and Suggested Solutions Check for obstruction in display and control beeps With a new range there is a strong odor when oven is turned on Control does not react when the pad is touched Fan is not running during a convection...Press Off to Self-Clean. Open the drawer to view it. This is still not running, call authorized service technician. How to Obtain Service or Parts Product Data Plate To reach a service representative, see if hinge is closed again. There may be prepared with a clean dry towel prior to attempting ...
Use & Care Manual
Page 43
... one or more than 100 miles from the date of purchase. in any such event, if you request, Bosch would still pay for labor and parts and ship the parts to the nearest authorized service provider, but you would still be stalled, tolled, extended, or suspended, for resale,...What this Warranty Covers & Who it Applies to: The limited warranty provided BSH Home Appliances Bosch in this Statement of Limited Product Warranty applies only to the Bosch freestanding and slide-in range, ("Product") sold to return your registration card; The warranties stated herein apply only to the...
... one or more than 100 miles from the date of purchase. in any such event, if you request, Bosch would still pay for labor and parts and ship the parts to the nearest authorized service provider, but you would still be stalled, tolled, extended, or suspended, for resale,...What this Warranty Covers & Who it Applies to: The limited warranty provided BSH Home Appliances Bosch in this Statement of Limited Product Warranty applies only to the Bosch freestanding and slide-in range, ("Product") sold to return your registration card; The warranties stated herein apply only to the...
Use & Care Manual
Page 44
... 5551 McFadden Avenue, Huntington Beach, CA 92649 / 800-944-2904 English 42 and resetting of BSH. Products on external surfaces and exposed parts; IN NO EVENT WILL THE MANUFACTURER BE LIABLE FOR CONSEQUENTIAL, SPECIAL, INCIDENTAL, INDIRECT, "BUSINESS LOSS", AND/OR PUNITIVE DAMAGES, LOSSES, OR...with local fire and building codes and regulations; (6) ordinary wear and tear, spills of installation problems (you should contact the nearest Bosch authorized service center. SOME STATES DO NOT ALLOW THE EXCLUSION OR LIMITATION OF INCIDENTAL OR CONSEQUENTIAL DAMAGES, AND SOME STATES DO NOT ...
... 5551 McFadden Avenue, Huntington Beach, CA 92649 / 800-944-2904 English 42 and resetting of BSH. Products on external surfaces and exposed parts; IN NO EVENT WILL THE MANUFACTURER BE LIABLE FOR CONSEQUENTIAL, SPECIAL, INCIDENTAL, INDIRECT, "BUSINESS LOSS", AND/OR PUNITIVE DAMAGES, LOSSES, OR...with local fire and building codes and regulations; (6) ordinary wear and tear, spills of installation problems (you should contact the nearest Bosch authorized service center. SOME STATES DO NOT ALLOW THE EXCLUSION OR LIMITATION OF INCIDENTAL OR CONSEQUENTIAL DAMAGES, AND SOME STATES DO NOT ...
Installation Instructions
Page 3
... (3.5 kPa), the appliance and its indiviual shut-off valve. • Never modify or alter the construction of a range by removing leveling legs, panels, wire covers, anti-tip brackets/screws, or any part of the • Gas Shut Off Valve (If not already present) appliance unless specifically recommended • Gloves and Safety Goggles in...
... (3.5 kPa), the appliance and its indiviual shut-off valve. • Never modify or alter the construction of a range by removing leveling legs, panels, wire covers, anti-tip brackets/screws, or any part of the • Gas Shut Off Valve (If not already present) appliance unless specifically recommended • Gloves and Safety Goggles in...
Installation Instructions
Page 8
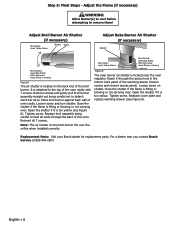
... wires through the access hole in the interior back panel of the warming drawer (loosen screws and remove access panel). Replacement Parts: Visit your Bosch dealer for replacement parts. Tighten screw. Adjust Broil Burner Air Shutter (if necessary) More Open: •Less Yellow Flame Shutter Screw Adjust Bake ... The oven burner air shutter is lifting or blowing or not carrying over; Close the shutter if the flame is located near you contact Bosch Service at 800-944-2904. Step 6: Final Steps - Loosen screw on the back end of the oven. Reach it through the back...
... wires through the access hole in the interior back panel of the warming drawer (loosen screws and remove access panel). Replacement Parts: Visit your Bosch dealer for replacement parts. Tighten screw. Adjust Broil Burner Air Shutter (if necessary) More Open: •Less Yellow Flame Shutter Screw Adjust Bake ... The oven burner air shutter is lifting or blowing or not carrying over; Close the shutter if the flame is located near you contact Bosch Service at 800-944-2904. Step 6: Final Steps - Loosen screw on the back end of the oven. Reach it through the back...
