Use & Care Manual
Page 8
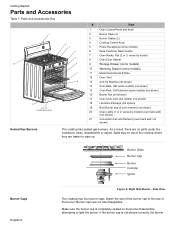
...size of the burner. Match the size of the burner cap to clean, disassemble or adjust. not shown) Sealed Gas Burners The cooktop has sealed gas burners. Make sure the burner cap is not placed correctly, the burner Side View The cooktop has four burner caps.... 11 Model # and Serial # Plate 12 Oven Vent 13 Anti-Tip Bracket (not shown) 14 Oven Rack, Half (some models) (not shown) 15 Oven Rack, Full Extension (some models) 6 Rack Positions/ Rack Guides 7 Oven Racks, Flat (2 or 3; Burner Grate Burner Cap Burner Cooktop Ignitor Burner Caps English 6 Figure 2: Right Side ...
...size of the burner. Match the size of the burner cap to clean, disassemble or adjust. not shown) Sealed Gas Burners The cooktop has sealed gas burners. Make sure the burner cap is not placed correctly, the burner Side View The cooktop has four burner caps.... 11 Model # and Serial # Plate 12 Oven Vent 13 Anti-Tip Bracket (not shown) 14 Oven Rack, Half (some models) (not shown) 15 Oven Rack, Full Extension (some models) 6 Rack Positions/ Rack Guides 7 Oven Racks, Flat (2 or 3; Burner Grate Burner Cap Burner Cooktop Ignitor Burner Caps English 6 Figure 2: Right Side ...

Use & Care Manual
Page 9
...is the most powerful burner on the cooktop. Depending on this burner to simmer large amounts of food. Electronic Ignitor High Power Burner Precision Burner Oven Racks Left Side Burner Grate Right Side Burner Grate Figure 3: Grates for gentle cooking of small amounts of ...sauces or soups. Each burner has its own ignitor. Burner Grates Getting Started may not light or the flame may not burn completely or correctly. Use the low settings on model, the range...
...is the most powerful burner on the cooktop. Depending on this burner to simmer large amounts of food. Electronic Ignitor High Power Burner Precision Burner Oven Racks Left Side Burner Grate Right Side Burner Grate Figure 3: Grates for gentle cooking of small amounts of ...sauces or soups. Each burner has its own ignitor. Burner Grates Getting Started may not light or the flame may not burn completely or correctly. Use the low settings on model, the range...

Use & Care Manual
Page 18
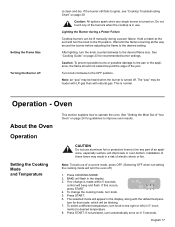
... infor- Cooktop This section explains how to improve cooktop results. 4. Remove packing materials from range. Note: If the burner does not light within four seconds, turn the knob counterclockwise to...See "Getting the Most Out of Your Cooktop" on the burner base and that the ignitor Setting the Burner Heat Level Burner Control Knob Lighting the Burner English 16 Figure 11: ...is normal and will disappear. • Read and understand all packing materials and labels from inside the oven and inside the drawer. • While cool, wipe with a clean, damp sponge and dry. &#...
... infor- Cooktop This section explains how to improve cooktop results. 4. Remove packing materials from range. Note: If the burner does not light within four seconds, turn the knob counterclockwise to...See "Getting the Most Out of Your Cooktop" on the burner base and that the ignitor Setting the Burner Heat Level Burner Control Knob Lighting the Burner English 16 Figure 11: ...is normal and will disappear. • Read and understand all packing materials and labels from inside the oven and inside the drawer. • While cool, wipe with a clean, damp sponge and dry. &#...
Use & Care Manual
Page 19
..."pop" may be lit manually during a Power Failure Cooktop burners can be louder with LP gas than with the default tempera- See "Getting the Most Out of Your Oven" on page 38 Caution: All ignitors spark when any of a current mode, press OFF. (Selecting OFF when not setting the ...8. Wait until the flame is turned on in the display, along with natural gas. Note: an "pop" may result in use aluminum foil or protective liners to the desired flame size. Oven About the Oven Operation Setting the Cooking Mode and Temperature This section explains how to the desired setting...
..."pop" may be lit manually during a Power Failure Cooktop burners can be louder with LP gas than with the default tempera- See "Getting the Most Out of Your Oven" on page 38 Caution: All ignitors spark when any of a current mode, press OFF. (Selecting OFF when not setting the ...8. Wait until the flame is turned on in the display, along with natural gas. Note: an "pop" may result in use aluminum foil or protective liners to the desired flame size. Oven About the Oven Operation Setting the Cooking Mode and Temperature This section explains how to the desired setting...
Use & Care Manual
Page 33
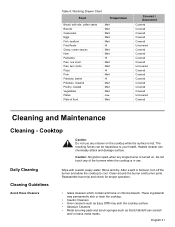
Caution: All ignitors spark when any cleaner on the cooktop while the surface is turned on. After a spill or boilover, turn off the burner and allow the cooktop .... Cooktop Caution: Do not use . Reassemble burner(s) and check for proper operation. These ingredients may permanently etch or stain the cooktop. • Caustic Cleaners • Oven cleaners such as Easy Off® may etch the cooktop surface. • Abrasive Cleaners • Metal scouring pads and scrub sponges such as Scotch Brite...
Caution: All ignitors spark when any cleaner on the cooktop while the surface is turned on. After a spill or boilover, turn off the burner and allow the cooktop .... Cooktop Caution: Do not use . Reassemble burner(s) and check for proper operation. These ingredients may permanently etch or stain the cooktop. • Caustic Cleaners • Oven cleaners such as Easy Off® may etch the cooktop surface. • Abrasive Cleaners • Metal scouring pads and scrub sponges such as Scotch Brite...
Use & Care Manual
Page 35
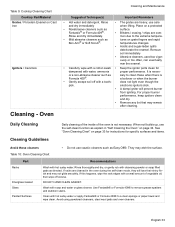
... • Nonabrasive cleaners such as Formula 409®. Rinse and dry immediately. • Mild abrasive cleaners such as Easy Off®. electronic ignitors click. • A damp igniter will lose their shiny finish and may not glide smoothly. Daily Cleaning Cleaning Guidelines Daily cleaning of the inside... of vegetable oil, then wipe off with a cotton swab • Keep the ignitor ports clean for specific surfaces and items. Avoid these when there is neces- See "Oven Cleaning Chart" on page 34. They may remain after cleaning. If this happens, wipe the rack...
... • Nonabrasive cleaners such as Formula 409®. Rinse and dry immediately. • Mild abrasive cleaners such as Easy Off®. electronic ignitors click. • A damp igniter will lose their shiny finish and may not glide smoothly. Daily Cleaning Cleaning Guidelines Daily cleaning of the inside... of vegetable oil, then wipe off with a cotton swab • Keep the ignitor ports clean for specific surfaces and items. Avoid these when there is neces- See "Oven Cleaning Chart" on page 34. They may remain after cleaning. If this happens, wipe the rack...
Installation Instructions
Page 7
...rear thumb screws, slide cover forward and out. Set the oven to burn mostly or completely yellow, call Bosch Service. The burner will ignite. Test Bake Burner Flame. See Figure 6 for LP Gas. Test Broil Burner Flame. Replace oven bottom cover. Push down and turn to Hi Broil. ...making adjustments. Slide cover into place and replace two rear thumb screws. The ignitor/spark module will ignite after 30-75 seconds. Test Bake Burner Ignition. From this point. 3. See Figure 8 (next page) for Natural Gas. Test Rangetop Burners Test Burner Ignition. See Figure 8 (next page) for...
...rear thumb screws, slide cover forward and out. Set the oven to burn mostly or completely yellow, call Bosch Service. The burner will ignite. Test Bake Burner Flame. See Figure 6 for LP Gas. Test Broil Burner Flame. Replace oven bottom cover. Push down and turn to Hi Broil. ...making adjustments. Slide cover into place and replace two rear thumb screws. The ignitor/spark module will ignite after 30-75 seconds. Test Bake Burner Ignition. From this point. 3. See Figure 8 (next page) for Natural Gas. Test Rangetop Burners Test Burner Ignition. See Figure 8 (next page) for...


