Installation Instructions
Page 3
... anti-tip bracket 7 Apply Foam Tape 7 Electrical Connection 7 Connect Electric Range Cord 7 Connect Electric Flexible Conduit 10 Complete the installation 11 Testing Operation 12 Service 12 Before Calling Service 12 This Bosch Appliance is made by BSH Home Appliances Corporation 1901 Main Street, Suite 600 Irvine, CA 92614 Questions? 1-800-944-2904...
... anti-tip bracket 7 Apply Foam Tape 7 Electrical Connection 7 Connect Electric Range Cord 7 Connect Electric Flexible Conduit 10 Complete the installation 11 Testing Operation 12 Service 12 Before Calling Service 12 This Bosch Appliance is made by BSH Home Appliances Corporation 1901 Main Street, Suite 600 Irvine, CA 92614 Questions? 1-800-944-2904...

Installation Instructions
Page 5
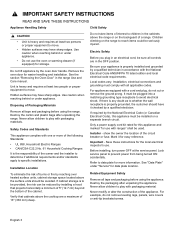
...• Ask your gas supplier, call your gas supplier from the back to this manual for use combustible materials, gasoline or other servicing should not move more than 36 inches. • Installer - A child or adult can tip the range over . Refer to ensure that ... injury or death. Check for safe operation up to recommend a qualified technician and an authorized repair service. • Install only per the installation instructions provided in the manuals. Carefully tip the range forward pulling from a neighbor's phone. Range should be longer than 1" (2.5 cm). WARNING:...
...• Ask your gas supplier, call your gas supplier from the back to this manual for use combustible materials, gasoline or other servicing should not move more than 36 inches. • Installer - A child or adult can tip the range over . Refer to ensure that ... injury or death. Check for safe operation up to recommend a qualified technician and an authorized repair service. • Install only per the installation instructions provided in the manuals. Carefully tip the range forward pulling from a neighbor's phone. Range should be longer than 1" (2.5 cm). WARNING:...
Installation Instructions
Page 6
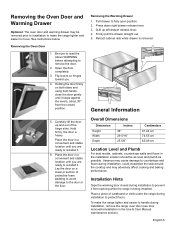
... do not cut or remove the ground prong. English 3 See the section "Removing the Oven Door" in the range Use and Care manual. Installation Location To eliminate the risk of the cabinet. Children climbing on a separate branch circuit. If required by the oven door handle. show...ANSI/NFPA 70 latest edition and local electrical code requirements. Destroy the packaging after unpacking the range. Be sure your appliance is properly installed and grounded by a qualified technician in accordance with a cord and plug, do not remove leveling legs, panels, wire covers or ...
... do not cut or remove the ground prong. English 3 See the section "Removing the Oven Door" in the range Use and Care manual. Installation Location To eliminate the risk of the cabinet. Children climbing on a separate branch circuit. If required by the oven door handle. show...ANSI/NFPA 70 latest edition and local electrical code requirements. Destroy the packaging after unpacking the range. Be sure your appliance is properly installed and grounded by a qualified technician in accordance with a cord and plug, do not remove leveling legs, panels, wire covers or ...

Installation Instructions
Page 8
... for Anti-Tip Bracket (Style will vary depending on local code). to the pages following for Canadian installations. Refer to the installation manual for content regarding Safety, Cabinet Dimensions, Remove Packaging, Electrical Installation, Gas Connection, Testing the Installation and Customer Service. ___ 3. (Optional) Remove the oven door to reduce the unit weight and to provide...
... for Anti-Tip Bracket (Style will vary depending on local code). to the pages following for Canadian installations. Refer to the installation manual for content regarding Safety, Cabinet Dimensions, Remove Packaging, Electrical Installation, Gas Connection, Testing the Installation and Customer Service. ___ 3. (Optional) Remove the oven door to reduce the unit weight and to provide...
Installation Instructions
Page 9
... and stable location unitl you are ready to handle during installation to fully open position. 2. Be sure to read the above WARNING before attempting to reinstall it . 6. the door is removed. Place the door in the Use & Care Manual maintenance section). Firmly pull the drawer straight out. 5. ...Holding the door firmly on a towel or section of the hinge slots. To make the range lighter and easier to countertops and floors during installation to the door or the floor. See...
... and stable location unitl you are ready to handle during installation to fully open position. 2. Be sure to read the above WARNING before attempting to reinstall it . 6. the door is removed. Place the door in the Use & Care Manual maintenance section). Firmly pull the drawer straight out. 5. ...Holding the door firmly on a towel or section of the hinge slots. To make the range lighter and easier to countertops and floors during installation to the door or the floor. See...

Installation Instructions
Page 10
...inside house is recommended. Electrical kW Rating Ranges are dual rated for the kW rating. The available space for more information. Be sure to install your range according to data plate for the gas connection is adequate. Shut off main gas supply valve before beginning. Electrical Requirements Refer to the... kW rating in the table below 20 in a separate switch and fuse box The range requires a minimum of the wiring to make sure your installation in this manual. VOLTS HZ A/C 120/240 60 120/240 60 120/208 60 120/208 60 RATING KW 13.0 13.8 9.8 10.4 CIRCUIT BREAKER 40 or...
...inside house is recommended. Electrical kW Rating Ranges are dual rated for the kW rating. The available space for more information. Be sure to install your range according to data plate for the gas connection is adequate. Shut off main gas supply valve before beginning. Electrical Requirements Refer to the... kW rating in the table below 20 in a separate switch and fuse box The range requires a minimum of the wiring to make sure your installation in this manual. VOLTS HZ A/C 120/240 60 120/240 60 120/208 60 120/208 60 RATING KW 13.0 13.8 9.8 10.4 CIRCUIT BREAKER 40 or...
Installation Instructions
Page 15
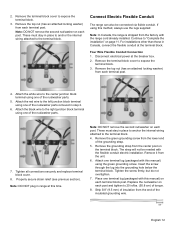
... in range at this manual) using one of torque. 8. Disconnect electrical power at the terminal block. Note: DO NOT remove the second nut/washer on the terminal block. Remove the grounding strap from the factory with the flexible conduit electric installation. Attach one terminal lug... (packaged with this time. If using this manual) on each terminal block post. Replace the nut/washer on each post and tighten to the...
... in range at this manual) using one of torque. 8. Disconnect electrical power at the terminal block. Note: DO NOT remove the second nut/washer on the terminal block. Remove the grounding strap from the factory with the flexible conduit electric installation. Attach one terminal lug... (packaged with this time. If using this manual) on each terminal block post. Replace the nut/washer on each post and tighten to the...
Installation Instructions
Page 17
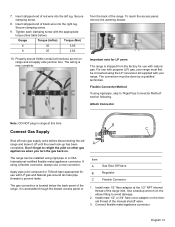
Insert stripped end of the manual shutoff valve. 3. Tighten each clamping screw with LP... Connector Method If using rigid pipe or a CSA International-certified flexible metal appliance connector. The range can be installed using rigid pipe, skip to avoid damage. 2. Apply pipe joint compound or Teflon® tape appropriate for use... appliance connector. Important note for use a new connector. The conversion must first be done by a qualified technician. Install male 1/2" or 3/4" flare union adapter on the elbow fitting to "Rigid Pipe Connector Method" section following. For ...
Insert stripped end of the manual shutoff valve. 3. Tighten each clamping screw with LP... Connector Method If using rigid pipe or a CSA International-certified flexible metal appliance connector. The range can be installed using rigid pipe, skip to avoid damage. 2. Apply pipe joint compound or Teflon® tape appropriate for use... appliance connector. Important note for use a new connector. The conversion must first be done by a qualified technician. Install male 1/2" or 3/4" flare union adapter on the elbow fitting to "Rigid Pipe Connector Method" section following. For ...

Installation Instructions
Page 4
... gas fitter qualified or licensed by BSH Home Appliances can be met when testing supply piping system: a) The appliance and its individual manual shut-off valve must not be disconnected from natural gas operation to an altitude of 10,000 ft. If the information in the ...future • This kit is responsible for possible conversion from the propane gas tank regulator. • The following must be installed by closing its individual shut-off valve during any modifications (except LP conversion, when applicable). English 1 In addition, the range has its own...
... gas fitter qualified or licensed by BSH Home Appliances can be met when testing supply piping system: a) The appliance and its individual manual shut-off valve must not be disconnected from natural gas operation to an altitude of 10,000 ft. If the information in the ...future • This kit is responsible for possible conversion from the propane gas tank regulator. • The following must be installed by closing its individual shut-off valve during any modifications (except LP conversion, when applicable). English 1 In addition, the range has its own...

Installation Instructions
Page 6
Insert the socket driver with the placement specifications displayed in Use and Care manual). 2. If the orifices become separated from the card, placement can be properly positioned on the orifice with 3" minimum extension into its respective threaded hole ...LP Cooktop Orifices. Replace screws. Replace the cover plate and warming drawer and proceed to next step. For gas range conversions, continue to "Test the Installation" on the card 4. The orifice is inside shaft). Verify that all knobs are in the orifice card. Remove Natural Gas Cooktop Orifices. Replace Cooktop ...
Insert the socket driver with the placement specifications displayed in Use and Care manual). 2. If the orifices become separated from the card, placement can be properly positioned on the orifice with 3" minimum extension into its respective threaded hole ...LP Cooktop Orifices. Replace screws. Replace the cover plate and warming drawer and proceed to next step. For gas range conversions, continue to "Test the Installation" on the card 4. The orifice is inside shaft). Verify that all knobs are in the orifice card. Remove Natural Gas Cooktop Orifices. Replace Cooktop ...


