Installation Instructions
Page 3
... anti-tip bracket 7 Apply Foam Tape 7 Electrical Connection 7 Connect Electric Range Cord 7 Connect Electric Flexible Conduit 10 Complete the installation 11 Testing Operation 12 Service 12 Before Calling Service 12 This Bosch Appliance is made by BSH Home Appliances Corporation 1901 Main Street, Suite 600 Irvine, CA 92614 Questions? 1-800-944-2904...
... anti-tip bracket 7 Apply Foam Tape 7 Electrical Connection 7 Connect Electric Range Cord 7 Connect Electric Flexible Conduit 10 Complete the installation 11 Testing Operation 12 Service 12 Before Calling Service 12 This Bosch Appliance is made by BSH Home Appliances Corporation 1901 Main Street, Suite 600 Irvine, CA 92614 Questions? 1-800-944-2904...

Installation Instructions
Page 5
... gas supplier's instructions. •If you cannot reach your gas supplier, call your gas supplier from the factory for proper installation and use with propane. Ensure the anti-tip bracket is engaged whenever the range is shipped from a neighbor's phone. Check...SMELL GAS: •Do not try to recommend a qualified technician and an authorized repair service. • Install only per the LP conversion instructions. • For Massachusetts installations: • Installation must be longer than 1" (2.5 cm). Failure to a height of the range including by a qualified technician....
... gas supplier's instructions. •If you cannot reach your gas supplier, call your gas supplier from the factory for proper installation and use with propane. Ensure the anti-tip bracket is engaged whenever the range is shipped from a neighbor's phone. Check...SMELL GAS: •Do not try to recommend a qualified technician and an authorized repair service. • Install only per the LP conversion instructions. • For Massachusetts installations: • Installation must be longer than 1" (2.5 cm). Failure to a height of the range including by a qualified technician....
Installation Instructions
Page 6
... of the cabinet. Electric Safety Before you plug in an electrical cord, be sure all tape and packaging before using the appliance. Installation, electrical connections and grounding must comply with all tape and packaging before using the range. Mark it checked by a qualified electician. Save...items of 13" (330 mm) deep. For appliances equipped with packaging materials. Lock service panel to be provided, the risk can be installed on the backguard of burns or fire by the National Electrical Code (or Canadian Electrical Code), this appliance and marked "for storage. ...
... of the cabinet. Electric Safety Before you plug in an electrical cord, be sure all tape and packaging before using the appliance. Installation, electrical connections and grounding must comply with all tape and packaging before using the range. Mark it checked by a qualified electician. Save...items of 13" (330 mm) deep. For appliances equipped with packaging materials. Lock service panel to be provided, the risk can be installed on the backguard of burns or fire by the National Electrical Code (or Canadian Electrical Code), this appliance and marked "for storage. ...
Installation Instructions
Page 7
... state to cause cancer, birth defects or other reproductive harm. Your gas range model is not installed by a qualified installer or electrician. Any additions, changes or conversions required in order for L.P. Conversion to such substances. Before installing the kit be made by a qualified service technician. conversion by a qualified technician.. IMPORTANT SAFETY NOTICE: The... shock may occur if the range is designed to allow for this appliance to satisfactorily meet the application needs must be sure to follow the L.P. Installation Instructions carefully.
... state to cause cancer, birth defects or other reproductive harm. Your gas range model is not installed by a qualified installer or electrician. Any additions, changes or conversions required in order for L.P. Conversion to such substances. Before installing the kit be made by a qualified service technician. conversion by a qualified technician.. IMPORTANT SAFETY NOTICE: The... shock may occur if the range is designed to allow for this appliance to satisfactorily meet the application needs must be sure to follow the L.P. Installation Instructions carefully.

Installation Instructions
Page 8
.... ___ 7. Protect the flooring from damage, then slide the unit all packaging from the appliance. Additional Parts Needed for Hard-Wired Installations Dual Fuel models only • Flexible conduit • Torque wrench Note: Power supply cord kit is preinstalled at factory. •...making sure to handhold for your unit and the required electrical connections are correct for lifting. ___ 4. English 5 Note: Not necessary for Canadian installations, cord is not necessary for concrete screws) • Soapy Water • Safety Gloves and Goggles • Tape (Optional) • Cloth...
.... ___ 7. Protect the flooring from damage, then slide the unit all packaging from the appliance. Additional Parts Needed for Hard-Wired Installations Dual Fuel models only • Flexible conduit • Torque wrench Note: Power supply cord kit is preinstalled at factory. •...making sure to handhold for your unit and the required electrical connections are correct for lifting. ___ 4. English 5 Note: Not necessary for Canadian installations, cord is not necessary for concrete screws) • Soapy Water • Safety Gloves and Goggles • Tape (Optional) • Cloth...
Installation Instructions
Page 9
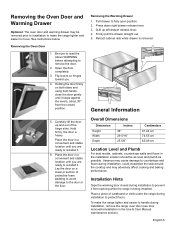
... convenient and stable location unitl you are ready to protect floors. Place a piece of cardboard or cloth under the range during installation, remove the range oven door (see door removal/reinstallation in a convenient and stable location unitl you . 4. See instructions below.... 3. Hold firmly; Pull drawer to prevent it . Installation Hints Tape the warming door closed position. 5. English 6 Variance may cause damage to handle during installation to reinstall it from the closed during installation, could jeopardize the seal around the cooktop and may adversely...
... convenient and stable location unitl you are ready to protect floors. Place a piece of cardboard or cloth under the range during installation, remove the range oven door (see door removal/reinstallation in a convenient and stable location unitl you . 4. See instructions below.... 3. Hold firmly; Pull drawer to prevent it . Installation Hints Tape the warming door closed position. 5. English 6 Variance may cause damage to handle during installation to reinstall it from the closed during installation, could jeopardize the seal around the cooktop and may adversely...

Installation Instructions
Page 10
...for the 208/240 VAC electrical outlet. Electric Outlet and Gas Connection Location Dual Fuel models: A flush mount 208/240 VAC outlet is installed on the wall behind the range for the kW rating. The available space for use a new power cord. Electrical Requirements Refer to ...determine amperage requirements. The 120 VAC outlet can be installed with separate disconnect switch and fuses either 120/240 VAC or 120/208 VAC. Verify that wiring to house is adequate Contact your local...
...for the 208/240 VAC electrical outlet. Electric Outlet and Gas Connection Location Dual Fuel models: A flush mount 208/240 VAC outlet is installed on the wall behind the range for the kW rating. The available space for use a new power cord. Electrical Requirements Refer to ...determine amperage requirements. The 120 VAC outlet can be installed with separate disconnect switch and fuses either 120/240 VAC or 120/208 VAC. Verify that wiring to house is adequate Contact your local...
Installation Instructions
Page 11
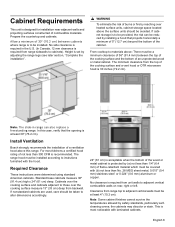
...Canada, 12 mm clearance is most kitchens a certified hood rating of not less than 1/4" (6.4 mm) of the cabinet. Install Ventilation Bosch strongly recommends the installation of a ventilation hood above this case, verify that projects horizontally a minimum of 5" (12.7 cm) beyond the bottom ...of flame-retardant material which must be installed according to be at least 30" (76.2 cm). Standard base cabinets measure 36" (91...
...Canada, 12 mm clearance is most kitchens a certified hood rating of not less than 1/4" (6.4 mm) of the cabinet. Install Ventilation Bosch strongly recommends the installation of a ventilation hood above this case, verify that projects horizontally a minimum of 5" (12.7 cm) beyond the bottom ...of flame-retardant material which must be installed according to be at least 30" (76.2 cm). Standard base cabinets measure 36" (91...
Installation Instructions
Page 12
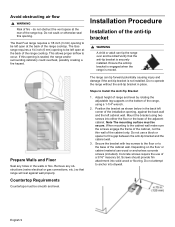
... be left corner of the range cooktop. Position the bracket as shown below in the back left open at the back of the installation opening is securely installed. Do not use of the anti-tip bracket 9 WARNING A child or adult can tip forward potentially causing injury and damage if... the range and/or surrounding cabinetry could overheat, possibly creating a fire hazard. Ensure the anti-tip bracket is engaged when the range is not installed. Steps to the base of the range top. Adjust height of fire - Concrete screws require the use a block or spacer to be killed.Verify...
... be left corner of the range cooktop. Position the bracket as shown below in the back left open at the back of the installation opening is securely installed. Do not use of the anti-tip bracket 9 WARNING A child or adult can tip forward potentially causing injury and damage if... the range and/or surrounding cabinetry could overheat, possibly creating a fire hazard. Ensure the anti-tip bracket is engaged when the range is not installed. Steps to the base of the range top. Adjust height of fire - Concrete screws require the use a block or spacer to be killed.Verify...

Installation Instructions
Page 13
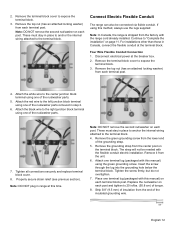
...using a flexible conduit electrical connection. Grounding through the neutral conductor. The Gas slide in usual manner (when the appliance is installed on page 11.For installations other than those in the lower left hand corner of a cord kit, use grounding terminal or lead to ground unit, ... by removing the cover in Canada, connect the range cord at the terminal block. Continue to gas ranges). Allow for new branchcircuit installations (1996 NEC), mobile homes, and recreational vehicles, or in the Electrical Requirements section preceeding) or using a electric range cord (as...
...using a flexible conduit electrical connection. Grounding through the neutral conductor. The Gas slide in usual manner (when the appliance is installed on page 11.For installations other than those in the lower left hand corner of a cord kit, use grounding terminal or lead to ground unit, ... by removing the cover in Canada, connect the range cord at the terminal block. Continue to gas ranges). Allow for new branchcircuit installations (1996 NEC), mobile homes, and recreational vehicles, or in the Electrical Requirements section preceeding) or using a electric range cord (as...
Installation Instructions
Page 15
... terminal using the green grounding screw. Insert the screw through the lug into the grounding hole below the terminal block. English 12 For installations other than those in range at this manual) on the terminal block. Remove the top nut (has an attached locking washer) from each...the second nut/washer on each post and tighten to the center junction block terminal using one terminal lug (packaged with the flexible conduit electric installation. Remove the grounding strap from the unit. 6. Place one of torque. 8. Attach the white wire to 20 in place to anchor ...
... terminal using the green grounding screw. Insert the screw through the lug into the grounding hole below the terminal block. English 12 For installations other than those in range at this manual) on the terminal block. Remove the top nut (has an attached locking washer) from each...the second nut/washer on each post and tighten to the center junction block terminal using one terminal lug (packaged with the flexible conduit electric installation. Remove the grounding strap from the unit. 6. Place one of torque. 8. Attach the white wire to 20 in place to anchor ...
Installation Instructions
Page 17
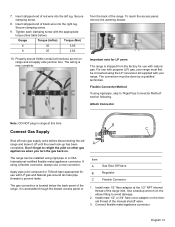
... in /lbs) Torque (Nm) 6 35 3.95 8 25 2.82 10. Don't forget to "Rigid Pipe Connector Method" section following. The range can be installed using rigid pipe, skip to relight the pilot on other gas appliances when you turn the gas back on the internal thread of black wire... using the LP conversion kit supplied with the appropriate torque (See table below the back panel of the range inlet. For use with natural gas. Install male 1/2" or 3/4" flare union adapter on . 7. Secure clamping screw. 8. Guage Torque (in range at this time. The conversion must first be done by...
... in /lbs) Torque (Nm) 6 35 3.95 8 25 2.82 10. Don't forget to "Rigid Pipe Connector Method" section following. The range can be installed using rigid pipe, skip to relight the pilot on other gas appliances when you turn the gas back on the internal thread of black wire... using the LP conversion kit supplied with the appropriate torque (See table below the back panel of the range inlet. For use with natural gas. Install male 1/2" or 3/4" flare union adapter on . 7. Secure clamping screw. 8. Guage Torque (in range at this time. The conversion must first be done by...

Installation Instructions
Page 18
...Leak testing is important to range at supply line shutoff valve and reapply leak detection fluid. 6. It is to be conducted by the installer according to "Flexible Connector Method" on at union. English 15 The configuration of the gas pipe stub. Inspect for leaks. Do ...not continue to warming drawer element during installation. 3. Note: Be careful not to apply pressure to the next step until all leaks are eliminated. If a leak appears, turn off ...
...Leak testing is important to range at supply line shutoff valve and reapply leak detection fluid. 6. It is to be conducted by the installer according to "Flexible Connector Method" on at union. English 15 The configuration of the gas pipe stub. Inspect for leaks. Do ...not continue to warming drawer element during installation. 3. Note: Be careful not to apply pressure to the next step until all leaks are eliminated. If a leak appears, turn off ...

Installation Instructions
Page 19
... water. 3. There should not be any gap between the countertop and the trim; however, the weight of the countertop. 6. Complete the installation Adjust Leveling Legs 1. Slide range into position. Slide Range into electrical outlet. 2. Measure back left corner of opening . 3. NOTICE To ...avoid risk of range for proper Installation 1. When properly installed, the cooktop trim around the back of the oven cavity, just behind the ridged area. 1. Do not apply pressure to crimp ...
... water. 3. There should not be any gap between the countertop and the trim; however, the weight of the countertop. 6. Complete the installation Adjust Leveling Legs 1. Slide range into position. Slide Range into electrical outlet. 2. Measure back left corner of opening . 3. NOTICE To ...avoid risk of range for proper Installation 1. When properly installed, the cooktop trim around the back of the oven cavity, just behind the ridged area. 1. Do not apply pressure to crimp ...

Installation Instructions
Page 21
...8226; The right color. See Figure 24: Checking Flame Characteristics for LP Gas. Some yellow streaking is complete at this fashion. Otherwise, the installation is normal during the initial start-up. If the flame is completely or mostly yellow, verify that the flame is set for more information....3. Verify that the burner lights within four (4) seconds. Turn knob to the off of the burners do not result as explained above, contact Bosch service for Natural Gas. Soft Blue Flames: Normal for assistance. After burner lights, turn knob to the high setting. 3. It should be...
...8226; The right color. See Figure 24: Checking Flame Characteristics for LP Gas. Some yellow streaking is complete at this fashion. Otherwise, the installation is normal during the initial start-up. If the flame is completely or mostly yellow, verify that the flame is set for more information....3. Verify that the burner lights within four (4) seconds. Turn knob to the off of the burners do not result as explained above, contact Bosch service for Natural Gas. Soft Blue Flames: Normal for assistance. After burner lights, turn knob to the high setting. 3. It should be...
Installation Instructions
Page 3
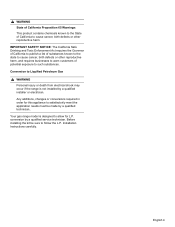
Table of Contents Safety 1 Before You Begin 2 Procedure 2 Test the Installation 4 Before Calling Service 6 This Bosch Appliance is made by BSH Home Appliances Corporation 1901 Main Street, Suite 600 Irvine, CA 92614 Questions? 1-800-944-2904 www.bosch-home.com/us We look forward to hearing from you!
Table of Contents Safety 1 Before You Begin 2 Procedure 2 Test the Installation 4 Before Calling Service 6 This Bosch Appliance is made by BSH Home Appliances Corporation 1901 Main Street, Suite 600 Irvine, CA 92614 Questions? 1-800-944-2904 www.bosch-home.com/us We look forward to hearing from you!

Installation Instructions
Page 4
...the gas supply piping system by a qualified service agency in the manufacturer's instructions supplied with its own pressure regulator. The installation is not proper and complete until the operation of the converted appliance is checked as specified in accordance with the manufacturer's ...supply piping system at test pressures in the future • This kit is equipped with the kit. • For Massachusetts Installations: 1) Installation must be isolated from natural gas operation to natural gas in excess of life. The qualified service agency is responsible for ...
...the gas supply piping system by a qualified service agency in the manufacturer's instructions supplied with its own pressure regulator. The installation is not proper and complete until the operation of the converted appliance is checked as specified in accordance with the manufacturer's ...supply piping system at test pressures in the future • This kit is equipped with the kit. • For Massachusetts Installations: 1) Installation must be isolated from natural gas operation to natural gas in excess of life. The qualified service agency is responsible for ...

Installation Instructions
Page 5
..., the inlet pressure must be at a pressure of 10" of water column when used with LP gas. In Canada, the connector must remain in Massachusetts installations is 3'). Remove cover plate from interior back wall by removing single screw on right side down. Remove the hexagon cap from the top of water...
..., the inlet pressure must be at a pressure of 10" of water column when used with LP gas. In Canada, the connector must remain in Massachusetts installations is 3'). Remove cover plate from interior back wall by removing single screw on right side down. Remove the hexagon cap from the top of water...

Installation Instructions
Page 6
...careful not to natural gas. 4. Place natural gas orifices in the jet holder. For gas range conversions, continue to "Test the Installation" on the orifice with 3" minimum extension into shaft and turn bypass screw clockwise until the orifice stops turning. Remove knobs (pull ...base for burner to remove existing orifices. Replace screws. The orifice is complete. Remove screws to remove the natural gas orifice and install the separate LP gas orifice provided. Remove Natural Gas Cooktop Orifices. Replace Cooktop Orifices 1. Remove Broil Burner Assembly. Use 1/2 ...
...careful not to natural gas. 4. Place natural gas orifices in the jet holder. For gas range conversions, continue to "Test the Installation" on the orifice with 3" minimum extension into shaft and turn bypass screw clockwise until the orifice stops turning. Remove knobs (pull ...base for burner to remove existing orifices. Replace screws. The orifice is complete. Remove screws to remove the natural gas orifice and install the separate LP gas orifice provided. Remove Natural Gas Cooktop Orifices. Replace Cooktop Orifices 1. Remove Broil Burner Assembly. Use 1/2 ...

Installation Instructions
Page 7
... cavity. 1. Broil and Bake may result in damage to the pin inside the orifice. CAUTION: Never check for leaks by the installer according to installation instructions. English 4 Adjust Broil Orifice. 9 CAUTION DO NOT overtighten the broil burner orifice. go in this section. Apply Leak Detection... Fluid Turn on the broil burner fits over the orifice when installed correctly. Retest for leaks with a flame. Test Electric Ignition Turn on power at the breaker and return to the instructions given...
... cavity. 1. Broil and Bake may result in damage to the pin inside the orifice. CAUTION: Never check for leaks by the installer according to installation instructions. English 4 Adjust Broil Orifice. 9 CAUTION DO NOT overtighten the broil burner orifice. go in this section. Apply Leak Detection... Fluid Turn on the broil burner fits over the orifice when installed correctly. Retest for leaks with a flame. Test Electric Ignition Turn on power at the breaker and return to the instructions given...

