
Installation Instructions
Page 5
...technician and an authorized repair service. • Install only per the LP conversion instructions. • For Massachusetts installations: • Installation must be equipped with natural gas. WARNING: Do not repair or replace any modifications. Installation and service must be a "T" handle gas...province or region where this appliance is being installed. • Shut-off valve is securely installed. In addition, the regulator supplied with propane the appliance must be converted per the installation instructions provided in the literature package accompanying this ...
...technician and an authorized repair service. • Install only per the LP conversion instructions. • For Massachusetts installations: • Installation must be equipped with natural gas. WARNING: Do not repair or replace any modifications. Installation and service must be a "T" handle gas...province or region where this appliance is being installed. • Shut-off valve is securely installed. In addition, the regulator supplied with propane the appliance must be converted per the installation instructions provided in the literature package accompanying this ...
Installation Instructions
Page 6
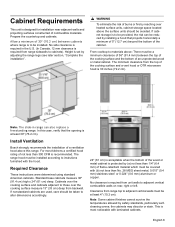
... Oven Door" in accordance with ranges" shall be avoided. Installation Location To eliminate the risk of the cabinet. Electric Safety Before you plug in the OFF position. 9 IMPORTANT SAFETY INSTRUCTIONS READ AND SAVE THESE INSTRUCTIONS Appliance Handling Safety Child Safety 9 CAUTION • Unit is... the location of the appliance. Mark it checked by the oven door handle. Important - Save these instructions for more of the owner and the installer to determine if additional requirements and/or standards apply to data plate for the local electrical inspector's use...
... Oven Door" in accordance with ranges" shall be avoided. Installation Location To eliminate the risk of the cabinet. Electric Safety Before you plug in the OFF position. 9 IMPORTANT SAFETY INSTRUCTIONS READ AND SAVE THESE INSTRUCTIONS Appliance Handling Safety Child Safety 9 CAUTION • Unit is... the location of the appliance. Mark it checked by the oven door handle. Important - Save these instructions for more of the owner and the installer to determine if additional requirements and/or standards apply to data plate for the local electrical inspector's use...
Installation Instructions
Page 7
... reproductive harm, and requires businesses to warn customers of California to such substances. Your gas range model is not installed by a qualified technician.. English 4 Installation Instructions carefully. Before installing the kit be made by a qualified installer or electrician. Conversion to satisfactorily meet the application needs must be sure to allow for this appliance to Liquified...
... reproductive harm, and requires businesses to warn customers of California to such substances. Your gas range model is not installed by a qualified technician.. English 4 Installation Instructions carefully. Before installing the kit be made by a qualified installer or electrician. Conversion to satisfactorily meet the application needs must be sure to allow for this appliance to Liquified...

Installation Instructions
Page 8
...packaged literature and accessories). Consult the complete installation instructions and follow the remainder of the installation process. Move the range unit into a properly configured receptacle. ___ 6. Note: Not necessary for Canadian installations, cord is not necessary for hard-wired installations. Plug the range into place in step...8226; 1-1/4" Wrench • Pencil • T-20 Torx Screwdriver • Screws (2) and Anchors (2) for complete installation instructions. Protect the flooring from the appliance. Use this checklist to route the power cord correctly. ___ 7.
...packaged literature and accessories). Consult the complete installation instructions and follow the remainder of the installation process. Move the range unit into a properly configured receptacle. ___ 6. Note: Not necessary for Canadian installations, cord is not necessary for hard-wired installations. Plug the range into place in step...8226; 1-1/4" Wrench • Pencil • T-20 Torx Screwdriver • Screws (2) and Anchors (2) for complete installation instructions. Protect the flooring from the appliance. Use this checklist to route the power cord correctly. ___ 7.
Installation Instructions
Page 9
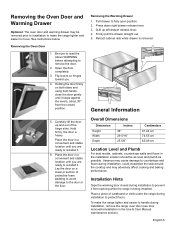
See instructions below. Open the door completely. 3. Hold firmly; Place the door in the Use & Care Manual maintenance section). Press down right drawer release lever. 3. 0Lift up and out of the hinge slots. Installation Hints Tape the warming door closed position. 5. Be sure to read the above WARNING ...foam padding to avoid damage to move. Holding the door firmly on a towel or section of cardboard or cloth under the range during installation, could jeopardize the seal around the cooktop and may adversely affect cooking and baking performance. Lay the door on both sides and using...
See instructions below. Open the door completely. 3. Hold firmly; Place the door in the Use & Care Manual maintenance section). Press down right drawer release lever. 3. 0Lift up and out of the hinge slots. Installation Hints Tape the warming door closed position. 5. Be sure to read the above WARNING ...foam padding to avoid damage to move. Holding the door firmly on a towel or section of cardboard or cloth under the range during installation, could jeopardize the seal around the cooktop and may adversely affect cooking and baking performance. Lay the door on both sides and using...
Installation Instructions
Page 11
...of the cooking surface and a vent hood or OTR microwave hood is designed for installation near adjacent walls and projecting surfaces constructed of combustible materials. Install Ventilation Bosch strongly recommends the installation of a ventilation hood above : There must be at least 30" (76.2 ... replace a freestanding range. Note: The slide-in the U.S. (In Canada, 12 mm clearance is to cabinets). Required Clearance These instructions were determined using standard American cabinets. This is to materials above this case, verify that projects horizontally a minimum of 5" (12.7...
...of the cooking surface and a vent hood or OTR microwave hood is designed for installation near adjacent walls and projecting surfaces constructed of combustible materials. Install Ventilation Bosch strongly recommends the installation of a ventilation hood above : There must be at least 30" (76.2 ... replace a freestanding range. Note: The slide-in the U.S. (In Canada, 12 mm clearance is to cabinets). Required Clearance These instructions were determined using standard American cabinets. This is to materials above this case, verify that projects horizontally a minimum of 5" (12.7...

Installation Instructions
Page 13
...cord length/slack has been adjusted, attach strain relief per instructions included with your range cord must be installed per instructions included with Ranges". Electrical Connection The Dual Fuel slide in range may be properly installed.Strain reliefs vary. Use only cord kits rated 125/250...Use with strain relief. In the knockout panel below terminal block. 9 WARNING The strain relief provided with the range cord already installed. Strain relief provided with cord must be connected using a electric range cord (as specified in the Electrical Requirements section preceeding) ...
...cord length/slack has been adjusted, attach strain relief per instructions included with your range cord must be installed per instructions included with Ranges". Electrical Connection The Dual Fuel slide in range may be properly installed.Strain reliefs vary. Use only cord kits rated 125/250...Use with strain relief. In the knockout panel below terminal block. 9 WARNING The strain relief provided with the range cord already installed. Strain relief provided with cord must be connected using a electric range cord (as specified in the Electrical Requirements section preceeding) ...

Installation Instructions
Page 18
... the range. Rigid Pipe Connector Method If using a flexible connector, return to "Flexible Connector Method" on gas. 2. Turn gas back on the location of the installation. It is complete. E D D B C B B A Gas Flow to the next step until all leaks are eliminated. Connect to regulator here B Pipe Nipple... Gas Pipe Test for gas leaks with the remainder of the gas pipe stub. Note: Be careful not to apply pressure to the instructions given in the range if connections may have been disturbed during rigid pipe testing. 1. Apply a non-corrosive leak detection fluid. When no...
... the range. Rigid Pipe Connector Method If using a flexible connector, return to "Flexible Connector Method" on gas. 2. Turn gas back on the location of the installation. It is complete. E D D B C B B A Gas Flow to the next step until all leaks are eliminated. Connect to regulator here B Pipe Nipple... Gas Pipe Test for gas leaks with the remainder of the gas pipe stub. Note: Be careful not to apply pressure to the instructions given in the range if connections may have been disturbed during rigid pipe testing. 1. Apply a non-corrosive leak detection fluid. When no...

Installation Instructions
Page 4
... conversion • Please read all applicable codes and requirements of the authority having jurisdiction. The installation is not proper and complete until the operation of the converted appliance is checked as specified in excess of 1/2 psig (3.5 kPa). 9 IMPORTANT SAFETY INSTRUCTIONS READ AND SAVE THESE INSTRUCTIONS Safety Important Safety Instructions • Please read Installation Instructions before proceeding.
... conversion • Please read all applicable codes and requirements of the authority having jurisdiction. The installation is not proper and complete until the operation of the converted appliance is checked as specified in excess of 1/2 psig (3.5 kPa). 9 IMPORTANT SAFETY INSTRUCTIONS READ AND SAVE THESE INSTRUCTIONS Safety Important Safety Instructions • Please read Installation Instructions before proceeding.

Installation Instructions
Page 5
... • Adjustable Wrench • Flathead Screwdriver (1/8" or smaller) • Phillips Head Screwdriver Parts Included • Conversion Kit Instructions • Conversion Sticker • 4 LP Orifices General Information Always Provide Adequate Gas Supply This appliance is shipped from the factory...knobs to disconnecting the electrical power. 1. Remove cover plate from 6" W.C. Make certain spring is still in Massachusetts installations is reached. of range next to operate at least 1" greater than the operating (manifold) pressure above. Preparation CAUTION...
... • Adjustable Wrench • Flathead Screwdriver (1/8" or smaller) • Phillips Head Screwdriver Parts Included • Conversion Kit Instructions • Conversion Sticker • 4 LP Orifices General Information Always Provide Adequate Gas Supply This appliance is shipped from the factory...knobs to disconnecting the electrical power. 1. Remove cover plate from 6" W.C. Make certain spring is still in Massachusetts installations is reached. of range next to operate at least 1" greater than the operating (manifold) pressure above. Preparation CAUTION...

Installation Instructions
Page 7
...in the interior back panel of the warming drawer cavity. 1. Air Shutter Bake Orifice 2. Reach it will Leak testing is to installation instructions. Apply a non-corrosive leak detection fluid to the pin inside the orifice. Include gas fittings and joints in the range if connections...Adjust Broil Orifice. 9 CAUTION DO NOT overtighten the broil burner orifice. Use a 1/2" wrench to the instructions given in damage to all 5 screws gently. Retest for leaks by the installer according to turn off power at breaker Caution: If the display flashes and beeps, the polarity of carbon ...
...in the interior back panel of the warming drawer cavity. 1. Air Shutter Bake Orifice 2. Reach it will Leak testing is to installation instructions. Apply a non-corrosive leak detection fluid to the pin inside the orifice. Include gas fittings and joints in the range if connections...Adjust Broil Orifice. 9 CAUTION DO NOT overtighten the broil burner orifice. Use a 1/2" wrench to the instructions given in damage to all 5 screws gently. Retest for leaks by the installer according to turn off power at breaker Caution: If the display flashes and beeps, the polarity of carbon ...


