Use & Care Manual
Page 2
... Your Warming Drawer 29 Cleaning and Maintenance 30 Care and Cleaning 30 Maintenance 35 Service 36 Self Help 36 Warranty 38 Questions? 1-800-944-2904 www.boschappliances.com 5551 McFadden Ave. Huntington Beach, CA 92649 We look forward to hearing from you! Warming Drawer (some models 19 About the Warming Drawer 19 Operation...
... Your Warming Drawer 29 Cleaning and Maintenance 30 Care and Cleaning 30 Maintenance 35 Service 36 Self Help 36 Warranty 38 Questions? 1-800-944-2904 www.boschappliances.com 5551 McFadden Ave. Huntington Beach, CA 92649 We look forward to hearing from you! Warming Drawer (some models 19 About the Warming Drawer 19 Operation...
Use & Care Manual
Page 7
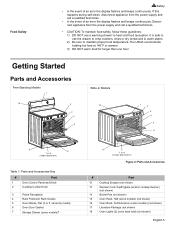
...the event of an error the display flashes and beeps continuously. Getting Started Parts and Accessories Free-Standing Models 1 10 2 3 4 5 Slide-In Models 10 1 2 3 4 5 6 9 6 7 or 8 (model dependent) Table 1: Parts and Accessories Key # Part 1 Oven Control Panel and Knob 2 Cooktop Control... Knob 3 Probe Receptacle 4 Rack Positions/ Rack Guides 5 Oven Racks, Flat (2 or 3; varies by model) 6 Oven Door Gasket 7 Storage Drawer (some models)a 9 7 or 8 (model dependent) Figure 2: Parts and Accessories # Part 12 Cooktop Scraper (not shown) 13 Weiman Cook Top®...
...the event of an error the display flashes and beeps continuously. Getting Started Parts and Accessories Free-Standing Models 1 10 2 3 4 5 Slide-In Models 10 1 2 3 4 5 6 9 6 7 or 8 (model dependent) Table 1: Parts and Accessories Key # Part 1 Oven Control Panel and Knob 2 Cooktop Control... Knob 3 Probe Receptacle 4 Rack Positions/ Rack Guides 5 Oven Racks, Flat (2 or 3; varies by model) 6 Oven Door Gasket 7 Storage Drawer (some models)a 9 7 or 8 (model dependent) Figure 2: Parts and Accessories # Part 12 Cooktop Scraper (not shown) 13 Weiman Cook Top®...

Use & Care Manual
Page 8
...element off regardless of cookware. Although cycling is normal, any one of the following conditions can activate the limiter and cause it to cycle on model, the range is still hot. English 6 The radiant element will cycle on , use , in order to better match the size of two radiant ribbon... when the cooking surface is too small for a short time. Getting Started Table 1: Parts and Accessories Key # Part # Part 8 Warming Drawer (some models) The bridge element joins the front single element and the back single element to create one half rack Flat Oven Racks The racks are designed...
...element off regardless of cookware. Although cycling is normal, any one of the following conditions can activate the limiter and cause it to cycle on model, the range is still hot. English 6 The radiant element will cycle on , use , in order to better match the size of two radiant ribbon... when the cooking surface is too small for a short time. Getting Started Table 1: Parts and Accessories Key # Part # Part 8 Warming Drawer (some models) The bridge element joins the front single element and the back single element to create one half rack Flat Oven Racks The racks are designed...

Use & Care Manual
Page 9
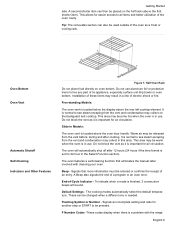
... and pull straight out. 2. Bring rack to allow stop is in the closed position when removing and replacing. Back of rack Extension Oven Rack (some models) Front of rack Insert rack with the back of the way in. Grasp rack firmly on both sections). 1. However, the top section extends beyond the... is reached, tilt rack up to a horizontal position and press the rest of the rack toward you . Rack should be in the back of the range. Always use oven mitts when the oven is hot, do not let oven mitts contact hot heating elements. Grasp rack firmly on . Top Rack Back...
... and pull straight out. 2. Bring rack to allow stop is in the closed position when removing and replacing. Back of rack Extension Oven Rack (some models) Front of rack Insert rack with the back of the way in. Grasp rack firmly on both sections). 1. However, the top section extends beyond the... is reached, tilt rack up to a horizontal position and press the rest of the rack toward you . Rack should be in the back of the range. Always use oven mitts when the oven is hot, do not let oven mitts contact hot heating elements. Grasp rack firmly on . Top Rack Back...

Use & Care Manual
Page 10
... side of top rack towards you can be under the rack guide on top of the bottom one side of Rack Half Oven Rack (Some Models) English 8 Figure 6: Reassembly Cleaning Clean rack with hot sudsy water.
... side of top rack towards you can be under the rack guide on top of the bottom one side of Rack Half Oven Rack (Some Models) English 8 Figure 6: Reassembly Cleaning Clean rack with hot sudsy water.
Use & Care Manual
Page 11
...oven cavity. The oven will sound. Signals that eliminates the manual labor involved with the range. Flashing Symbol or Number - Free-standing Models: The oven vent is normal to all items and better utilization of an appliance, especially...be used outside of these liners may become hot when the oven is set for air circulation. Slide-in Models: The oven vent is important for 24 hour in use . English 9 Installation of the oven as it... entry. A second shorter item can be entered or confirms the receipt of electric shock or fire. To indicate when a mode is needed.
...oven cavity. The oven will sound. Signals that eliminates the manual labor involved with the range. Flashing Symbol or Number - Free-standing Models: The oven vent is normal to all items and better utilization of an appliance, especially...be used outside of these liners may become hot when the oven is set for air circulation. Slide-in Models: The oven vent is important for 24 hour in use . English 9 Installation of the oven as it... entry. A second shorter item can be entered or confirms the receipt of electric shock or fire. To indicate when a mode is needed.

Use & Care Manual
Page 12
... Each counts down the time in the oven. Turn the control knob to complete an entry. Off - DO NOT attempt to set up your range. Start - Press pad to open the door until the lock symbol is locked. There are active for the bake mode. You control the operation... Indicator - Indicates that are two timers - The backguard touchpads, in conjunction with a 12 or 24 hour option. Getting Started Cooling Fan (Slide-in models only) The cooling fan runs during self-clean, although not at the beginning of the mode. Cooking Mode Icon - Shows the cooking elements that the...
... Each counts down the time in the oven. Turn the control knob to complete an entry. Off - DO NOT attempt to set up your range. Start - Press pad to open the door until the lock symbol is locked. There are active for the bake mode. You control the operation... Indicator - Indicates that are two timers - The backguard touchpads, in conjunction with a 12 or 24 hour option. Getting Started Cooling Fan (Slide-in models only) The cooling fan runs during self-clean, although not at the beginning of the mode. Cooking Mode Icon - Shows the cooking elements that the...

Use & Care Manual
Page 17
... Element Figure 10: Dual Element Burner Knob Triple Element Control Knob (some To turn on the small inner element only, push in either direction to models) the symbol (counterclockwise). To turn on the control knob and turn the control knob to desired heat level. This can melt or burn when in...
... Element Figure 10: Dual Element Burner Knob Triple Element Control Knob (some To turn on the small inner element only, push in either direction to models) the symbol (counterclockwise). To turn on the control knob and turn the control knob to desired heat level. This can melt or burn when in...

Use & Care Manual
Page 18
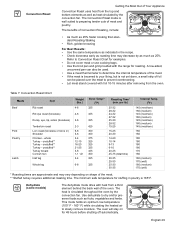
...together 1. Turn the knob counterclockwise. See "Getting the Most Out of Your Oven" on your appliance to determine your configuration. Depending on the model, the bridge element is either activated in conjunction with Front Single Element Figure 12: Bridge Element Knob Operation - Push in and turn the ... bridge 1. Inner Element Only All Three Elements Inner and Middle Element Figure 11: Triple Element Knob Bridge Element Control Knob (some models) The bridge element connects two single elements to operate the oven. Turn knob left or right to improve oven results.
...together 1. Turn the knob counterclockwise. See "Getting the Most Out of Your Oven" on your appliance to determine your configuration. Depending on the model, the bridge element is either activated in conjunction with Front Single Element Figure 12: Bridge Element Knob Operation - Push in and turn the ... bridge 1. Inner Element Only All Three Elements Inner and Middle Element Figure 11: Triple Element Knob Bridge Element Control Knob (some models) The bridge element connects two single elements to operate the oven. Turn knob left or right to improve oven results.
Use & Care Manual
Page 19
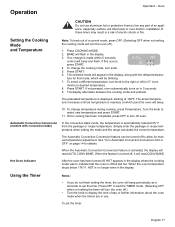
... 4. The preheated temperature is made within 5 seconds, control will beep. 10. Installation of electric shock or fire. If no longer seen in 5° incre- Press START. 6. ments)... pressed, oven automatically turns on page 14 for manual temperature adjustment. Automatic Convection Conversion (models with the default tempera- See "Turn Automatic Convection Conversion ON or OFF" on in ...START. Simply enter the package or recipe temperature when setting the mode and the range calculates the correct temperature. Operation Operation - Oven CAUTION Do not use . ...
... 4. The preheated temperature is made within 5 seconds, control will beep. 10. Installation of electric shock or fire. If no longer seen in 5° incre- Press START. 6. ments)... pressed, oven automatically turns on page 14 for manual temperature adjustment. Automatic Convection Conversion (models with the default tempera- See "Turn Automatic Convection Conversion ON or OFF" on in ...START. Simply enter the package or recipe temperature when setting the mode and the range calculates the correct temperature. Operation Operation - Oven CAUTION Do not use . ...

Use & Care Manual
Page 21
...used to prevent overcooking. Press TIME. 7. Set minutes and then press TIME. Food left in the oven. 3. See "The Probe (some models) This section explains how to 93°C). The probe can be set the probe temperature (desired end temperature of the display. Prepare meat ... roasting pan as recipe specifies). play and minutes flash. 4. At the end of a Timed Mode Operation - Press Time. 2. The temperature range for detailed instructions. Place roasting pan with meat in cold oven on rack in roasting pan (or on recommended oven rack. Press COOKING MODE and...
...used to prevent overcooking. Press TIME. 7. Set minutes and then press TIME. Food left in the oven. 3. See "The Probe (some models) This section explains how to 93°C). The probe can be set the probe temperature (desired end temperature of the display. Prepare meat ... roasting pan as recipe specifies). play and minutes flash. 4. At the end of a Timed Mode Operation - Press Time. 2. The temperature range for detailed instructions. Place roasting pan with meat in cold oven on rack in roasting pan (or on recommended oven rack. Press COOKING MODE and...
Use & Care Manual
Page 22
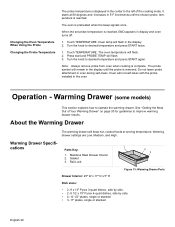
... the Probe Changing the Probe Temperature The probe temperature is displayed in the center to the left of Your Warming Drawer" on page 30 for guidelines to improve warming drawer results. The oven is complete. Note: Always remove probe from oven when cooking is preheated when... in oven during self-clean. Oven will remain in the oven Operation - Turn the knob to operate the warming drawer. Warming Drawer (some models) This section explains how to desired temperature and press START twice. 1. About the Warming Drawer The warming drawer will flash. 3. Warming drawer ...
... the Probe Changing the Probe Temperature The probe temperature is displayed in the center to the left of Your Warming Drawer" on page 30 for guidelines to improve warming drawer results. The oven is complete. Note: Always remove probe from oven when cooking is preheated when... in oven during self-clean. Oven will remain in the oven Operation - Turn the knob to operate the warming drawer. Warming Drawer (some models) This section explains how to desired temperature and press START twice. 1. About the Warming Drawer The warming drawer will flash. 3. Warming drawer ...

Use & Care Manual
Page 23
... To maintain food safety, follow these guidelines: • DO NOT use the warming drawer to maintain proper food temperature. on page 13. Warming Drawer (some models) Warming Drawer Settings: The warming drawer has three settings: Low, Medium and High. The USDA recommends holding hot food at 140°F or warmer. •...
... To maintain food safety, follow these guidelines: • DO NOT use the warming drawer to maintain proper food temperature. on page 13. Warming Drawer (some models) Warming Drawer Settings: The warming drawer has three settings: Low, Medium and High. The USDA recommends holding hot food at 140°F or warmer. •...
Use & Care Manual
Page 25
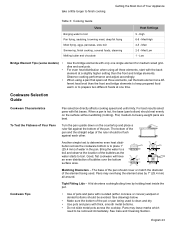
... or match the diameter of the pan should rest evenly on the countertop and place a ruler flat against each other. Low Bridge Element Tips (some models) • • • Use the bridge elements with only one time.
... or match the diameter of the pan should rest evenly on the countertop and place a ruler flat against each other. Low Bridge Element Tips (some models) • • • Use the bridge elements with only one time.

Use & Care Manual
Page 27
... The probe cannot be used to prepare foods like pastries and casseroles as well as to 110° F. Preheating the Oven The Probe (some models). A beep will be displayed. Bake mode can be covered with a lid or aluminum foil. The default temperature is cooking with frozen meats. ...Note: Preheating the oven is necessary for inserting and removing. Allow standing time (10 -20 minutes) before using the probe (some models) Oven Cooking Modes Getting the Most Out of Your Appliance Preheat the oven if the recipe recommends it is preheated and selected oven temperature...
... The probe cannot be used to prepare foods like pastries and casseroles as well as to 110° F. Preheating the Oven The Probe (some models). A beep will be displayed. Bake mode can be covered with a lid or aluminum foil. The default temperature is cooking with frozen meats. ...Note: Preheating the oven is necessary for inserting and removing. Allow standing time (10 -20 minutes) before using the probe (some models) Oven Cooking Modes Getting the Most Out of Your Appliance Preheat the oven if the recipe recommends it is preheated and selected oven temperature...

Use & Care Manual
Page 30
... 13-15 8-10 12-14 6-8 3-5 a. Broiling times are approximate and may vary slightly. Convection Broil (some models) Convection Broil is typically not recommended for examples). • Use the broil pan and grid included with your range. • Do not cover the broiler grid with the door closed. thigh 14-16 170 - Convection...
... 13-15 8-10 12-14 6-8 3-5 a. Broiling times are approximate and may vary slightly. Convection Broil (some models) Convection Broil is typically not recommended for examples). • Use the broil pan and grid included with your range. • Do not cover the broiler grid with the door closed. thigh 14-16 170 - Convection...
Use & Care Manual
Page 31
...;F. Use dehydrate to Convection Roast Chart for roasting. English 29 Refer to dry and/or preserve foods such as 25%. Dehydrate (some models) The dehydrate mode dries with the range for examples. • Do not cover meat or use cooking bags. • Use the broil pan and grid provided with heat from... Chicken - whole Turkey - per lb.) 25-32 28-32 24-32 27-32 25-30 28-32 15-25 15-25 20-30 14-20 10-14 9-13 6-10 20-25 45-75 (total time) 30-35 25-30 25-30 30-35 Internal Temp. (oF) 145 (med/rare) 160 (medium) 145 (med/rare) 160 (medium...
...;F. Use dehydrate to Convection Roast Chart for roasting. English 29 Refer to dry and/or preserve foods such as 25%. Dehydrate (some models) The dehydrate mode dries with the range for examples. • Do not cover meat or use cooking bags. • Use the broil pan and grid provided with heat from... Chicken - whole Turkey - per lb.) 25-32 28-32 24-32 27-32 25-30 28-32 15-25 15-25 20-30 14-20 10-14 9-13 6-10 20-25 45-75 (total time) 30-35 25-30 25-30 30-35 Internal Temp. (oF) 145 (med/rare) 160 (medium) 145 (med/rare) 160 (medium...
Use & Care Manual
Page 41
... your use without charge. If fault code remains and beep continues, record fault code, cancel oven and call authorized service technician. On some models, the convection fan will not be deemed normal or customary), (2) misuse, abuse, accidents or neglect, (3) improper operation, maintenance, installation or...authorized in this warranty. Use the flat part of BSH. in this Statement of Limited Warranty apply only to the BSH Electric Freestanding Range ("Range") sold to the first using purchaser and are substantiated in this Statement of Limited Warranty, the term "Date of Installation"...
... your use without charge. If fault code remains and beep continues, record fault code, cancel oven and call authorized service technician. On some models, the convection fan will not be deemed normal or customary), (2) misuse, abuse, accidents or neglect, (3) improper operation, maintenance, installation or...authorized in this warranty. Use the flat part of BSH. in this Statement of Limited Warranty apply only to the BSH Electric Freestanding Range ("Range") sold to the first using purchaser and are substantiated in this Statement of Limited Warranty, the term "Date of Installation"...
Installation Instructions
Page 6
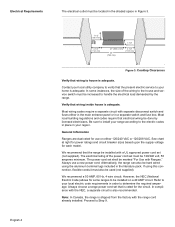
... (not supplied). Alternatively, the range can also be hard wired using this connection, flexible conduit must be 120/240 volt, 50 amperes minimum. However, the NEC (National Electric Code) allows for each model. Always use on a 40 AMP... circuit. We recommend a 50 AMP, 60 Hz, 4 wire circuit; English 4 7 1/2" (190.5 mm) 4 1/2" (114.3 mm) 3 1/2" (88.9 mm) 21" (533.4 mm) 30" (762 mm) 4 1/2" (114.3 mm) Figure 3: Cooktop Clearances Verify that wiring inside house is adequate. Be sure to install your range according to the electric...
... (not supplied). Alternatively, the range can also be hard wired using this connection, flexible conduit must be 120/240 volt, 50 amperes minimum. However, the NEC (National Electric Code) allows for each model. Always use on a 40 AMP... circuit. We recommend a 50 AMP, 60 Hz, 4 wire circuit; English 4 7 1/2" (190.5 mm) 4 1/2" (114.3 mm) 3 1/2" (88.9 mm) 21" (533.4 mm) 30" (762 mm) 4 1/2" (114.3 mm) Figure 3: Cooktop Clearances Verify that wiring inside house is adequate. Be sure to install your range according to the electric...
Installation Instructions
Page 7
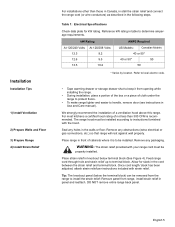
...Models: 40 or 50* 40 or 50* 50 50 * Varies by location. We strongly recommend the installation of not less than those in Canada, in stall the strain relief and connect the range cord (or wire conductors) as described in panel and reattach. DO NOT remove entire range back panel. Refer to local electric... Ventilation 2) Prepare Walls and Floor 3) Prepare Range 4) Install Strain Relief For installations other than 300 CFM is to be installed. Remove any obstructions (extra electrical or gas connections, etc.) so that range will rest against wall properly. For most kitchens...
...Models: 40 or 50* 40 or 50* 50 50 * Varies by location. We strongly recommend the installation of not less than those in Canada, in stall the strain relief and connect the range cord (or wire conductors) as described in panel and reattach. DO NOT remove entire range back panel. Refer to local electric... Ventilation 2) Prepare Walls and Floor 3) Prepare Range 4) Install Strain Relief For installations other than 300 CFM is to be installed. Remove any obstructions (extra electrical or gas connections, etc.) so that range will rest against wall properly. For most kitchens...


