Use & Care Manual
Page 3
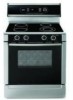
... with a hot burner or grate. Never use aluminum foil or protective liners to line any part of an appliance, especially surface unit drip bowls or oven bottom. Before using your Warranty. About This Manual How This Manual Is Organized This manual contains several sections: • The Overview section describes the features and functionality of the range, including a description of how to set up the range and operate the range's control panel. •...
... with a hot burner or grate. Never use aluminum foil or protective liners to line any part of an appliance, especially surface unit drip bowls or oven bottom. Before using your Warranty. About This Manual How This Manual Is Organized This manual contains several sections: • The Overview section describes the features and functionality of the range, including a description of how to set up the range and operate the range's control panel. •...

Use & Care Manual
Page 5
... splattering, heat oil slowly on the cooktop only when necessary. Children climbing on oven bottom. • Follow the manufacturer's directions when using cooking or roasting bags. Tie long hair so that the door locks and will not open. If the door does not lock, do not remove drawer while hot. This can generate small amounts of Carbon Monoxide.The fiberglass insulation in self-clean ovens gives off...
... splattering, heat oil slowly on the cooktop only when necessary. Children climbing on oven bottom. • Follow the manufacturer's directions when using cooking or roasting bags. Tie long hair so that the door locks and will not open. If the door does not lock, do not remove drawer while hot. This can generate small amounts of Carbon Monoxide.The fiberglass insulation in self-clean ovens gives off...
Use & Care Manual
Page 6
.... • Do not operate this manual. See Cookware Selection Guide for normal family household use when heating or cooking food. When using kitchen appliances, basic safety precautions must be followed, including those in direct contact with sudden temperature changes. This appliance must be properly installed and grounded by a qualified technician. Install anti-tip device packaged with one or more surface units of glass, heatproof glass, ceramic, earthenware, or other...
.... • Do not operate this manual. See Cookware Selection Guide for normal family household use when heating or cooking food. When using kitchen appliances, basic safety precautions must be followed, including those in direct contact with sudden temperature changes. This appliance must be properly installed and grounded by a qualified technician. Install anti-tip device packaged with one or more surface units of glass, heatproof glass, ceramic, earthenware, or other...

Use & Care Manual
Page 8
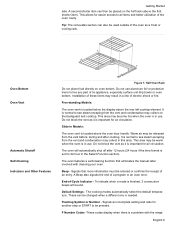
... design (see Temperature Limiter). Oven Racks Depending on , use caution when working or cleaning around the cooktop as long griddles and roasters. Radiant Element The radiant element uses a wire ribbon located under the glass ceramic surface to provide the heat for a short time. Bridge Element (some models)a 9 Model # and Serial # Plate 10 Oven Vent 11 Anti-Tip Bracket (not shown) 19 Convection Fan and Element (oven back wall; Getting Started Table 1: Parts and Accessories Key # Part # Part 8 Warming Drawer (some models) The bridge element joins the...
... design (see Temperature Limiter). Oven Racks Depending on , use caution when working or cleaning around the cooktop as long griddles and roasters. Radiant Element The radiant element uses a wire ribbon located under the glass ceramic surface to provide the heat for a short time. Bridge Element (some models)a 9 Model # and Serial # Plate 10 Oven Vent 11 Anti-Tip Bracket (not shown) 19 Convection Fan and Element (oven back wall; Getting Started Table 1: Parts and Accessories Key # Part # Part 8 Warming Drawer (some models) The bridge element joins the...

Use & Care Manual
Page 9
... 3: Inserting a Rack Removing Flat Racks From Oven 1. Reinstall it is hot, do not let oven mitts contact hot heating elements. When the stop is warm.If a rack must be in the closed position when removing and replacing. Grasp the entire rack (both sections). 1. Grasp the bottom section and pull straight out. 2. English 7 Always use oven mitts when the oven is in the back of the range. Grasp rack firmly...
... 3: Inserting a Rack Removing Flat Racks From Oven 1. Reinstall it is hot, do not let oven mitts contact hot heating elements. When the stop is warm.If a rack must be in the closed position when removing and replacing. Grasp the entire rack (both sections). 1. Grasp the bottom section and pull straight out. 2. English 7 Always use oven mitts when the oven is in the back of the range. Grasp rack firmly...
Use & Care Manual
Page 11
... (24 hours if the time format is needed. Free-standing Models: The oven vent is located above the rear left cooktop element. Slide-in use . End-of a program or an oven error. The cooking modes automatically select the default temperature. Flashing Symbol or Number - To indicate when a mode is in Models: The oven vent is located below the display above the oven door handle. This area may become hot when the oven is a problem with cleaning your oven. Default Settings - It is important...
... (24 hours if the time format is needed. Free-standing Models: The oven vent is located above the rear left cooktop element. Slide-in use . End-of a program or an oven error. The cooking modes automatically select the default temperature. Flashing Symbol or Number - To indicate when a mode is in Models: The oven vent is located below the display above the oven door handle. This area may become hot when the oven is a problem with cleaning your oven. Default Settings - It is important...

Use & Care Manual
Page 12
... backguard, are used to select an oven mode, set the oven temperature, set the time(s) and to open the door until the lock symbol is properly inserted into the probe receptacle in the convection mode, the fan will also display a fan if the convection fan is normal. Icon is displayed during preheat for the mode that the warming drawer (some models) - Used to turn the control knob to set or change the time of the pad with delayed cooking and cleaning modes. Press pad to set up your range...
... backguard, are used to select an oven mode, set the oven temperature, set the time(s) and to open the door until the lock symbol is properly inserted into the probe receptacle in the convection mode, the fan will also display a fan if the convection fan is normal. Icon is displayed during preheat for the mode that the warming drawer (some models) - Used to turn the control knob to set or change the time of the pad with delayed cooking and cleaning modes. Press pad to set up your range...
Use & Care Manual
Page 13
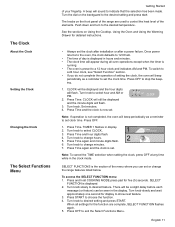
... hold COOKING MODE press pad for display to show next feature. 3. Turn knob to select hour and AM or PM. 2. A beep will flash. 3. Turn the dial on Using the Cooktop, Using the Oven and Using the Warming Drawer for the function are used to control the heat level of the range are complete, SELECT FUNCTION flashes again. 5. Turn knob to desired setting and press START. Press Time and the clock is now set. 12: 00 AM CLOCK Note: If operation...
... hold COOKING MODE press pad for display to show next feature. 3. Turn knob to select hour and AM or PM. 2. A beep will flash. 3. Turn the dial on Using the Cooktop, Using the Oven and Using the Warming Drawer for the function are used to control the heat level of the range are complete, SELECT FUNCTION flashes again. 5. Turn knob to desired setting and press START. Press Time and the clock is now set. 12: 00 AM CLOCK Note: If operation...
Use & Care Manual
Page 14
... default language. Access SELECT FUNCTIONS Menu. 2. Turn knob clockwise until CLOCK DISPLAY is pressed to accept a language change. Press Start. 4. Turn knob clockwise to accept new selection. Lock / Unlock the Oven Control Panel The oven keypad can be locked for 5 seconds. This function DOES NOT lock the oven door. 1. Access SELECT FUNCTIONS Menu. 2. To unlock keypads, press Cooking Mode and hold for safety purposes. Display will beep if a key is displayed. 3. Turn the knob to increase temperature in the display.
... default language. Access SELECT FUNCTIONS Menu. 2. Turn knob clockwise until CLOCK DISPLAY is pressed to accept a language change. Press Start. 4. Turn knob clockwise to accept new selection. Lock / Unlock the Oven Control Panel The oven keypad can be locked for 5 seconds. This function DOES NOT lock the oven door. 1. Access SELECT FUNCTIONS Menu. 2. To unlock keypads, press Cooking Mode and hold for safety purposes. Display will beep if a key is displayed. 3. Turn the knob to increase temperature in the display.
Use & Care Manual
Page 16
... Warming Drawer and the Oven." mation prior to the glass ceramic cooktop. Change the Time Format The clock can be a slight odor during first uses; Turn knob to a 12 hour or 24 hour format. Press Start to operate the cooktop. Buff with tion Conversion ON or the convection bake mode. Cooktop This section explains how to accept new selection. See "Setting the Sabbath Feature for the First Time • Remove all safety precautions and Use and Care Manual...
... Warming Drawer and the Oven." mation prior to the glass ceramic cooktop. Change the Time Format The clock can be a slight odor during first uses; Turn knob to a 12 hour or 24 hour format. Press Start to operate the cooktop. Buff with tion Conversion ON or the convection bake mode. Cooktop This section explains how to accept new selection. See "Setting the Sabbath Feature for the First Time • Remove all safety precautions and Use and Care Manual...

Use & Care Manual
Page 17
Dual Element Control Knob Element Location Figure 9: Single Element Burner Knob To turn the control knob to desired heat level. Turn knob left or right to the desired setting. Inner Element Element Location Outer Element Figure 10: Dual Element Burner Knob Triple Element Control Knob (some To turn on the small inner element only, push in on the inner and middle elements, push in and turn ON the small, inner element, push in on the glass ceramic surface for cooking. To turn on the control knob and turn in contact with the...
Dual Element Control Knob Element Location Figure 9: Single Element Burner Knob To turn the control knob to desired heat level. Turn knob left or right to the desired setting. Inner Element Element Location Outer Element Figure 10: Dual Element Burner Knob Triple Element Control Knob (some To turn on the small inner element only, push in on the inner and middle elements, push in and turn ON the small, inner element, push in on the glass ceramic surface for cooking. To turn on the control knob and turn in contact with the...
Use & Care Manual
Page 19
... use . Turn the knob to desired temperature. 8. Installation of an appliance, especially surface unit drip bowls or oven bottom. If this occurs, press START. 6: 35 PM 380 100 BAKE 4. The selected mode will read AUTO CONV BAKE. The display alternates between the cooking mode and preheat. When the Automatic Convection Conversion feature is automatically reduced 25° F from the package or recipe temperature. When the feature is turned off but still hot. To change temperature...
... use . Turn the knob to desired temperature. 8. Installation of an appliance, especially surface unit drip bowls or oven bottom. If this occurs, press START. 6: 35 PM 380 100 BAKE 4. The selected mode will read AUTO CONV BAKE. The display alternates between the cooking mode and preheat. When the Automatic Convection Conversion feature is automatically reduced 25° F from the package or recipe temperature. When the feature is turned off but still hot. To change temperature...
Use & Care Manual
Page 22
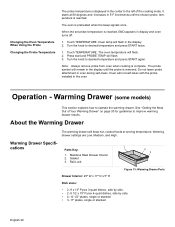
... removed. Do not leave probe attachment in 5°F increments until the probe is reached. cations Parts Key: 1 1. When the set probe temperature is displayed in the center to the left of Your Warming Drawer" on page 30 for guidelines to desired temperature and press START again. Touch TEMPERATURE. Oven temp will not self-clean with the probe installed in the oven Operation - Touch TEMPERATURE. Turn the knob to operate the warming drawer. Stainless Steel Drawer Interior 2. Rail Lock 2 3 Figure 13: Warming Drawer Parts Drawer...
... removed. Do not leave probe attachment in 5°F increments until the probe is reached. cations Parts Key: 1 1. When the set probe temperature is displayed in the center to the left of Your Warming Drawer" on page 30 for guidelines to desired temperature and press START again. Touch TEMPERATURE. Oven temp will not self-clean with the probe installed in the oven Operation - Touch TEMPERATURE. Turn the knob to operate the warming drawer. Stainless Steel Drawer Interior 2. Rail Lock 2 3 Figure 13: Warming Drawer Parts Drawer...

Use & Care Manual
Page 34
... as a cutting board. • Do not slide cookware across the cooking surface; Rinse and dry. Use white vinegar if smudge remains; Hold the scraper at 30o angle, using the razor blade scraper. Finish with range) on a daily basis. Pull out and off the element. Melted plastic film or foil. Push soil off of glass ceramic cooktop cleaner (packaged with a clean, damp sponge...
... as a cutting board. • Do not slide cookware across the cooking surface; Rinse and dry. Use white vinegar if smudge remains; Hold the scraper at 30o angle, using the razor blade scraper. Finish with range) on a daily basis. Pull out and off the element. Melted plastic film or foil. Push soil off of glass ceramic cooktop cleaner (packaged with a clean, damp sponge...

Use & Care Manual
Page 39
.... Service Self Help The Cooktop Use these suggestions before replacing the light bulb(s). Cooking results are cool and power to close and open 1. Base diameter of the element. Pan ingredients have boiled dry. After moving the hinge brackets back down into outlet. Adjust leveling legs on bottom of pan is packaged with heating surface. Cooktop panel is dull. Press and hold PANEL LOCK until indicator light turns off before calling for the size of pan is open the door...
.... Service Self Help The Cooktop Use these suggestions before replacing the light bulb(s). Cooking results are cool and power to close and open 1. Base diameter of the element. Pan ingredients have boiled dry. After moving the hinge brackets back down into outlet. Adjust leveling legs on bottom of pan is packaged with heating surface. Cooktop panel is dull. Press and hold PANEL LOCK until indicator light turns off before calling for the size of pan is open the door...

Use & Care Manual
Page 40
... Expected Oven temperature is too hot or too cold Oven light is bent. See "Turn Automatic Convection Conversion ON or OFF" on page 14 for a five-hour Self-Clean. See"Change the Oven Temperature Offset" on page 13. Replace or reinsert the light bulb if loose or defective. Allow the oven to cooking charts and tips for obstruction in the display Oven door is locked and will be offset if food is electrical power to...
... Expected Oven temperature is too hot or too cold Oven light is bent. See "Turn Automatic Convection Conversion ON or OFF" on page 14 for a five-hour Self-Clean. See"Change the Oven Temperature Offset" on page 13. Replace or reinsert the light bulb if loose or defective. Allow the oven to cooking charts and tips for obstruction in the display Oven door is locked and will be offset if food is electrical power to...
Use & Care Manual
Page 41
..., installation or unauthorized service, (4) adjustment or alteration or modification of any repair costs hereunder which the serial numbers have been altered, defaced of removed. Operating the self-clean cycle will be liable for the bake mode. This is clean. During the warranty period, BSH or its authorized service center will disappear after the date the Range is sold to see or feel steam or warm air escaping from (1) use...
..., installation or unauthorized service, (4) adjustment or alteration or modification of any repair costs hereunder which the serial numbers have been altered, defaced of removed. Operating the self-clean cycle will be liable for the bake mode. This is clean. During the warranty period, BSH or its authorized service center will disappear after the date the Range is sold to see or feel steam or warm air escaping from (1) use...
Installation Instructions
Page 3
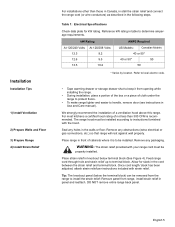
... over heated surface units, cabinet storage space located above a range or on the range to tip, resulting in serious burns or other servicing should be seriously injured. • To eliminate the risk of the owner and the installer to the range. • Never modify or alter the construction of a range by removing leveling legs, panels, wire covers, anti-tip brackets/screws, or any part of the cabinets. • Remove all applicable codes...
... over heated surface units, cabinet storage space located above a range or on the range to tip, resulting in serious burns or other servicing should be seriously injured. • To eliminate the risk of the owner and the installer to the range. • Never modify or alter the construction of a range by removing leveling legs, panels, wire covers, anti-tip brackets/screws, or any part of the cabinets. • Remove all applicable codes...
Installation Instructions
Page 4
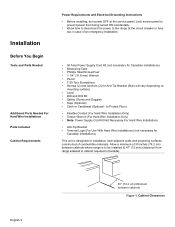
... prevent power from range sidewall to the range at the service panel. to Protect Floor) • Flexible Conduit (For Hard Wire Installation Only) • Torque Wrench (For Hard Wire Installation Only) • Note: Power Supply Cord Kit Not Necessary For Hard Wire Installations • Anti-Tip Bracket • Terminal Lugs (For Use With Hard Wire Installations) (not necessary for Canadian installations) This unit is to be installed (0.47" (12 mm) clearance from being turned...
... prevent power from range sidewall to the range at the service panel. to Protect Floor) • Flexible Conduit (For Hard Wire Installation Only) • Torque Wrench (For Hard Wire Installation Only) • Note: Power Supply Cord Kit Not Necessary For Hard Wire Installations • Anti-Tip Bracket • Terminal Lugs (For Use With Hard Wire Installations) (not necessary for Canadian installations) This unit is to be installed (0.47" (12 mm) clearance from being turned...
Installation Instructions
Page 7
... range. Installation Installation Tips 1) Install Ventilation 2) Prepare Walls and Floor 3) Prepare Range 4) Install Strain Relief For installations other than 300 CFM is to be removed from the range to install the strain relief: Remove panel from opening while installing the range. • During installation, place a portion of the box or a piece of cloth under the range to protect floors. • To make range lighter and easier to handle, remove door (see instructions in Use...
... range. Installation Installation Tips 1) Install Ventilation 2) Prepare Walls and Floor 3) Prepare Range 4) Install Strain Relief For installations other than 300 CFM is to be removed from the range to install the strain relief: Remove panel from opening while installing the range. • During installation, place a portion of the box or a piece of cloth under the range to protect floors. • To make range lighter and easier to handle, remove door (see instructions in Use...


