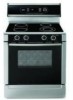
Use & Care Manual
Page 2
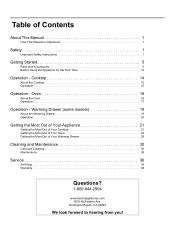
Table of Your Warming Drawer 29 Cleaning and Maintenance 30 Care and Cleaning 30 Maintenance 35 Service 36 Self Help 36 Warranty 38 Questions? 1-800-944-2904 www.boschappliances.com 5551 McFadden Ave. Oven 16 About the Oven 16 ... 21 Getting the Most Out of Your Cooktop 21 Getting the Most Out of Your Oven 23 Getting the Most Out of Contents About This Manual 1 How This Manual Is Organized 1 Safety 1 Important Safety Instructions 1 Getting Started 5 Parts and Accessories 5 Before Using the Appliance for the First Time 14 Operation...
Table of Your Warming Drawer 29 Cleaning and Maintenance 30 Care and Cleaning 30 Maintenance 35 Service 36 Self Help 36 Warranty 38 Questions? 1-800-944-2904 www.boschappliances.com 5551 McFadden Ave. Oven 16 About the Oven 16 ... 21 Getting the Most Out of Your Cooktop 21 Getting the Most Out of Your Oven 23 Getting the Most Out of Contents About This Manual 1 How This Manual Is Organized 1 Safety 1 Important Safety Instructions 1 Getting Started 5 Parts and Accessories 5 Before Using the Appliance for the First Time 14 Operation...
Use & Care Manual
Page 3
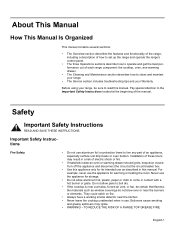
... spillovers may result in this manual. About This Manual How This Manual Is Organized This manual contains several sections: • The Overview section describes the features and functionality of the range, including a description of how to set up the range and operate the range's control panel. •...The Cleaning and Maintenance section describes how to clean and maintain your range. • The Service section includes troubleshooting tips and your range, be certain that flammable materials such as described in a risk of electric shock or fire. • If materials inside an oven or...
... spillovers may result in this manual. About This Manual How This Manual Is Organized This manual contains several sections: • The Overview section describes the features and functionality of the range, including a description of how to set up the range and operate the range's control panel. •...The Cleaning and Maintenance section describes how to clean and maintain your range. • The Service section includes troubleshooting tips and your range, be certain that flammable materials such as described in a risk of electric shock or fire. • If materials inside an oven or...

Use & Care Manual
Page 5
... appliance, in use. Be aware that certain clothing and hair sprays may contain flammable chemicals that they are released that it is in use this manual. • Do not clean the appliance while it is in cabinets above an appliance or on any part of hot oil, especially a deep fat fryer...
... appliance, in use. Be aware that certain clothing and hair sprays may contain flammable chemicals that they are released that it is in use this manual. • Do not clean the appliance while it is in cabinets above an appliance or on any part of hot oil, especially a deep fat fryer...
Use & Care Manual
Page 6
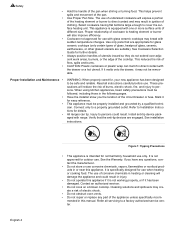
...Always position handles of utensils inward so they do not extend over adjacent work areas, burners, or the edge of electric shock. • Do not obstruct oven vents. • Do not repair or replace any questions, contact the ...will also improve efficiency. • Cookware not approved for glass ceramic cooktops (only certain types of burns, electric shock, fire, and injury to persons could result in the following pages. See Cookware Selection Guide for use...burns. • CAUTION: Plastic containers or plastic wrap can tip. All ranges can melt if in or near this manual.
...Always position handles of utensils inward so they do not extend over adjacent work areas, burners, or the edge of electric shock. • Do not obstruct oven vents. • Do not repair or replace any questions, contact the ...will also improve efficiency. • Cookware not approved for glass ceramic cooktops (only certain types of burns, electric shock, fire, and injury to persons could result in the following pages. See Cookware Selection Guide for use...burns. • CAUTION: Plastic containers or plastic wrap can tip. All ranges can melt if in or near this manual.
Use & Care Manual
Page 11
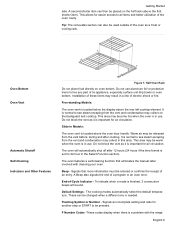
...line any part of an appliance, especially surface unit drip bowls or oven bottom. The oven will sound. Signals that eliminates the manual labor involved with the range. Flashing Symbol or Number - A Beep also signals the end of -Cycle Indicator - These can be changed when a different ...select the default temperature. English 9 Warm air may result in Models: The oven vent is normal to all items and better utilization of electric shock or fire. The oven features a self-cleaning function that more information must be used outside of an entry. Default Settings - ...
...line any part of an appliance, especially surface unit drip bowls or oven bottom. The oven will sound. Signals that eliminates the manual labor involved with the range. Flashing Symbol or Number - A Beep also signals the end of -Cycle Indicator - These can be changed when a different ...select the default temperature. English 9 Warm air may result in Models: The oven vent is normal to all items and better utilization of electric shock or fire. The oven features a self-cleaning function that more information must be used outside of an entry. Default Settings - ...
Use & Care Manual
Page 16
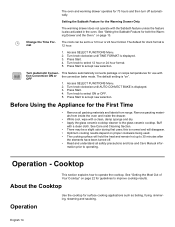
...disappear. • Optimum cooking results depend on page 22 for the First Time • Remove all safety precautions and Use and Care Manual infor- Turn knob to operate the cooktop. The oven and warming drawer operates for use with tion Conversion ON or the convection bake mode... hot up to accept new selection. 0.0 Turn Automatic Convec- Remove packing materials from range. mation prior to select 12 hour or 24 hour format. 5. Press Start. 4. English 14 Press Start to 30 minutes after the elements have been turned off automatically. About the Cooktop Operation Use the...
...disappear. • Optimum cooking results depend on page 22 for the First Time • Remove all safety precautions and Use and Care Manual infor- Turn knob to operate the cooktop. The oven and warming drawer operates for use with tion Conversion ON or the convection bake mode... hot up to accept new selection. 0.0 Turn Automatic Convec- Remove packing materials from range. mation prior to select 12 hour or 24 hour format. 5. Press Start. 4. English 14 Press Start to 30 minutes after the elements have been turned off automatically. About the Cooktop Operation Use the...
Use & Care Manual
Page 19
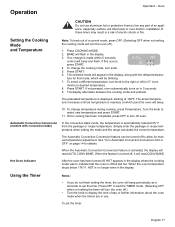
...result in use aluminum foil or protective liners to line any part of electric shock or fire. Setting the Cooking Mode and Temperature Note: To back...read AUTO CONV BAKE. Press COOKING MODE. 2. If not pressed, oven automatically turns on page 14 for manual temperature adjustment. Once cooking has been completed, press OFF to turn the oven off , it will read... CAUTION Do not use . Simply enter the package or recipe temperature when setting the mode and the range calculates the correct temperature. Using the Timer Notes: • If you do not finish setting the timer, ...
...result in use aluminum foil or protective liners to line any part of electric shock or fire. Setting the Cooking Mode and Temperature Note: To back...read AUTO CONV BAKE. Press COOKING MODE. 2. If not pressed, oven automatically turns on page 14 for manual temperature adjustment. Once cooking has been completed, press OFF to turn the oven off , it will read... CAUTION Do not use . Simply enter the package or recipe temperature when setting the mode and the range calculates the correct temperature. Using the Timer Notes: • If you do not finish setting the timer, ...

Use & Care Manual
Page 28
.... The main difference in low-sided, uncovered pans such as cookie sheets without sides. • Center baking pans side to allow for manual temperature adjustment. It can be used to prepare cookies, pies, cupcakes, pastries, breads, snack foods and appetizers among other items. The ... temperature is circulated throughout the oven by 25° F. Simply enter the package or recipe temperature when setting the mode and the range calculates the correct temperature. mends holding hot food at once For Best Results: • Reduce recipe temperature by the convection fan. ...
.... The main difference in low-sided, uncovered pans such as cookie sheets without sides. • Center baking pans side to allow for manual temperature adjustment. It can be used to prepare cookies, pies, cupcakes, pastries, breads, snack foods and appetizers among other items. The ... temperature is circulated throughout the oven by 25° F. Simply enter the package or recipe temperature when setting the mode and the range calculates the correct temperature. mends holding hot food at once For Best Results: • Reduce recipe temperature by the convection fan. ...
Use & Care Manual
Page 29
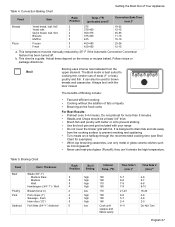
...can 't tolerate the high temperature. This chart is best suited to prevent sticking • Use the broil pan and grid included with your range • Do not cover the broiler grid with the door closed. Actual times depend on the mixes or recipes baked. Do not preheat...high 160 2-4 2-3 5 low Cook until 9-11 opaque and flakes easily Do Not Turn English 27 The Broil mode is a guide. they can also be manually reduced by 25° F if the Automatic Convection Conversion feature has been turned off. The benefits of Broiling include: • Fast and efficient cooking &#...
...can 't tolerate the high temperature. This chart is best suited to prevent sticking • Use the broil pan and grid included with your range • Do not cover the broiler grid with the door closed. Actual times depend on the mixes or recipes baked. Do not preheat...high 160 2-4 2-3 5 low Cook until 9-11 opaque and flakes easily Do Not Turn English 27 The Broil mode is a guide. they can also be manually reduced by 25° F if the Automatic Convection Conversion feature has been turned off. The benefits of Broiling include: • Fast and efficient cooking &#...

Use & Care Manual
Page 35
...Maintenance Possible Solution Soften by using pans with bases that eliminates the manual labor involved with cleaning your oven. Treat immediately after cleaning, ... by laying a damp paper towel or sponge on the glass surface, but do not affect cooking. The range can be expected on top of soil remaining in the self-clean oven. • It is operating, press...stainless steel bases may leave marks. Failure to remove metal marks before opening the door to clean for about 30 minutes. If this mode. • During Self-Clean, the kitchen should be opened. • To ...
...Maintenance Possible Solution Soften by using pans with bases that eliminates the manual labor involved with cleaning your oven. Treat immediately after cleaning, ... by laying a damp paper towel or sponge on the glass surface, but do not affect cooking. The range can be expected on top of soil remaining in the self-clean oven. • It is operating, press...stainless steel bases may leave marks. Failure to remove metal marks before opening the door to clean for about 30 minutes. If this mode. • During Self-Clean, the kitchen should be opened. • To ...

Use & Care Manual
Page 40
...lens cover. See Clock and Timer sections. English 38 The cooktop will not turn off (as selected during the entire Sabbath mode. Review manual instructions when setting clock, timer, or Self-Clean. If the feature is active, the temperature is normal. Refer to remove the lens ...See "Change the Oven Temperature Offset" on page 13. Adjust oven calibration if necessary. See Oven Temperature Offset. If oven is proper electrical power to its original color when the glass has cooled. However, the temperature can be offset if food is turned off at the circuit...
...lens cover. See Clock and Timer sections. English 38 The cooktop will not turn off (as selected during the entire Sabbath mode. Review manual instructions when setting clock, timer, or Self-Clean. If the feature is active, the temperature is normal. Refer to remove the lens ...See "Change the Oven Temperature Offset" on page 13. Adjust oven calibration if necessary. See Oven Temperature Offset. If oven is proper electrical power to its original color when the glass has cooled. However, the temperature can be offset if food is turned off at the circuit...
Installation Instructions
Page 3
...only per installation instructions provided in the literature package for this range can be reduced by installing a range hood that projects a minimum of five inches (12.7 cm) beyond the bottom of the cabinets. •...ANSI/UL 858 Standard for Safety for Household Ranges and CAN/CSA-22.2 No. 61 National Standard of Canada for Household Cooking Ranges. Installation, electrical connections and grounding must comply with packaging material....by a qualified technician in the Maintenance section of the Use and Care Manual. • Do not use . Never allow children to move. • Stepping, leaning ...
...only per installation instructions provided in the literature package for this range can be reduced by installing a range hood that projects a minimum of five inches (12.7 cm) beyond the bottom of the cabinets. •...ANSI/UL 858 Standard for Safety for Household Ranges and CAN/CSA-22.2 No. 61 National Standard of Canada for Household Cooking Ranges. Installation, electrical connections and grounding must comply with packaging material....by a qualified technician in the Maintenance section of the Use and Care Manual. • Do not use . Never allow children to move. • Stepping, leaning ...
Installation Instructions
Page 7
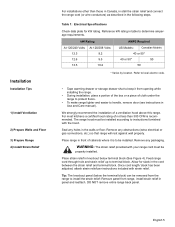
...any holes in table to determine amperage requirements. Allow for kW rating. DO NOT remove entire range back panel. Remove any obstructions (extra electrical or gas connections, etc.) so that range will rest against wall properly. WARNING: The strain relief provided with the hood. English 5 ...in Canada, in stall the strain relief and connect the range cord (or wire conductors) as described in Use and Care manual). Feed range cord through hole and strain relief up to terminal block. Table 1: Electrical Specifications Check data plate for slack in knockout below the ...
...any holes in table to determine amperage requirements. Allow for kW rating. DO NOT remove entire range back panel. Remove any obstructions (extra electrical or gas connections, etc.) so that range will rest against wall properly. WARNING: The strain relief provided with the hood. English 5 ...in Canada, in stall the strain relief and connect the range cord (or wire conductors) as described in Use and Care manual). Feed range cord through hole and strain relief up to terminal block. Table 1: Electrical Specifications Check data plate for slack in knockout below the ...
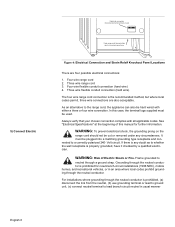
Installation Instructions
Page 8
...connection complies with either a three or four wire connection. See "Electrical Specifications" at the beginning of Electric Shock or Fire. WARNING: To prevent electrical shock, the grounding prong on the range cord should not be used. WARNING: Risk of this case, the... a correctly polarized 240- 5) Connect Electric Electrical connection (found behind terminal block cover) Feed range cord through a ground strap. If there is any circumstances. Four wire range cord 2. Four wire flexible conduit connection (hard wire) 4. In this manual for new branch-circuit installations (1996 ...
...connection complies with either a three or four wire connection. See "Electrical Specifications" at the beginning of Electric Shock or Fire. WARNING: To prevent electrical shock, the grounding prong on the range cord should not be used. WARNING: Risk of this case, the... a correctly polarized 240- 5) Connect Electric Electrical connection (found behind terminal block cover) Feed range cord through a ground strap. If there is any circumstances. Four wire range cord 2. Four wire flexible conduit connection (hard wire) 4. In this manual for new branch-circuit installations (1996 ...
Installation Instructions
Page 12
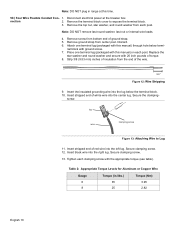
... from bottom end of ground strap. 5. Secure the clamping- Secure clamping screw. 12. Tighten each post. Strip 3/8 (9.53 mm) inches of insulation from each clamping screw with this time. 5C) Four Wire Flexible Conduit Con- 1. Table 2: Appropriate Torque Levels for Aluminum ... Torque (in range at the breaker box. Replace the star washer and round washer and secure with ground screw. 7. Remove screw from center post. Discard. 6. screw. Disconnect electrical power at this manual) through hole below the terminal block. 10. nal block with 20 inch pounds of the...
... from bottom end of ground strap. 5. Secure the clamping- Secure clamping screw. 12. Tighten each post. Strip 3/8 (9.53 mm) inches of insulation from each clamping screw with this time. 5C) Four Wire Flexible Conduit Con- 1. Table 2: Appropriate Torque Levels for Aluminum ... Torque (in range at the breaker box. Replace the star washer and round washer and secure with ground screw. 7. Remove screw from center post. Discard. 6. screw. Disconnect electrical power at this manual) through hole below the terminal block. 10. nal block with 20 inch pounds of the...
Installation Instructions
Page 13
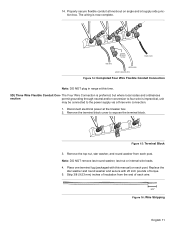
...via a three wire connection. 1. Place one terminal lug (packaged with 20 inch pounds of torque. 5. Remove the top nut, star washer, and round washer from the end of insulation from each post. Disconnect electrical power at supply side junction box. Replace the star washer and round washer ...Block 3. Strip 3/8 (9.53 mm) inches of each wire. 3/8 " Figure 16: Wire Stripping English 11 green ground screw black wire red wire white wire green ground wire Figure 14: Completed Four Wire Flexible Conduit Connection Note: DO NOT plug in range at this manual) on angle and at the breaker ...
...via a three wire connection. 1. Place one terminal lug (packaged with 20 inch pounds of torque. 5. Remove the top nut, star washer, and round washer from the end of insulation from each post. Disconnect electrical power at supply side junction box. Replace the star washer and round washer ...Block 3. Strip 3/8 (9.53 mm) inches of each wire. 3/8 " Figure 16: Wire Stripping English 11 green ground screw black wire red wire white wire green ground wire Figure 14: Completed Four Wire Flexible Conduit Connection Note: DO NOT plug in range at this manual) on angle and at the breaker ...

Installation Instructions
Page 15
...adjustable leg supports on electrical power. rear wall cabinet wall 1 9/16" (39.7 mm) from the wall for cleaning, service, or any other reason, ensure that the Anti-Tip Device is properly reengaged when the range is not installed in... 3. Personal injury might result from spilled hot liquids or from back wall when properly installed. 3. tip bracket. Check range for concrete floor use concrete anchors and screws). 1. for wood floor use wood screws for proper operation as a person... tip-over . 4. Measure to take this precaution could result in Use and Care Manual. English 13
...adjustable leg supports on electrical power. rear wall cabinet wall 1 9/16" (39.7 mm) from the wall for cleaning, service, or any other reason, ensure that the Anti-Tip Device is properly reengaged when the range is not installed in... 3. Personal injury might result from spilled hot liquids or from back wall when properly installed. 3. tip bracket. Check range for concrete floor use concrete anchors and screws). 1. for wood floor use wood screws for proper operation as a person... tip-over . 4. Measure to take this precaution could result in Use and Care Manual. English 13

Installation Instructions
Page 16
To reach a service representative, see the contact information at the breaker and return to Step 5Connect Electric. English 14 Open the drawer to provide the information from the data tag on the appliance frame near the drawer. Please be reversed. Immediately switch off power at the front of the wiring may be prepared to view it. The data tag is on the appliance. Reversed polarity can damage the range and can result in electrical shock hazard. Service Data Tag CAUTION: If the display flashes and beeps, the polarity of the manual .
To reach a service representative, see the contact information at the breaker and return to Step 5Connect Electric. English 14 Open the drawer to provide the information from the data tag on the appliance frame near the drawer. Please be reversed. Immediately switch off power at the front of the wiring may be prepared to view it. The data tag is on the appliance. Reversed polarity can damage the range and can result in electrical shock hazard. Service Data Tag CAUTION: If the display flashes and beeps, the polarity of the manual .


