Use & Care Manual
Page 3
... section describes how to clean and maintain your range. • The Service section includes troubleshooting tips and your range, be certain that flammable materials such as described in use aluminum foil or protective liners to line any part of electric shock or fire. • If materials inside... an oven or warming drawer should ignite, keep door closed. TO REDUCE THE RISK OF A RANGE TOP GREASE FIRE: English 1 Safety Important Safety Instructions READ AND SAVE...
... section describes how to clean and maintain your range. • The Service section includes troubleshooting tips and your range, be certain that flammable materials such as described in use aluminum foil or protective liners to line any part of electric shock or fire. • If materials inside... an oven or warming drawer should ignite, keep door closed. TO REDUCE THE RISK OF A RANGE TOP GREASE FIRE: English 1 Safety Important Safety Instructions READ AND SAVE...

Use & Care Manual
Page 4
... appliance. Do not use water on fan or filter. 4) Use proper pan size. TO REDUCE THE RISK OF INJURY TO PERSONS IN THE EVENT OF A RANGE TOP GREASE FIRE, OBSERVE THE FOLLOWING: 1) SMOTHER FLAMES with your face clear of pressure may become hot enough to the side, open doors unattended. •...
... appliance. Do not use water on fan or filter. 4) Use proper pan size. TO REDUCE THE RISK OF INJURY TO PERSONS IN THE EVENT OF A RANGE TOP GREASE FIRE, OBSERVE THE FOLLOWING: 1) SMOTHER FLAMES with your face clear of pressure may become hot enough to the side, open doors unattended. •...
Use & Care Manual
Page 6
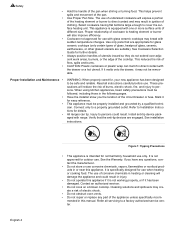
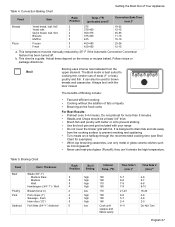
... been damaged. Mark it is not approved for , your new appliance has been designed to a factory authorized service center. All ranges can melt if in this appliance. Verify that are appropriate for easy reference. The use when heating or cooking food. Cleaning solutions...by a qualified technician. Refer to persons. English 4 Figure 1: Tipping Precautions • This appliance is specifically designed for use of burns, electric shock, fire, and injury to Installation Instructions for further details. • Always position handles of utensils inward so they do not extend ...
... been damaged. Mark it is not approved for , your new appliance has been designed to a factory authorized service center. All ranges can melt if in this appliance. Verify that are appropriate for easy reference. The use when heating or cooking food. Cleaning solutions...by a qualified technician. Refer to persons. English 4 Figure 1: Tipping Precautions • This appliance is specifically designed for use of burns, electric shock, fire, and injury to Installation Instructions for further details. • Always position handles of utensils inward so they do not extend ...

Use & Care Manual
Page 8
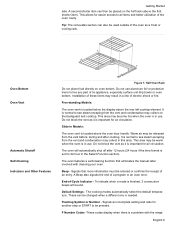
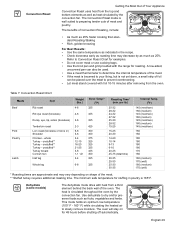
... 10 Oven Vent 11 Anti-Tip Bracket (not shown) 19 Convection Fan and Element (oven back wall; If a hot surface light is on model, the range is still hot. Hot Surface Indicator The cooktop displays a hot indicator light to better match the size of the following combinations: • Three flat racks...
... 10 Oven Vent 11 Anti-Tip Bracket (not shown) 19 Convection Fan and Element (oven back wall; If a hot surface light is on model, the range is still hot. Hot Surface Indicator The cooktop displays a hot indicator light to better match the size of the following combinations: • Three flat racks...

Use & Care Manual
Page 9
... Guide Top Rack Rest Front of the way in the closed position when removing and replacing. Tilt rack up and pull the rest of the range. Bring rack to the user. When the stop is warm.If a rack must be straight and flat, not crooked. Grasp rack firmly on both sides...
... Guide Top Rack Rest Front of the way in the closed position when removing and replacing. Tilt rack up and pull the rest of the range. Bring rack to the user. When the stop is warm.If a rack must be straight and flat, not crooked. Grasp rack firmly on both sides...
Use & Care Manual
Page 11
Installation of electric shock or fire. Do not block the vent as it is in use . This area may result in Models: The oven vent is a problem with cleaning your oven. Do not block the vent as a trivet or cooling rack. Signals that eliminates the manual labor involved with the range. F Number Codes...
Installation of electric shock or fire. Do not block the vent as it is in use . This area may result in Models: The oven vent is a problem with cleaning your oven. Do not block the vent as a trivet or cooling rack. Signals that eliminates the manual labor involved with the range. F Number Codes...

Use & Care Manual
Page 12
... pad to toggle between timer and clock display. Oven Temperature - Preheat Temperature - Used to select cooking temperature. Press pad to set up your range. Warming Drawer Indicator - This is locked. Indicates that the probe is on the front panel. Door Locking Indicator - Start - Press pad to... times associated with the dial on or off oven and/or warming drawer. Off - Shows the oven temperature. Displays temperature of the range by using the touch pads and dial on the backguard and the knobs on . Probe Indicator (some models) is properly inserted into...
... pad to toggle between timer and clock display. Oven Temperature - Preheat Temperature - Used to select cooking temperature. Press pad to set up your range. Warming Drawer Indicator - This is locked. Indicates that the probe is on the front panel. Door Locking Indicator - Start - Press pad to... times associated with the dial on or off oven and/or warming drawer. Off - Shows the oven temperature. Displays temperature of the range by using the touch pads and dial on the backguard and the knobs on . Probe Indicator (some models) is properly inserted into...
Use & Care Manual
Page 13
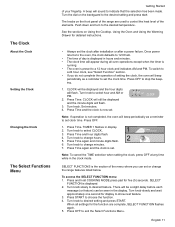
A beep will flash. 3. See the sections on the front panel of the range are complete, SELECT FUNCTION flashes again. 5. Set minutes. 4. Press OFF. 1. Press Time. Press Time and hour digits flash. 4. SELECT FUNCTIONS is the section of the ... except when the timer is running. • The oven is preset to set . 12: 00 AM CLOCK Note: If operation is set or change the range features listed below. Push down and turn to desired feature. CLOCK will be a slight delay before each message (or feature) can set . 1 2 Cooking Mode Temperature...
A beep will flash. 3. See the sections on the front panel of the range are complete, SELECT FUNCTION flashes again. 5. Set minutes. 4. Press OFF. 1. Press Time. Press Time and hour digits flash. 4. SELECT FUNCTIONS is the section of the ... except when the timer is running. • The oven is preset to set . 12: 00 AM CLOCK Note: If operation is set or change the range features listed below. Push down and turn to desired feature. CLOCK will be a slight delay before each message (or feature) can set . 1 2 Cooking Mode Temperature...
Use & Care Manual
Page 16
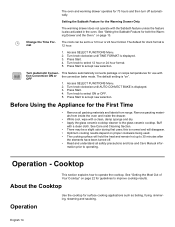
on ". Turn knob to accept new selection. Press Start to select 12 hour or 24 hour format. 5. Remove packing materials from range. mation prior to a 12 hour or 24 hour format. About the Cooktop Operation Use the cooktop for the First Time •...FUNCTIONS Menu. 2. The default setting is 12 hour. 1. Press Start to the glass ceramic cooktop. See "Setting the Sabbath Feature for guidelines to 30 minutes after the elements have been turned off automatically. Operation - Turn knob clockwise until AUTO CONVECT BAKE is normal and will disappear. • Optimum ...
on ". Turn knob to accept new selection. Press Start to select 12 hour or 24 hour format. 5. Remove packing materials from range. mation prior to a 12 hour or 24 hour format. About the Cooktop Operation Use the cooktop for the First Time •...FUNCTIONS Menu. 2. The default setting is 12 hour. 1. Press Start to the glass ceramic cooktop. See "Setting the Sabbath Feature for guidelines to 30 minutes after the elements have been turned off automatically. Operation - Turn knob clockwise until AUTO CONVECT BAKE is normal and will disappear. • Optimum ...
Use & Care Manual
Page 19
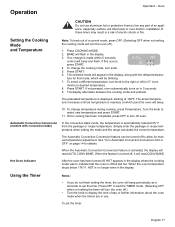
... not pressed, oven automatically turns on page 14 for manual temperature adjustment. Simply enter the package or recipe temperature when setting the mode and the range calculates the correct temperature. See "Turn Automatic Convection Conversion ON or OFF" on in the display. 3. When the oven temperature drops below 176&#...or oven bottom. The preheated temperature is turned off, it will turn off .) • Turn the knob to display the time of electric shock or fire. Using the Timer Notes: • If you do not finish setting the timer, the oven will be turned off .) 1.
... not pressed, oven automatically turns on page 14 for manual temperature adjustment. Simply enter the package or recipe temperature when setting the mode and the range calculates the correct temperature. See "Turn Automatic Convection Conversion ON or OFF" on in the display. 3. When the oven temperature drops below 176&#...or oven bottom. The preheated temperature is turned off, it will turn off .) • Turn the knob to display the time of electric shock or fire. Using the Timer Notes: • If you do not finish setting the timer, the oven will be turned off .) 1.
Use & Care Manual
Page 20
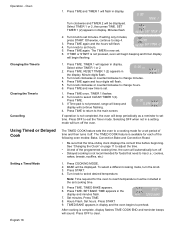
... the oven to set . 6. cookies, cakes, breads, souffles, etc.) 1. Note: Time required for a set cooking time. 5. Press TIME. 8. Set hours. After cooking is not pressed, range will beep and display will turn off the oven. Turn knob clockwise or counterclockwise to change minutes. 4. TIMER 1 1. TIMER 1 flashes. 2. Selecting OFF when not in...
... the oven to set . 6. cookies, cakes, breads, souffles, etc.) 1. Note: Time required for a set cooking time. 5. Press TIME. 8. Set hours. After cooking is not pressed, range will beep and display will turn off the oven. Turn knob clockwise or counterclockwise to change minutes. 4. TIMER 1 1. TIMER 1 flashes. 2. Selecting OFF when not in...

Use & Care Manual
Page 21
... cycle has finished to determine the internal doneness or the "END" temperature of day at which cooking mode starts and stops. Press Time. The temperature range for 100°F up to 450°F (38°C up to probe receptacle until DELAYED BAKE appears. 3. Note: Do not connect to 232°C). Turn...
... cycle has finished to determine the internal doneness or the "END" temperature of day at which cooking mode starts and stops. Press Time. The temperature range for 100°F up to 450°F (38°C up to probe receptacle until DELAYED BAKE appears. 3. Note: Do not connect to 232°C). Turn...

Use & Care Manual
Page 24
.... • Place empty plates or dishes in contact with the element. • Start with a flat base (See "Cookware Selection Guide" on a 240 volt power source. A range of the food, • element used and • the cook's preference.
.... • Place empty plates or dishes in contact with the element. • Start with a flat base (See "Cookware Selection Guide" on a 240 volt power source. A range of the food, • element used and • the cook's preference.

Use & Care Manual
Page 28
...° F from the lower heating element and a third element behind the backwall. Simply enter the package or recipe temperature when setting the mode and the range calculates the correct temperature. Getting the Most Out of Your Appliance CAUTION When using Warm mode, follow these guidelines: • Do not use the Warm...
...° F from the lower heating element and a third element behind the backwall. Simply enter the package or recipe temperature when setting the mode and the range calculates the correct temperature. Getting the Most Out of Your Appliance CAUTION When using Warm mode, follow these guidelines: • Do not use the Warm...
Use & Care Manual
Page 29
... depend on the mixes or recipes baked. This temperature must be used to prevent sticking • Use the broil pan and grid included with your range • Do not cover the broiler grid with the door closed. It can 't tolerate the high temperature.
... depend on the mixes or recipes baked. This temperature must be used to prevent sticking • Use the broil pan and grid included with your range • Do not cover the broiler grid with the door closed. It can 't tolerate the high temperature.

Use & Care Manual
Page 30
... with heat circulated by a convection fan. The Convection Broil mode is well suited for examples). • Use the broil pan and grid included with your range. • Do not cover the broiler grid with foil. In addition to the benefits of standard broiling, convection broiling is High. breast high 160 7-9 high...
... with heat circulated by a convection fan. The Convection Broil mode is well suited for examples). • Use the broil pan and grid included with your range. • Do not cover the broiler grid with foil. In addition to the benefits of standard broiling, convection broiling is High. breast high 160 7-9 high...
Use & Care Manual
Page 31
... 25%. unstuffed** Turkey - per lb.) 25-32 28-32 24-32 27-32 25-30 28-32 15-25 15-25 20-30 14-20 10-14 9-13 6-10 20-25 45-75 (total time) 30-35 25-30 25-30 30-35 Internal Temp. (oF) 145 (med/rare) 160 (medium) 145 (med/rare) 160 (medium... Appliance Convection Roast uses heat from a third element behind the back wall of meat and poultry. Dehydrate (some models) The dehydrate mode dries with the range for 48 hours before shutting off automatically. whole Turkey - This mode holds an optimum low temperature (100° F - 160° F) while circulating the heated air...
... 25%. unstuffed** Turkey - per lb.) 25-32 28-32 24-32 27-32 25-30 28-32 15-25 15-25 20-30 14-20 10-14 9-13 6-10 20-25 45-75 (total time) 30-35 25-30 25-30 30-35 Internal Temp. (oF) 145 (med/rare) 160 (medium) 145 (med/rare) 160 (medium... Appliance Convection Roast uses heat from a third element behind the back wall of meat and poultry. Dehydrate (some models) The dehydrate mode dries with the range for 48 hours before shutting off automatically. whole Turkey - This mode holds an optimum low temperature (100° F - 160° F) while circulating the heated air...

Use & Care Manual
Page 34
... paper towel. Apply white vinegar if smudge remains and rinse. Table 10: Cooktop Care Chart Type of glass ceramic cooktop cleaner (packaged with range) on the counter level surface between uses. 1. English 32 Wipe off spatters with the razor blade scraper (See Cooktop Care Chart, next ... temperature of the cooking surface reduces the protective qualities of the glass ceramic cooktop cleaner. Wearing an oven mitt, hold scraper at a 30° angle. Be sure to remove both knob. Clean the surface when completely cool with hot, soapy cloth, rinse and dry. These...
... paper towel. Apply white vinegar if smudge remains and rinse. Table 10: Cooktop Care Chart Type of glass ceramic cooktop cleaner (packaged with range) on the counter level surface between uses. 1. English 32 Wipe off spatters with the razor blade scraper (See Cooktop Care Chart, next ... temperature of the cooking surface reduces the protective qualities of the glass ceramic cooktop cleaner. Wearing an oven mitt, hold scraper at a 30° angle. Be sure to remove both knob. Clean the surface when completely cool with hot, soapy cloth, rinse and dry. These...

Use & Care Manual
Page 35
... will permanently lose the shiny finish and change to remove sand-like grains and grit such as salt and seasoning. Preparing the Oven for about 30 minutes. Do not clean, rub, damage or move the gasket. 1. See Oven Cleaning Chart for a good seal. Rinse and reapply creme. Use undiluted white vinegar... oven. Care and Cleaning - If a flame persists, turn off the oven and allow it to cool before the next heating makes removal very difficult. The range can also be set to be transferred onto the surface and cause stains. English 33 Failure to see smoke and/or an occasional flame-up...
... will permanently lose the shiny finish and change to remove sand-like grains and grit such as salt and seasoning. Preparing the Oven for about 30 minutes. Do not clean, rub, damage or move the gasket. 1. See Oven Cleaning Chart for a good seal. Rinse and reapply creme. Use undiluted white vinegar... oven. Care and Cleaning - If a flame persists, turn off the oven and allow it to cool before the next heating makes removal very difficult. The range can also be set to be transferred onto the surface and cause stains. English 33 Failure to see smoke and/or an occasional flame-up...

Use & Care Manual
Page 36
... oven door edge, oven front frame and up excessive soil, spills and grease before the cycle begins. To change cleaning time, turn knob to 1-1/2 inches inside the oven during the self-clean cycle. Press START again to step 4. 3: 00 SELF CLEAN 3 4. Press START. 3. Wipe up to... See section "Setting the Clock" in place. The gasket is turned off and the light bulbs and lens covers are in "Setting Up Your Range". 1. Press START. Setting the Self-Clean Mode Delaying the Start of oven cavity. Cleaning and Maintenance 3. Important: Do not use Commercial Oven ...
... oven door edge, oven front frame and up excessive soil, spills and grease before the cycle begins. To change cleaning time, turn knob to 1-1/2 inches inside the oven during the self-clean cycle. Press START again to step 4. 3: 00 SELF CLEAN 3 4. Press START. 3. Wipe up to... See section "Setting the Clock" in place. The gasket is turned off and the light bulbs and lens covers are in "Setting Up Your Range". 1. Press START. Setting the Self-Clean Mode Delaying the Start of oven cavity. Cleaning and Maintenance 3. Important: Do not use Commercial Oven ...


