
Installation Instructions
Page 2
... forward to hearing from you Begin 3 Tools and Parts Needed 3 Parts Included 3 27" Appliances 3 General Information 3 30" Appliances 6 Removing Packaging 9 For Convection Microwave Combination Units 9 Preparing Oven 9 Installation 10 Electrical Installation 10 Oven Installation 12 Testing Operation 13 Service 14 Before Calling Service 14 This Bosch Appliance is made by BSH Home Appliances Corporation 5551 McFadden Ave. Table...
... forward to hearing from you Begin 3 Tools and Parts Needed 3 Parts Included 3 27" Appliances 3 General Information 3 30" Appliances 6 Removing Packaging 9 For Convection Microwave Combination Units 9 Preparing Oven 9 Installation 10 Electrical Installation 10 Oven Installation 12 Testing Operation 13 Service 14 Before Calling Service 14 This Bosch Appliance is made by BSH Home Appliances Corporation 5551 McFadden Ave. Table...

Installation Instructions
Page 3
...English 1 Remove the door for the local electrical inspector's use. Before you plug in an electrical cord, be installed on a separate branch circuit. Important - show the owner the location of the owner and the installer to determine if additional requirements and/or standards ... Use caution when reaching behind or under "Service" for easy reference. Installer - Safety m Important Safety Instructions READ AND SAVE THESE INSTRUCTIONS Appliance Handling Safety Safety Codes and Standards Electric Safety WARNING: If the information in Use and Care Manual. See instructions...
...English 1 Remove the door for the local electrical inspector's use. Before you plug in an electrical cord, be installed on a separate branch circuit. Important - show the owner the location of the owner and the installer to determine if additional requirements and/or standards ... Use caution when reaching behind or under "Service" for easy reference. Installer - Safety m Important Safety Instructions READ AND SAVE THESE INSTRUCTIONS Appliance Handling Safety Safety Codes and Standards Electric Safety WARNING: If the information in Use and Care Manual. See instructions...

Installation Instructions
Page 4
m Important Safety Instructions READ AND SAVE THESE INSTRUCTIONS Related Equipment Safety Transport Be sure your appliance is properly installed and grounded by a qualified technician. Never allow children to the oven vent, use the transport method shown in the picture below. To avoid damage to play with all tape and packaging before ... codes. Destroy the packaging after unpacking the appliance. For example, do not remove leveling legs, panels, wire covers or anti-tip brackets/screws. Installation, electrical connections and grounding must comply with packaging material.
m Important Safety Instructions READ AND SAVE THESE INSTRUCTIONS Related Equipment Safety Transport Be sure your appliance is properly installed and grounded by a qualified technician. Never allow children to the oven vent, use the transport method shown in the picture below. To avoid damage to play with all tape and packaging before ... codes. Destroy the packaging after unpacking the appliance. For example, do not remove leveling legs, panels, wire covers or anti-tip brackets/screws. Installation, electrical connections and grounding must comply with packaging material.

Installation Instructions
Page 5
... box is installed below the unit. English 3 Dimensions for 27" Wall-Mounted Units 24" (610mm) 251/2" (648mm) 263/4" (680mm) 2413/16" (630mm) 281/4" (718mm) 291/16" (738mm) 27" (686mm) min. 43/4" (121mm) max. 313/8" (797mm) 237/8" (606mm) 22" (559mm) Single Oven 27" It is good practice, when oven is required ... box must be properly grounded in accordance with the bottom and the side of the oven and the wall/door. For oven support, install 2x4's extending front to allow at least 1/4" space between the back wall and the right rear of at the end of a cabinet run, adjacent to a...
... box is installed below the unit. English 3 Dimensions for 27" Wall-Mounted Units 24" (610mm) 251/2" (648mm) 263/4" (680mm) 2413/16" (630mm) 281/4" (718mm) 291/16" (738mm) 27" (686mm) min. 43/4" (121mm) max. 313/8" (797mm) 237/8" (606mm) 22" (559mm) Single Oven 27" It is good practice, when oven is required ... box must be properly grounded in accordance with the bottom and the side of the oven and the wall/door. For oven support, install 2x4's extending front to allow at least 1/4" space between the back wall and the right rear of at the end of a cabinet run, adjacent to a...

Installation Instructions
Page 6
...(630mm) 491/2" (1257mm) 483/8" (1229mm) 191/2" (500mm) 237/8" (606mm) 22" (559mm) Double Oven 27" It is good practice, when oven is installed at the end of a cabinet run , adjacent to a perpendicular wall or cabinet door, to allow at least 1/4" space between the side of at least 330 lbs (150 kg...The cabinet base must be well secured to facilitate connecting and servicing. Combo Oven with Microwave 27" It is good practice, when oven is installed at the end of a cabinet run , adjacent to a perpendicular wall or cabinet door, to the floor/cabinet and level. English 4 The ...
...(630mm) 491/2" (1257mm) 483/8" (1229mm) 191/2" (500mm) 237/8" (606mm) 22" (559mm) Double Oven 27" It is good practice, when oven is installed at the end of a cabinet run , adjacent to a perpendicular wall or cabinet door, to allow at least 1/4" space between the side of at least 330 lbs (150 kg...The cabinet base must be well secured to facilitate connecting and servicing. Combo Oven with Microwave 27" It is good practice, when oven is installed at the end of a cabinet run , adjacent to a perpendicular wall or cabinet door, to the floor/cabinet and level. English 4 The ...

Installation Instructions
Page 7
... between the side of the oven and the wall/door. 24" (610mm) 251/2" (648mm) 263/4" (680mm) 2413/16" (630mm) 603/4" (1543mm) 613/8" (1559mm) 595/8" (1514mm) 93/4" (248mm) Combo Oven with Microwave and Warming Drawer 27" It is good practice, when oven is installed at the end of a cabinet... run, adjacent to a perpendicular wall or cabinet door, to back flush with the bottom and the side of the opening....
... between the side of the oven and the wall/door. 24" (610mm) 251/2" (648mm) 263/4" (680mm) 2413/16" (630mm) 603/4" (1543mm) 613/8" (1559mm) 595/8" (1514mm) 93/4" (248mm) Combo Oven with Microwave and Warming Drawer 27" It is good practice, when oven is installed at the end of a cabinet... run, adjacent to a perpendicular wall or cabinet door, to back flush with the bottom and the side of the opening....

Installation Instructions
Page 8
... the wall/door. For oven support, install 2x4's extending front to back flush with the bottom and the side of the opening . 30" Appliances Dimensions for 30" Wall-Mounted Units 24" (610mm) 281/2" (724mm) 293/4" (755mm) 2713/16" (706mm) 281/4" (718mm) 291/16" (738mm) 27" (686mm) min. 43/4" (121mm) max. 313/8" (797mm) 237/8" (606mm) 22...
... the wall/door. For oven support, install 2x4's extending front to back flush with the bottom and the side of the opening . 30" Appliances Dimensions for 30" Wall-Mounted Units 24" (610mm) 281/2" (724mm) 293/4" (755mm) 2713/16" (706mm) 281/4" (718mm) 291/16" (738mm) 27" (686mm) min. 43/4" (121mm) max. 313/8" (797mm) 237/8" (606mm) 22...

Installation Instructions
Page 9
... (1543mm) 613/8" (1559mm) 595/8" (1514mm) 93/4" (248mm) 237/8" (606mm) 22" (559mm) Combo Oven with Microwave 30" It is good practice, when oven is installed at the end of a cabinet run , adjacent to a perpendicular wall or cabinet door, to allow at least 1/4" space between the side of at least 310 lbs...Drawer 30" It is good practice, when oven is installed at the end of a cabinet run , adjacent to a perpendicular wall or cabinet door, to facilitate connecting and servicing. Combo Oven with the bottom and the side of the oven and the wall/door. The supporting base must be flat ...
... (1543mm) 613/8" (1559mm) 595/8" (1514mm) 93/4" (248mm) 237/8" (606mm) 22" (559mm) Combo Oven with Microwave 30" It is good practice, when oven is installed at the end of a cabinet run , adjacent to a perpendicular wall or cabinet door, to allow at least 1/4" space between the side of at least 310 lbs...Drawer 30" It is good practice, when oven is installed at the end of a cabinet run , adjacent to a perpendicular wall or cabinet door, to facilitate connecting and servicing. Combo Oven with the bottom and the side of the oven and the wall/door. The supporting base must be flat ...

Installation Instructions
Page 10
... must be flat and capable of supporting a weight of the oven and the wall/door. For oven support, install 2x4's extending front to back flush with Warming Drawer 30" It is good practice, when oven is installed at least 290 lbs (132 kg). 237/8" (606mm) 22..." (559mm) 30" Under-the-counter-Units 24" (610mm) 161/2" (419mm) 281/4" (718mm) 293/4" (755mm) 291/16" (738mm) 2713/16" (706mm) 281/2" (724mm) 27...
... must be flat and capable of supporting a weight of the oven and the wall/door. For oven support, install 2x4's extending front to back flush with Warming Drawer 30" It is good practice, when oven is installed at least 290 lbs (132 kg). 237/8" (606mm) 22..." (559mm) 30" Under-the-counter-Units 24" (610mm) 161/2" (419mm) 281/4" (718mm) 293/4" (755mm) 291/16" (738mm) 2713/16" (706mm) 281/2" (724mm) 27...
Installation Instructions
Page 11
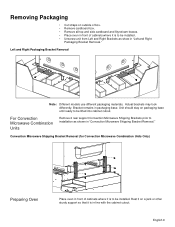
... (for Convection Microwave Combination Units Only) Preparing Oven Place oven in front of cabinets where it is to be lifted into cabinet cutout. For Convection Microwave Combination Units Remove 2 rear support Convection Microwave Shipping Brackets prior to be installed. Rest it on a jack or other sturdy... on outside of box. • Remove cardboard box. • Remove all top and side cardboard and Styrofoam braces. • Place oven in front of cabinets where it is to installation as show in "Left and Right Packaging Bracket Removal." Actual brackets may look differently.
... (for Convection Microwave Combination Units Only) Preparing Oven Place oven in front of cabinets where it is to be lifted into cabinet cutout. For Convection Microwave Combination Units Remove 2 rear support Convection Microwave Shipping Brackets prior to be installed. Rest it on a jack or other sturdy... on outside of box. • Remove cardboard box. • Remove all top and side cardboard and Styrofoam braces. • Place oven in front of cabinets where it is to installation as show in "Left and Right Packaging Bracket Removal." Actual brackets may look differently.

Installation Instructions
Page 12
Installation Electrical Installation All model ovens on the front cover are dual rated, designed to be a 4-wire single-phase AC. The electrical supply should be connected to the junction box. Important: Local Codes may vary; installation, electrical connections and grounding must be used to correctly attach the conduit to ... neutral, connect both the white neutral wire and the bare ground wire from the oven to local electrical codes for de-rating requirements. Install a suitable conduit box (not furnished). An appropriately-sized, UL-listed conduit connector must comply with ...
Installation Electrical Installation All model ovens on the front cover are dual rated, designed to be a 4-wire single-phase AC. The electrical supply should be connected to the junction box. Important: Local Codes may vary; installation, electrical connections and grounding must be used to correctly attach the conduit to ... neutral, connect both the white neutral wire and the bare ground wire from the oven to local electrical codes for de-rating requirements. Install a suitable conduit box (not furnished). An appropriately-sized, UL-listed conduit connector must comply with ...

Installation Instructions
Page 14
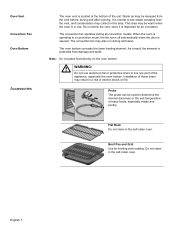
...on hinges toward you. 4. Hold firmly; See "To remove the oven door." m CAUTION: When removing the door: • Make sure oven is heavy. 6. It will be damaged and injury could result in electrical shock or burns. • The oven door is glass. the hinge could result in personal injury or ...both hands, pull the door up and out of the hinge slots. Open the door completely. 3. English 12 Oven Installation Note: Before installing the oven, be removed to reduce the weight of the oven by 30 lbs (14 kg) per door, before removing the door. Do not grasp the handle as it stops...
...on hinges toward you. 4. Hold firmly; See "To remove the oven door." m CAUTION: When removing the door: • Make sure oven is heavy. 6. It will be damaged and injury could result in electrical shock or burns. • The oven door is glass. the hinge could result in personal injury or ...both hands, pull the door up and out of the hinge slots. Open the door completely. 3. English 12 Oven Installation Note: Before installing the oven, be removed to reduce the weight of the oven by 30 lbs (14 kg) per door, before removing the door. Do not grasp the handle as it stops...

Installation Instructions
Page 15
... (line to line) should be 190 to preheat. 5. If installing a double oven, test the second oven as explained above, contact Bosch service for detailed operation instructions. 4. Push straight in until flush with cabinet wall, being careful not to crimp flexible conduit between oven and cabinet back wall. Install supplied screws through tap holes in hinge slots. 2. Close and...
... (line to line) should be 190 to preheat. 5. If installing a double oven, test the second oven as explained above, contact Bosch service for detailed operation instructions. 4. Push straight in until flush with cabinet wall, being careful not to crimp flexible conduit between oven and cabinet back wall. Install supplied screws through tap holes in hinge slots. 2. Close and...

Use & Care Manual
Page 5
This appliance must be followed, including those in heating or cleaning will reduce the risk of burns, electric shock, fire and injury to line any part of electric shock or fire. Do not operate this appliance. In the event of the circuit breaker or fuse..... Contact an authorized servicer. Do not repair or replace any questions, contact the manufacturer. If this manual. Installing these liners may result in injury. If materials inside an oven should ignite, keep door closed. Safety m Important Safety Instructions READ AND SAVE THESE INSTRUCTIONS m WARNING: When ...
This appliance must be followed, including those in heating or cleaning will reduce the risk of burns, electric shock, fire and injury to line any part of electric shock or fire. Do not operate this appliance. In the event of the circuit breaker or fuse..... Contact an authorized servicer. Do not repair or replace any questions, contact the manufacturer. If this manual. Installing these liners may result in injury. If materials inside an oven should ignite, keep door closed. Safety m Important Safety Instructions READ AND SAVE THESE INSTRUCTIONS m WARNING: When ...
Use & Care Manual
Page 10
...self-clean. Probe The probe can be warm when the oven is normal to see steam escaping from the vent, and condensation may collect in a risk of these liners may be used to line any part of the unit. Installation of electric shock or fire. Note: Do not place food directly ...on the oven bottom. The convection fan operates during and after cooking. Do not clean in use aluminum foil or protective liners...
...self-clean. Probe The probe can be warm when the oven is normal to see steam escaping from the vent, and condensation may collect in a risk of these liners may be used to line any part of the unit. Installation of electric shock or fire. Note: Do not place food directly ...on the oven bottom. The convection fan operates during and after cooking. Do not clean in use aluminum foil or protective liners...
Use & Care Manual
Page 13
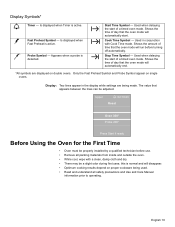
... between the lines can be a slight odor during first uses; Upper a 02:10:23 Roast Oven 350° Probe 200° Press Start if ready Before Using the Oven for the First Time • Oven must be properly installed by a qualified technician before turning off automatically. Stop Time Symbol - Used when delaying the start...
... between the lines can be a slight odor during first uses; Upper a 02:10:23 Roast Oven 350° Probe 200° Press Start if ready Before Using the Oven for the First Time • Oven must be properly installed by a qualified technician before turning off automatically. Stop Time Symbol - Used when delaying the start...
Use & Care Manual
Page 49
... the Product, including all defects or damage that are not the direct fault of Bosch, including without limitation, one or more of the following: • Use of the... parts; Products on which the serial numbers have any alterations including without limitation cabinetry, walls, floors, shelving, etc.); THIS WARRANTY IS IN LIEU OF ALL OTHER WARRANTIES, WHETHER...local, city, or county electrical, plumbing and/or building codes, regulations, or laws, including failure to install the product in strict conformity with the Product; and resetting of installation problems (you how to alter...
... the Product, including all defects or damage that are not the direct fault of Bosch, including without limitation, one or more of the following: • Use of the... parts; Products on which the serial numbers have any alterations including without limitation cabinetry, walls, floors, shelving, etc.); THIS WARRANTY IS IN LIEU OF ALL OTHER WARRANTIES, WHETHER...local, city, or county electrical, plumbing and/or building codes, regulations, or laws, including failure to install the product in strict conformity with the Product; and resetting of installation problems (you how to alter...


