
Installation Instructions
Page 1
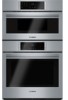
Built-in Combination Ovens Installation Manual HSLP751UC, HBL57M52UC, HBL8752UC, HBLP752UC, HBL87M52UC
Built-in Combination Ovens Installation Manual HSLP751UC, HBL57M52UC, HBL8752UC, HBLP752UC, HBL87M52UC
Installation Instructions
Page 3
... must comply with a cord and plug, do not immerse cord, plugs or other electrical parts in the manuals. If there is properly grounded, the customer should be installed on power supply, make sure all instructions carefully before use an adaptor or extension cord. If required by ...a qualified electrician. Mark it checked by the National Electrical Code (or Canadian Electrical Code), this manual for rating label location. ...
... must comply with a cord and plug, do not immerse cord, plugs or other electrical parts in the manuals. If there is properly grounded, the customer should be installed on power supply, make sure all instructions carefully before use an adaptor or extension cord. If required by ...a qualified electrician. Mark it checked by the National Electrical Code (or Canadian Electrical Code), this manual for rating label location. ...
Installation Instructions
Page 6
...wall/door. This can be located anywhere within reach of the procedures listed, including performing operation test. ▯ INSTALLER- For oven support, install 2x4s extending front to back flush with the screws supplied (using Starhead screwdriver) holding the lower oven to the... correct and the required electrical connections are present. ▯ Refer to additional information in this manual regarding Safety, Cabinet Dimensions, Removing Packaging, Electrical Installation, Testing the Installation and Customer Service. ▯ Remove the lower oven door to reduce the unit weight and...
...wall/door. This can be located anywhere within reach of the procedures listed, including performing operation test. ▯ INSTALLER- For oven support, install 2x4s extending front to back flush with the screws supplied (using Starhead screwdriver) holding the lower oven to the... correct and the required electrical connections are present. ▯ Refer to additional information in this manual regarding Safety, Cabinet Dimensions, Removing Packaging, Electrical Installation, Testing the Installation and Customer Service. ▯ Remove the lower oven door to reduce the unit weight and...
Installation Instructions
Page 13
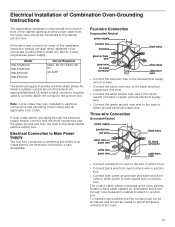
... box (not furnished). Note: Local codes may vary. Installation, electrical connections and grounding must not be shortened and should be routed to permit temporary removal of the oven. 13 Model HBL57M52UC HBL87M52UC HBL8752UC HBLP752UC Circuit Required 208V, 60 Hz/ 240V, 60 Hz 40 AMP...cabinet opening and the power cable from the oven to the junction box. Electrical Installation of Combination Oven-Grounding Instructions The assembled combination oven should be moved in front of this installation instruction manual are dual rated, designed to be connected to either 208 or 240V AC, ...
... box (not furnished). Note: Local codes may vary. Installation, electrical connections and grounding must not be shortened and should be routed to permit temporary removal of the oven. 13 Model HBL57M52UC HBL87M52UC HBL8752UC HBLP752UC Circuit Required 208V, 60 Hz/ 240V, 60 Hz 40 AMP...cabinet opening and the power cable from the oven to the junction box. Electrical Installation of Combination Oven-Grounding Instructions The assembled combination oven should be moved in front of this installation instruction manual are dual rated, designed to be connected to either 208 or 240V AC, ...

Installation Instructions
Page 14
...the door cannot fall over. Lay door on a towel or section of the hinge slots. the door is glass. Remove Lower Oven Door Prior to Installation It is heavy and fragile. Holding the door firmly on both sides and using both latch levers are securely in a convenient and stable location until...avoid breaking. ▯ Grasp only the sides of the oven door. Flip latch levers on sharp or pointed objects as it may swing in the installation manual regarding the door removal before removing the door. Be sure to read all the way down toward you are ready to grasp the oven door...
...the door cannot fall over. Lay door on a towel or section of the hinge slots. the door is glass. Remove Lower Oven Door Prior to Installation It is heavy and fragile. Holding the door firmly on both sides and using both latch levers are securely in a convenient and stable location until...avoid breaking. ▯ Grasp only the sides of the oven door. Flip latch levers on sharp or pointed objects as it may swing in the installation manual regarding the door removal before removing the door. Be sure to read all the way down toward you are ready to grasp the oven door...

Installation Instructions
Page 16
... expose hinges, latch levers and slots. Before Calling Service See the Use and Care Manual for the correct lifting point. Insert the hinges into the Cabinet 1. The door should be straight. Re-Install the Lower Oven Door Hold the door firmly in the right and left trim pieces ...it is released. When lifting the combined unit into the slots, flush with the information printed on your product data plate when calling. 16 Install four (4) supplied screws through tap holes in both hands. Refer to seat the hinge feet. Placing Combination Oven Into Cabinet Opening 9 CAUTION To...
... expose hinges, latch levers and slots. Before Calling Service See the Use and Care Manual for the correct lifting point. Insert the hinges into the Cabinet 1. The door should be straight. Re-Install the Lower Oven Door Hold the door firmly in the right and left trim pieces ...it is released. When lifting the combined unit into the slots, flush with the information printed on your product data plate when calling. 16 Install four (4) supplied screws through tap holes in both hands. Refer to seat the hinge feet. Placing Combination Oven Into Cabinet Opening 9 CAUTION To...
Instructions for Use
Page 5
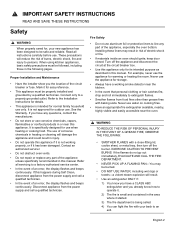
...materials inside an oven should ignite, keep door closed. It is not working smoke detector near this manual. If this appliance only for warming or heating the room. Installing these liners may be followed, including those in this appliance if it is not approved for outdoor ...IN THE EVENT OF A GREASE FIRE, OBSERVE THE FOLLOWING: • SMOTHER FLAMES with baking soda. Never use . English 2 Refer to the Installation Instructions for details. • This appliance is specifically designed for use only. If you have a working properly, or if it for easy reference....
...materials inside an oven should ignite, keep door closed. It is not working smoke detector near this manual. If this appliance only for warming or heating the room. Installing these liners may be followed, including those in this appliance if it is not approved for outdoor ...IN THE EVENT OF A GREASE FIRE, OBSERVE THE FOLLOWING: • SMOTHER FLAMES with baking soda. Never use . English 2 Refer to the Installation Instructions for details. • This appliance is specifically designed for use only. If you have a working properly, or if it for easy reference....

Instructions for Use
Page 13
...timer in operation). 2. The oven can not be set the clock before use the oven. The menu for 5 seconds. The oven must be properly installed by pressing Enter. The time blinks indicating it can be in Standby mode (oven is powered on proper bakeware being used. • Read and ... English 10 Thanks to access the clock set the clock: : Before Using the Oven for operating the oven. Clear labeling of the past. this manual. Each number pressed is done. Use the numeric keypad to improve heat distribution in a cooking mode to the Self Clean mode, hours of scrubbing ...
...timer in operation). 2. The oven can not be set the clock before use the oven. The menu for 5 seconds. The oven must be properly installed by pressing Enter. The time blinks indicating it can be in Standby mode (oven is powered on proper bakeware being used. • Read and ... English 10 Thanks to access the clock set the clock: : Before Using the Oven for operating the oven. Clear labeling of the past. this manual. Each number pressed is done. Use the numeric keypad to improve heat distribution in a cooking mode to the Self Clean mode, hours of scrubbing ...
Instructions for Use
Page 22
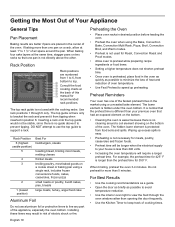
... guide would not be longer when the electrical supply to support a rack. Wiping up preheating. When baking four cake layers at the back of this manual for 350° F. The top rack guide is not used for Roast, Convection Roast and Proof modes. • Allow oven to preheat while preparing recipe... preheated, place food in risk of cooking times. DO NOT attempt to use aluminum foil or protective liners to line any part of the oven. Installing these liners may result in the oven as quickly as possible to avoid temperature reduction. • Use the interior oven light to view the food...
... guide would not be longer when the electrical supply to support a rack. Wiping up preheating. When baking four cake layers at the back of this manual for 350° F. The top rack guide is not used for Roast, Convection Roast and Proof modes. • Allow oven to preheat while preparing recipe... preheated, place food in risk of cooking times. DO NOT attempt to use aluminum foil or protective liners to line any part of the oven. Installing these liners may result in the oven as quickly as possible to avoid temperature reduction. • Use the interior oven light to view the food...


