Short Instructions
Page 1
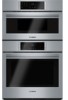
... the use odor, run a 30 minute bake cycle at 350° F. Pull the rack forward to set 12/24 hour clock mode, Fahrenheit/Celsius temperature display, touchpad sound, show clock, oven temperature offset, and auto convection (select models only). Lower the front of the rack in and out a few times to finish seating it is securely anchored. Electric Ovens Quick Reference Guide Built-in wall ovens, range ovens IMPORTANT: This reference guide is about 2 inches from...
... the use odor, run a 30 minute bake cycle at 350° F. Pull the rack forward to set 12/24 hour clock mode, Fahrenheit/Celsius temperature display, touchpad sound, show clock, oven temperature offset, and auto convection (select models only). Lower the front of the rack in and out a few times to finish seating it is securely anchored. Electric Ovens Quick Reference Guide Built-in wall ovens, range ovens IMPORTANT: This reference guide is about 2 inches from...

Short Instructions
Page 2
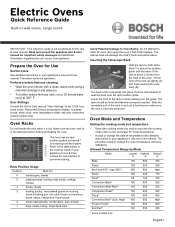
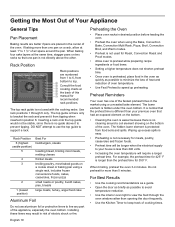
... Best Cooking Results • Open the oven door as briefly as fish sticks, chicken nuggets and french fries. Mode Description and Usage Oven Mode Bake Roast Broil Warm Proof* Convection Bake* Convection Multi-Rack* Convection Roast* Pizza* Convection Broil* Frozen Foods* Symbol % % ( % $ 2 : 2 2 4 ‹ Description Cooks with a single rack Preheat not necessary. Roasting vegetables. fresh, frozen, prebaked crust, ready-to 1 1/2" around pans • Stagger pans if used with dry, heated air Uses more intense heat from upper element, more browning of meat (more intense heat...
... Best Cooking Results • Open the oven door as briefly as fish sticks, chicken nuggets and french fries. Mode Description and Usage Oven Mode Bake Roast Broil Warm Proof* Convection Bake* Convection Multi-Rack* Convection Roast* Pizza* Convection Broil* Frozen Foods* Symbol % % ( % $ 2 : 2 2 4 ‹ Description Cooks with a single rack Preheat not necessary. Roasting vegetables. fresh, frozen, prebaked crust, ready-to 1 1/2" around pans • Stagger pans if used with dry, heated air Uses more intense heat from upper element, more browning of meat (more intense heat...

Short Instructions
Page 4
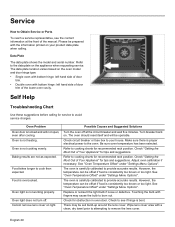
... steam or warm air coming No action required, do not This is normal in calibration needed . Adjust oven Incorrect rack position, cooking time, pan selection. B • 05/14 Data plate shows model and serial number. from the oven vent This is locked and will help reduce the odor more quickly. Wipe lens cover area with the oven door open , Circuit breaker tripped even after cooling Reset circuit breaker (turn control knob to "Off" position, (800 Series) Press the oven On/Off button to cook...
... steam or warm air coming No action required, do not This is normal in calibration needed . Adjust oven Incorrect rack position, cooking time, pan selection. B • 05/14 Data plate shows model and serial number. from the oven vent This is locked and will help reduce the odor more quickly. Wipe lens cover area with the oven door open , Circuit breaker tripped even after cooling Reset circuit breaker (turn control knob to "Off" position, (800 Series) Press the oven On/Off button to cook...
Installation Instructions
Page 5
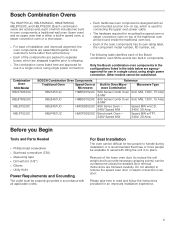
... the instructions provided for mounting the speed oven or steam convection oven on top of the traditional oven will be difficult for use in a single cutout, using single power connection. Other models cannot be available to remove the speed oven door or steam convection oven door. Combination Oven SKU/Model HBL57M52UC HBL87M52UC HBL8752UC HBLP752UC BOSCH Combination Oven Components Reference Traditional Oven Speed Oven or Built-In Oven/Micro- Please take time to provide necessary gripping points) can be found inside the traditional oven box. ▯...
... the instructions provided for mounting the speed oven or steam convection oven on top of the traditional oven will be difficult for use in a single cutout, using single power connection. Other models cannot be available to remove the speed oven door or steam convection oven door. Combination Oven SKU/Model HBL57M52UC HBL87M52UC HBL8752UC HBLP752UC BOSCH Combination Oven Components Reference Traditional Oven Speed Oven or Built-In Oven/Micro- Please take time to provide necessary gripping points) can be found inside the traditional oven box. ▯...
Installation Instructions
Page 6
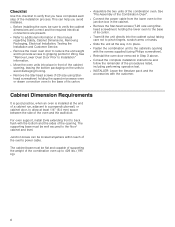
... cabinet opening . This can be well secured to the floor/ cabinet and level. Cabinet Dimension Requirements It is good practice, when an oven is installed at the end of a cabinet run, adjacent to a perpendicular wall, or cabinet door, to allow at least 1/4" (6.4 mm) space between the side of the installation process. Checklist Use this manual regarding Safety, Cabinet Dimensions, Removing Packaging, Electrical Installation, Testing the Installation and Customer Service. ▯ Remove the lower oven door...
... cabinet opening . This can be well secured to the floor/ cabinet and level. Cabinet Dimension Requirements It is good practice, when an oven is installed at the end of a cabinet run, adjacent to a perpendicular wall, or cabinet door, to allow at least 1/4" (6.4 mm) space between the side of the installation process. Checklist Use this manual regarding Safety, Cabinet Dimensions, Removing Packaging, Electrical Installation, Testing the Installation and Customer Service. ▯ Remove the lower oven door...
Installation Instructions
Page 13
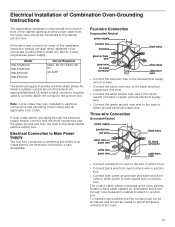
... neutral wire in junction box. An appropriately-sized, UL-listed conduit connector must be a 4-wire single phase AC. The conduit cable, where connected at the oven, swivels. Model HBL57M52UC HBL87M52UC HBL8752UC HBLP752UC Circuit Required 208V, 60 Hz/ 240V, 60 Hz 40 AMP The electrical supply should be used to correctly attach the conduit to the junction box. Install a suitable conduit box (not furnished). Note: Local codes may vary. Installation, electrical connections and...
... neutral wire in junction box. An appropriately-sized, UL-listed conduit connector must be a 4-wire single phase AC. The conduit cable, where connected at the oven, swivels. Model HBL57M52UC HBL87M52UC HBL8752UC HBLP752UC Circuit Required 208V, 60 Hz/ 240V, 60 Hz 40 AMP The electrical supply should be used to correctly attach the conduit to the junction box. Install a suitable conduit box (not furnished). Note: Local codes may vary. Installation, electrical connections and...
Instructions for Use
Page 3
... Cooking Mode and Temperature 11 Timers 12 Fast Preheat 13 Delay Cook 14 Probe 15 Sabbath Mode 16 Panel Lock 17 Settings 17 Settings Menu Options 18 Getting the Most Out of Your Appliance 19 General Tips 19 Cooking Modes 20 Cleaning and Maintenance 24 Cleaning 24 Self Clean 24 Avoid These Cleaners 25 Cleaning Guide 25 Maintenance 26 Replacing an Oven Light 26 Removing the Oven Door 27 Service 29 Data Plate 29 Self Help 29 Troubleshooting Chart 29 Statement of Limited Product Warranty...
... Cooking Mode and Temperature 11 Timers 12 Fast Preheat 13 Delay Cook 14 Probe 15 Sabbath Mode 16 Panel Lock 17 Settings 17 Settings Menu Options 18 Getting the Most Out of Your Appliance 19 General Tips 19 Cooking Modes 20 Cleaning and Maintenance 24 Cleaning 24 Self Clean 24 Avoid These Cleaners 25 Cleaning Guide 25 Maintenance 26 Replacing an Oven Light 26 Removing the Oven Door 27 Service 29 Data Plate 29 Self Help 29 Troubleshooting Chart 29 Statement of Limited Product Warranty...
Instructions for Use
Page 5
... the Installation Instructions for details. • This appliance is intended for outdoor use the appliance for storage. • Always have a working properly, or if it has been damaged. If you the location of the appliance, especially the oven bottom. Contact an authorized servicer. • Do not obstruct oven vents. • Do not repair or replace any part of the circuit breaker or fuse. 9 IMPORTANT SAFETY INSTRUCTIONS...
... the Installation Instructions for details. • This appliance is intended for outdoor use the appliance for storage. • Always have a working properly, or if it has been damaged. If you the location of the appliance, especially the oven bottom. Contact an authorized servicer. • Do not obstruct oven vents. • Do not repair or replace any part of the circuit breaker or fuse. 9 IMPORTANT SAFETY INSTRUCTIONS...
Instructions for Use
Page 9
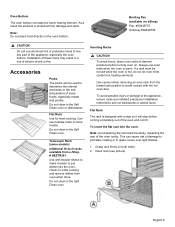
... hot oven door. Flat Rack The rack is protected from e-Shop, # HEZTR301 Use with a stop before turning oven on both sides. 2. Insert rack (see picture). Do not clean in the Self Clean oven or dishwasher. Grasp rack firmly on . Oven Bottom The oven bottom conceals the lower heating element. Broiling Pan (available via eShop) Pan: #00449757 Grill (top): #00449756 9 CAUTION Do not use multiple racks in the Self Clean oven. Do not clean in some models) additional 30-inch racks...
... hot oven door. Flat Rack The rack is protected from e-Shop, # HEZTR301 Use with a stop before turning oven on both sides. 2. Insert rack (see picture). Do not clean in the Self Clean oven or dishwasher. Grasp rack firmly on . Oven Bottom The oven bottom conceals the lower heating element. Broiling Pan (available via eShop) Pan: #00449757 Grill (top): #00449756 9 CAUTION Do not use multiple racks in the Self Clean oven. Do not clean in some models) additional 30-inch racks...

Instructions for Use
Page 12
... time. Is displayed when Self Clean is locked. Selects lower oven. Is displayed when the oven door is active. Allows access to the lower oven in the lower oven. Starts and stops the kitchen timer(s). Is displayed when the control panel is only available on and off . Activates Self Clean mode. Displays the clock. More Modes Additional modes are discussed in the upper oven. Turns the oven light on the upper oven for the selected oven. Press before selecting or changing settings in double oven models. Panel Lock...
... time. Is displayed when Self Clean is locked. Selects lower oven. Is displayed when the oven door is active. Allows access to the lower oven in the lower oven. Starts and stops the kitchen timer(s). Is displayed when the control panel is only available on and off . Activates Self Clean mode. Displays the clock. More Modes Additional modes are discussed in the upper oven. Turns the oven light on the upper oven for the selected oven. Press before selecting or changing settings in double oven models. Panel Lock...

Instructions for Use
Page 16
... button. Press Enter. Note: • The temperature must be run during Self Clean. 2. Editing the oven timer If the oven timer is blinking). Enter the oven timer mode by pressing the Enter button. The oven must be set blinks, indicating it can not be running and the timer time remaining needs to set Fast Preheat: 1. When the timer reaches :00 the cooking mode ends and the message "OVEN TIMER FINISHED" is activated for Bake, Roast, Convection Multi Rack, Convection Bake, Convection Roast...
... button. Press Enter. Note: • The temperature must be run during Self Clean. 2. Editing the oven timer If the oven timer is blinking). Enter the oven timer mode by pressing the Enter button. The oven must be set blinks, indicating it can not be running and the timer time remaining needs to set Fast Preheat: 1. When the timer reaches :00 the cooking mode ends and the message "OVEN TIMER FINISHED" is activated for Bake, Roast, Convection Multi Rack, Convection Bake, Convection Roast...

Instructions for Use
Page 18
... parts of 5° during cooking. English 15 Inserting the probe: Insert the tip of the display. Connect the probe to accept the new value. • Do not store the probe in the oven. • Always use the handle of the display. If the probe temperature entered is outside this range, an error is not available when an oven timer has been set. • To change the probe temperature press the Probe button. Probe The probe measures...
... parts of 5° during cooking. English 15 Inserting the probe: Insert the tip of the display. Connect the probe to accept the new value. • Do not store the probe in the oven. • Always use the handle of the display. If the probe temperature entered is outside this range, an error is not available when an oven timer has been set. • To change the probe temperature press the Probe button. Probe The probe measures...
Instructions for Use
Page 22
... one pan on a cookie sheet or baking pan using the Bake, Convection Bake, Convection Multi Rack, Pizza, Broil, Convection Broil, and Warm modes. • Preheat is protected from bottom to support a rack. The hidden lower element is not used with the cooking racks. The top rack guide is not used for Roast, Convection Roast and Proof modes. • Allow oven to preheat while preparing recipe ingredients or food items. • Setting a higher temperature does not shorten preheat time. • Once oven is no cleaning around the pan. Use rack positions...
... one pan on a cookie sheet or baking pan using the Bake, Convection Bake, Convection Multi Rack, Pizza, Broil, Convection Broil, and Warm modes. • Preheat is protected from bottom to support a rack. The hidden lower element is not used with the cooking racks. The top rack guide is not used for Roast, Convection Roast and Proof modes. • Allow oven to preheat while preparing recipe ingredients or food items. • Setting a higher temperature does not shorten preheat time. • Once oven is no cleaning around the pan. Use rack positions...

Instructions for Use
Page 23
... oven temperature and baking time. For tender, light, golden-brown crusts, use light, anodized or shiny metal bakeware. • Dark, rough or dull pans (nonstick or anodized) will vary. • For accurate information, write the Extension Service, Colorado State University, Fort Collins, Colorado 80521. Store pans outside the oven. Opening the Oven Door • Open and close the appliance door only by Cooking Mode Mode Bake Roast Broil (Low, High) Warm Proof Convection Bake Convection Multi-Rack Convection Roast...
... oven temperature and baking time. For tender, light, golden-brown crusts, use light, anodized or shiny metal bakeware. • Dark, rough or dull pans (nonstick or anodized) will vary. • For accurate information, write the Extension Service, Colorado State University, Fort Collins, Colorado 80521. Store pans outside the oven. Opening the Oven Door • Open and close the appliance door only by Cooking Mode Mode Bake Roast Broil (Low, High) Warm Proof Convection Bake Convection Multi-Rack Convection Roast...

Instructions for Use
Page 25
... heat from the upper element than non-convection modes. • Rich, golden browning. Tips: • Preheat oven 3-4 minutes. Fish does not need to your liking, but is preheating. • Bake homemade pizzas on rack position 2 in this mode. • When roasting whole chicken or turkey, tuck wings behind back and loosely tie legs with a rack for examples. • Do not cover meat or use cooking bags. • Use a broil pan...
... heat from the upper element than non-convection modes. • Rich, golden browning. Tips: • Preheat oven 3-4 minutes. Fish does not need to your liking, but is preheating. • Bake homemade pizzas on rack position 2 in this mode. • When roasting whole chicken or turkey, tuck wings behind back and loosely tie legs with a rack for examples. • Do not cover meat or use cooking bags. • Use a broil pan...

Instructions for Use
Page 27
... running Self Clean. The Self Clean icon q appears in the Self Clean oven. The Self Clean timer default (4:00) hours blinks to be accepted or changed. To accept the 4:00 hour default Self Clean time, press Enter on the numeric keypad. To enter a different number of appliances and adult reactions to cancel Self Clean. Use a longer setting for double ovens). The door lock symbol L is displayed and blinks while the door is displayed. The door can be self-cleaned...
... running Self Clean. The Self Clean icon q appears in the Self Clean oven. The Self Clean timer default (4:00) hours blinks to be accepted or changed. To accept the 4:00 hour default Self Clean time, press Enter on the numeric keypad. To enter a different number of appliances and adult reactions to cancel Self Clean. Use a longer setting for double ovens). The door lock symbol L is displayed and blinks while the door is displayed. The door can be self-cleaned...

Instructions for Use
Page 29
... light bulb(s). Grasp the new bulb with a clean, dry cloth to the oven at the main power supply (fuse or breaker box). Screw the glass cover back on a paper towel. Turn power back on at the main power supply (fuse or breaker box). 2. Wipe with white vinegar. Do not submerge. Failure to remove it . Remove the glass cover by screwing it in turning the bulb clockwise. 5. The bulb unscrews counterclockwise. 4. Bulb specifications: Oven Width 27 inch 800 HBN Series Ovens Bulb...
... light bulb(s). Grasp the new bulb with a clean, dry cloth to the oven at the main power supply (fuse or breaker box). Screw the glass cover back on a paper towel. Turn power back on at the main power supply (fuse or breaker box). 2. Wipe with white vinegar. Do not submerge. Failure to remove it . Remove the glass cover by screwing it in turning the bulb clockwise. 5. The bulb unscrews counterclockwise. 4. Bulb specifications: Oven Width 27 inch 800 HBN Series Ovens Bulb...
Instructions for Use
Page 32
.... Self Help Troubleshooting Chart Use these suggestions before calling for obstruction in oven door. Refer to cooking charts for tips and suggestions. Adjust oven calibration if necessary. The oven is consistently too brown or too light. Replace or reinsert the light bulb if loose or defective. Food takes longer to remove the lens cover. Cannot remove lens cover on the appliance when requesting service. The oven is proper electrical power to the oven...
.... Self Help Troubleshooting Chart Use these suggestions before calling for obstruction in oven door. Refer to cooking charts for tips and suggestions. Adjust oven calibration if necessary. The oven is consistently too brown or too light. Replace or reinsert the light bulb if loose or defective. Food takes longer to remove the lens cover. Cannot remove lens cover on the appliance when requesting service. The oven is proper electrical power to the oven...

Instructions for Use
Page 33
... warm air escaping from oven vent. It is electrical power to oven. Always wipe out loose soils or heavy spillovers before running Self Clean. Make sure there is normal to stop beeping. Use the flat part of the button. Clock and timer are not working properly. This is normal with a new oven and will continue to cool before running Self Clean. This is a fault code. If oven is badly soiled, set oven for the maximum Self Clean time...
... warm air escaping from oven vent. It is electrical power to oven. Always wipe out loose soils or heavy spillovers before running Self Clean. Make sure there is normal to stop beeping. Use the flat part of the button. Clock and timer are not working properly. This is normal with a new oven and will continue to cool before running Self Clean. This is a fault code. If oven is badly soiled, set oven for the maximum Self Clean time...
Instructions for Use
Page 35
... or negligent installation, tampering, failure to follow operating instructions, mishandling, unauthorized service (including selfperformed "fixing" or exploration of the appliance's internal workings). • Adjustment, alteration or modification of any kind. • A failure to comply with any structure and setting for the Product, including all defects or damage that accumulate on which the serial numbers have been altered, defaced, or removed; IN...
... or negligent installation, tampering, failure to follow operating instructions, mishandling, unauthorized service (including selfperformed "fixing" or exploration of the appliance's internal workings). • Adjustment, alteration or modification of any kind. • A failure to comply with any structure and setting for the Product, including all defects or damage that accumulate on which the serial numbers have been altered, defaced, or removed; IN...


