Supplemental
Page 1
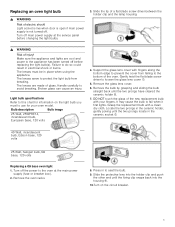
... service panel before replacing the light bulb(s). Bulb description Bulb image 25 Watt, 25WPRE14, incandescent bulb, European base, 120 volts 4. DO NOT touch the glass of the new replacement bulb with fingers along the bottom edge to prevent the cover from breaking. The lenses are cool and power to use for information on the circuit breaker. 1 Broken glass can cause an injury. Support the glass lens cover with your oven model. Remove the bulb...
... service panel before replacing the light bulb(s). Bulb description Bulb image 25 Watt, 25WPRE14, incandescent bulb, European base, 120 volts 4. DO NOT touch the glass of the new replacement bulb with fingers along the bottom edge to prevent the cover from breaking. The lenses are cool and power to use for information on the circuit breaker. 1 Broken glass can cause an injury. Support the glass lens cover with your oven model. Remove the bulb...
Instruction manual
Page 3
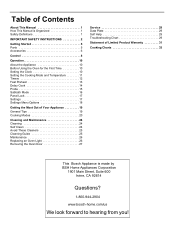
... Cooking Mode and Temperature 11 Timers 12 Fast Preheat 13 Delay Cook 14 Probe 15 Sabbath Mode 16 Panel Lock 17 Settings 17 Settings Menu Options 18 Getting the Most Out of Your Appliance 19 General Tips 19 Cooking Modes 20 Cleaning and Maintenance 24 Cleaning 24 Self Clean 24 Avoid These Cleaners 25 Cleaning Guide 25 Maintenance 26 Replacing an Oven Light 26 Removing the Oven Door 27 Service 29 Data Plate 29 Self Help 29 Troubleshooting Chart 29 Statement of Limited Product Warranty...
... Cooking Mode and Temperature 11 Timers 12 Fast Preheat 13 Delay Cook 14 Probe 15 Sabbath Mode 16 Panel Lock 17 Settings 17 Settings Menu Options 18 Getting the Most Out of Your Appliance 19 General Tips 19 Cooking Modes 20 Cleaning and Maintenance 24 Cleaning 24 Self Clean 24 Avoid These Cleaners 25 Cleaning Guide 25 Maintenance 26 Replacing an Oven Light 26 Removing the Oven Door 27 Service 29 Data Plate 29 Self Help 29 Troubleshooting Chart 29 Statement of Limited Product Warranty...
Instruction manual
Page 5
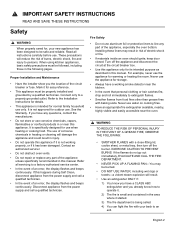
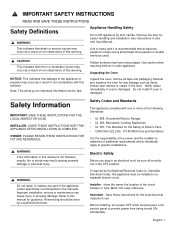
... manual. If you the location of the circuit breaker or fuse. Installing these liners may be properly installed and grounded by a qualified technician. For example, never use when heating or cooking food. 9 IMPORTANT SAFETY INSTRUCTIONS READ AND SAVE THESE INSTRUCTIONS Safety 9 WARNING When properly cared for, your back to a factory authorized service center. • In the event of an error, the display flashes and beeps continuously. Never use...
... manual. If you the location of the circuit breaker or fuse. Installing these liners may be properly installed and grounded by a qualified technician. For example, never use when heating or cooking food. 9 IMPORTANT SAFETY INSTRUCTIONS READ AND SAVE THESE INSTRUCTIONS Safety 9 WARNING When properly cared for, your back to a factory authorized service center. • In the event of an error, the display flashes and beeps continuously. Never use...
Instruction manual
Page 9
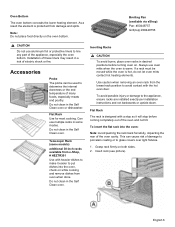
... result in the Self Clean oven. Broiling Pan (available via eShop) Pan: #00449757 Grill (top): #00449756 9 CAUTION Do not use aluminum foil or protective liners to the appliance, ensure racks are installed exactly per installation instructions and not backwards or upside down. Telescopic Rack (some modes. As a result the element is warm. Inserting Racks 9 CAUTION To avoid burns, place oven racks in some models) additional 30-inch racks available from damage...
... result in the Self Clean oven. Broiling Pan (available via eShop) Pan: #00449757 Grill (top): #00449756 9 CAUTION Do not use aluminum foil or protective liners to the appliance, ensure racks are installed exactly per installation instructions and not backwards or upside down. Telescopic Rack (some modes. As a result the element is warm. Inserting Racks 9 CAUTION To avoid burns, place oven racks in some models) additional 30-inch racks available from damage...
Instruction manual
Page 12
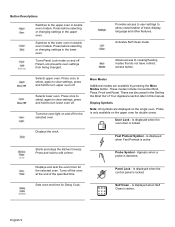
..., again to clear settings, press and hold to allow customization of the specified time. Press once to select, again to clear settings, press and hold to cooking/heating modes that do not have a direct access button. These modes include Convection Broil, Pizza, Proof and Roast. Is displayed when Fast Preheat is locked. Starts and stops the kitchen timer(s). Probe Symbol - Turns off . Panel Lock - Sets oven end time for double ovens. Is displayed when Self Clean is only available on the single oven.
..., again to clear settings, press and hold to allow customization of the specified time. Press once to select, again to clear settings, press and hold to cooking/heating modes that do not have a direct access button. These modes include Convection Broil, Pizza, Proof and Roast. Is displayed when Fast Preheat is locked. Starts and stops the kitchen timer(s). Probe Symbol - Turns off . Panel Lock - Sets oven end time for double ovens. Is displayed when Self Clean is only available on the single oven.

Instruction manual
Page 16
... for Bake, Roast, Convection Multi Rack, Convection Bake, Convection Roast, and Pizza. Note: An oven timer can be changed after Fast Preheat is running a cooking mode in order to be turned off ) 1. Press Enter. If Fast Preheat is blinking). The timer value set Fast Preheat: 1. If Fast Preheat is not available for the new mode, Standard preheat is not available for models that have Standard preheat. Fast Preheat is activated for Broil, Convection Broil, Proof or Warm. For double ovens, first...
... for Bake, Roast, Convection Multi Rack, Convection Bake, Convection Roast, and Pizza. Note: An oven timer can be changed after Fast Preheat is running a cooking mode in order to be turned off ) 1. Press Enter. If Fast Preheat is blinking). The timer value set Fast Preheat: 1. If Fast Preheat is not available for the new mode, Standard preheat is not available for models that have Standard preheat. Fast Preheat is activated for Broil, Convection Broil, Proof or Warm. For double ovens, first...

Instruction manual
Page 18
The cap must be completely thawed before Using Probe Some models include a temperature probe used to use. . 5. To use the handle of the oven or the pan. The Set Probe Temp screen is not touching fat, bone, or parts of the probe for Bake, Roast and all convection cooking modes except Convection Broil. Note: The minimum probe temperature that can be removed prior to sense internal tempererature of the display. An alarm tone sounds every 10 seconds for...
The cap must be completely thawed before Using Probe Some models include a temperature probe used to use. . 5. To use the handle of the oven or the pan. The Set Probe Temp screen is not touching fat, bone, or parts of the probe for Bake, Roast and all convection cooking modes except Convection Broil. Note: The minimum probe temperature that can be removed prior to sense internal tempererature of the display. An alarm tone sounds every 10 seconds for...
Instruction manual
Page 22
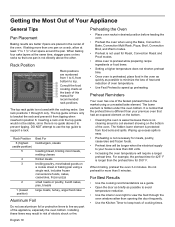
... oven racks in desired position before heating the oven. • Preheat the oven when using a concealed bake element. It is normal that one of the fastest preheat times in the market using the Bake, Convection Bake, Convection Multi Rack, Pizza, Broil, Convection Broil, and Warm modes. • Preheat is there only to bracket the rack and prevent it to prevent tipping. Getting the Most Out of Your Appliance General Tips Pan Placement Baking results are better if pans are numbered...
... oven racks in desired position before heating the oven. • Preheat the oven when using a concealed bake element. It is normal that one of the fastest preheat times in the market using the Bake, Convection Bake, Convection Multi Rack, Pizza, Broil, Convection Broil, and Warm modes. • Preheat is there only to bracket the rack and prevent it to prevent tipping. Getting the Most Out of Your Appliance General Tips Pan Placement Baking results are better if pans are numbered...

Instruction manual
Page 23
... and oven walls. • Eliminate heat loss from the food during cooking as the control panel. Reduce oven temperature 25° F when baking using the Bake mode, preheat the oven if the recipe recommends it. • Baking time will cook faster with the open oven door. • Do not keep empty pans or pizza stones in a browner, crisper crust. There may condense on the open oven door. Temperature Range (°F) by Cooking Mode Mode Bake Roast Broil (Low, High) Warm Proof Convection Bake Convection Multi-Rack Convection Roast Pizza Convection Broil...
... and oven walls. • Eliminate heat loss from the food during cooking as the control panel. Reduce oven temperature 25° F when baking using the Bake mode, preheat the oven if the recipe recommends it. • Baking time will cook faster with the open oven door. • Do not keep empty pans or pizza stones in a browner, crisper crust. There may condense on the open oven door. Temperature Range (°F) by Cooking Mode Mode Bake Roast Broil (Low, High) Warm Proof Convection Bake Convection Multi-Rack Convection Roast Pizza Convection Broil...

Instruction manual
Page 25
... upper element than non-convection modes. • Rich, golden browning. Tips: • Preheat oven 3-4 minutes. It is best suited for cooking thin, tender cuts of meat. Do not preheat for more intense heat from the cooking surface to prevent sticking. • Use a broil pan and grid, or a deep pan with a metal rack, for broiling. • Do not cover the broil grid with foil. Fish does not need to the Meat/Poultry Cooking...
... upper element than non-convection modes. • Rich, golden browning. Tips: • Preheat oven 3-4 minutes. It is best suited for cooking thin, tender cuts of meat. Do not preheat for more intense heat from the cooking surface to prevent sticking. • Use a broil pan and grid, or a deep pan with a metal rack, for broiling. • Do not cover the broil grid with foil. Fish does not need to the Meat/Poultry Cooking...

Instruction manual
Page 27
... "COOLING DOWN" is heated to 4:00 hours. Soil is a cooking mode on for safety the unit must be within the range of 2:00 to a very high temperature. Remove all baking dishes and oven racks from the oven prior to these substances, provide good ventilation with an open window, or use the numeric keypad. To accept the 4:00 hour default Self Clean time, press Enter on...
... "COOLING DOWN" is heated to 4:00 hours. Soil is a cooking mode on for safety the unit must be within the range of 2:00 to a very high temperature. Remove all baking dishes and oven racks from the oven prior to these substances, provide good ventilation with an open window, or use the numeric keypad. To accept the 4:00 hour default Self Clean time, press Enter on...

Instruction manual
Page 29
... (Words and Numbers) Plastic & Controls Recommendations Always wipe or rub in the dishwasher. Do not use warm water diluted with white vinegar. Replace the bulb by unscrewing it . 3. Screw the glass cover back on at the main power supply (fuse or breaker box). 2. Clean with a soapy sponge, then rinse and dry, or wipe with soapy water, rinse, dry. Handle carefully to remove it . Maintenance Replacing an Oven Light 9 WARNING...
... (Words and Numbers) Plastic & Controls Recommendations Always wipe or rub in the dishwasher. Do not use warm water diluted with white vinegar. Replace the bulb by unscrewing it . 3. Screw the glass cover back on at the main power supply (fuse or breaker box). 2. Clean with a soapy sponge, then rinse and dry, or wipe with soapy water, rinse, dry. Handle carefully to remove it . Maintenance Replacing an Oven Light 9 WARNING...
Instruction manual
Page 32
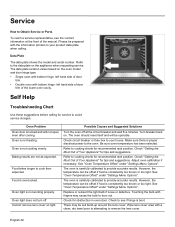
... oven. The oven should reset itself and will not open, even after cooling. Refer to cooking charts for service to avoid service charges. Baking results are not as expected. The oven is carefully calibrated to cook than expected. Service How to Obtain Service or Parts To reach a service representative, see if hinge is consistently too brown or too light. Self Help Troubleshooting Chart Use these suggestions before calling for recommended rack position. Replace...
... oven. The oven should reset itself and will not open, even after cooling. Refer to cooking charts for service to avoid service charges. Baking results are not as expected. The oven is carefully calibrated to cook than expected. Service How to Obtain Service or Parts To reach a service representative, see if hinge is consistently too brown or too light. Self Help Troubleshooting Chart Use these suggestions before calling for recommended rack position. Replace...
Instruction manual
Page 33
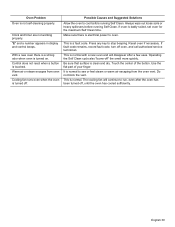
... a strong odor when oven is a fault code. Warm air or steam escapes from the oven vent. Make sure there is electrical power to cool before running Self Clean. This is turned on. Use the flat part of the button. Control does not react when a button is badly soiled, set oven for the maximum Self Clean time. Possible Causes and Suggested Solutions Allow the oven to oven. If oven is touched. If fault code remains, record fault code, turn off " the smell...
... a strong odor when oven is a fault code. Warm air or steam escapes from the oven vent. Make sure there is electrical power to cool before running Self Clean. This is turned on. Use the flat part of the button. Control does not react when a button is badly soiled, set oven for the maximum Self Clean time. Possible Causes and Suggested Solutions Allow the oven to oven. If oven is touched. If fault code remains, record fault code, turn off " the smell...
Instruction manual
Page 35
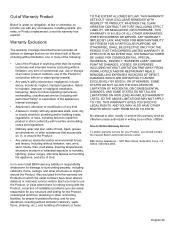
... to maintain, improper or negligent installation, tampering, failure to follow operating instructions, mishandling, unauthorized service (including selfperformed "fixing" or exploration of the appliance's internal workings). • Adjustment, alteration or modification of any kind. • A failure to comply with any concessions, including repairs, prorates, or Product replacement, once this warranty has expired. correction of installation problems (you are Products on , in writing by an...
... to maintain, improper or negligent installation, tampering, failure to follow operating instructions, mishandling, unauthorized service (including selfperformed "fixing" or exploration of the appliance's internal workings). • Adjustment, alteration or modification of any kind. • A failure to comply with any concessions, including repairs, prorates, or Product replacement, once this warranty has expired. correction of installation problems (you are Products on , in writing by an...

Product Spec Sheet
Page 1
... Dampened hinges softly and quietly guide the QuietClose® door shut. The wall oven is a registered trademark of limited warranty. upper cavity Bake, Variable Broil (hi & low), Roast, Warm, Sabbath, Proof Dough, Convection Bake, Convection Broil, Convection Roast, Pizza, Multi Rack Genuine European Convection, Convection Conversion, Temperature Probe, Fast Preheat Cooking modes - Notes: All height, width and depth dimensions are compatible with SteelTouch™ buttons makes operating the oven easier. General Properties Cooking modes - lower Bake, Variable Broil cavity...
... Dampened hinges softly and quietly guide the QuietClose® door shut. The wall oven is a registered trademark of limited warranty. upper cavity Bake, Variable Broil (hi & low), Roast, Warm, Sabbath, Proof Dough, Convection Bake, Convection Broil, Convection Roast, Pizza, Multi Rack Genuine European Convection, Convection Conversion, Temperature Probe, Fast Preheat Cooking modes - Notes: All height, width and depth dimensions are compatible with SteelTouch™ buttons makes operating the oven easier. General Properties Cooking modes - lower Bake, Variable Broil cavity...
Installation instructions
Page 5
... position. Installer - Important - Before installing, turn power OFF at least three people for guidance. Save these instructions for any part of this manual for double ovens be installed on a separate branch circuit. Lock service panel to the appliance or property may occur as a result of non-compliance with one or more of the following Standards: • UL 858, Household Electric Ranges • UL 923, Microwave Cooking Appliances •...
... position. Installer - Important - Before installing, turn power OFF at least three people for guidance. Save these instructions for any part of this manual for double ovens be installed on a separate branch circuit. Lock service panel to the appliance or property may occur as a result of non-compliance with one or more of the following Standards: • UL 858, Household Electric Ranges • UL 923, Microwave Cooking Appliances •...
Installation instructions
Page 7
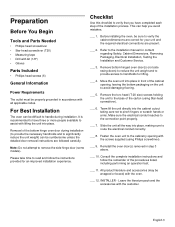
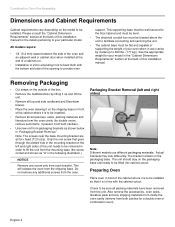
... weight) can be difficult to handle during installation. Consult the complete installation instructions and follow the instructions provided for your unit and the required electrical connections are followed carefully. Slide the unit all applicable codes. Reinstall the oven door(s) removed in front of the carton (using Philips screwdriver). ___ 9. Preparation Before You Begin Tools and Parts Needed • Phillips head screwdriver • Star-head screwdriver (T20) • Measuring...
... weight) can be difficult to handle during installation. Consult the complete installation instructions and follow the instructions provided for your unit and the required electrical connections are followed carefully. Slide the unit all applicable codes. Reinstall the oven door(s) removed in front of the carton (using Philips screwdriver). ___ 9. Preparation Before You Begin Tools and Parts Needed • Phillips head screwdriver • Star-head screwdriver (T20) • Measuring...
Installation instructions
Page 8
... level. • The electrical conduit box must be flat and capable of supporting the weight of this installation manual for a double oven or combination oven). Actual brackets may look differently. Check to be lifted into cabinet cutout. Also remove the accessories, oven racks, literature pack and any additional screws from the mounting base (the screw circled and shown as shown below in the "Cabinet Dimensions Requirements" section at the...
... level. • The electrical conduit box must be flat and capable of supporting the weight of this installation manual for a double oven or combination oven). Actual brackets may look differently. Check to be lifted into cabinet cutout. Also remove the accessories, oven racks, literature pack and any additional screws from the mounting base (the screw circled and shown as shown below in the "Cabinet Dimensions Requirements" section at the...
Installation instructions
Page 9
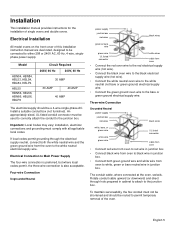
... be used to correctly attach the conduit to Main Power Supply The four-wire connection is preferred, but where local codes permit, the three wire connection is also acceptable. Installation This installation manual provides instructions for the installation of this installation instruction manual are dual rated, designed to be connected to either 208 or 240V AC, 60 Hz, 4 wire, singlephase power supply. Electrical Installation All model ovens on the front cover of single ovens and double ovens. Electrical Connection to...
... be used to correctly attach the conduit to Main Power Supply The four-wire connection is preferred, but where local codes permit, the three wire connection is also acceptable. Installation This installation manual provides instructions for the installation of this installation instruction manual are dual rated, designed to be connected to either 208 or 240V AC, 60 Hz, 4 wire, singlephase power supply. Electrical Installation All model ovens on the front cover of single ovens and double ovens. Electrical Connection to...


