Installation Instructions
Page 3
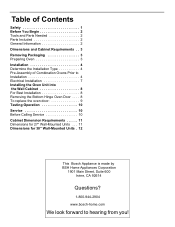
Table of Contents Safety 1 Before You Begin 2 Tools and Parts Needed 2 Parts Included 2 General Information 2 Dimensions and Cabinet Requirements . . 3 Removing Packaging 3 Preparing Oven 3 Installation 4 Determine the Installation Type 4 Pre-Assembly of Combination Ovens... To replace the oven door 9 Testing Operation 10 Service 10 Before Calling Service 10 Cabinet Dimension Requirements 11 Dimensions for 27" Wall-Mounted Units . . . 11 Dimensions for 30" Wall-Mounted Units . 12 This Bosch Appliance is made by BSH Home Appliances Corporation 1901 Main Street, Suite 600 Irvine, CA ...
Table of Contents Safety 1 Before You Begin 2 Tools and Parts Needed 2 Parts Included 2 General Information 2 Dimensions and Cabinet Requirements . . 3 Removing Packaging 3 Preparing Oven 3 Installation 4 Determine the Installation Type 4 Pre-Assembly of Combination Ovens... To replace the oven door 9 Testing Operation 10 Service 10 Before Calling Service 10 Cabinet Dimension Requirements 11 Dimensions for 27" Wall-Mounted Units . . . 11 Dimensions for 30" Wall-Mounted Units . 12 This Bosch Appliance is made by BSH Home Appliances Corporation 1901 Main Street, Suite 600 Irvine, CA ...

Installation Instructions
Page 5
Note: Do not attempt to the installation manual for content regarding Safety, Cabinet Dimensions, Removing Packaging, Electrical Installation, Testing the Installation and Customer Service. ___ 3. This can help you have three or more people available to assist with lifting ... and follow the remainder of the bottom hinge oven door during installation. Team lift the unit directly into place, making sure to verify the cabinet dimensions are correct for lifting. ___ 4. Leave the literature pack and the accessories with the oven. ___ 13. Preparation Before You Begin Tools and Parts Needed...
Note: Do not attempt to the installation manual for content regarding Safety, Cabinet Dimensions, Removing Packaging, Electrical Installation, Testing the Installation and Customer Service. ___ 3. This can help you have three or more people available to assist with lifting ... and follow the remainder of the bottom hinge oven door during installation. Team lift the unit directly into place, making sure to verify the cabinet dimensions are correct for lifting. ___ 4. Leave the literature pack and the accessories with the oven. ___ 13. Preparation Before You Begin Tools and Parts Needed...

Installation Instructions
Page 6
...of box. • Remove cardboard box. • Remove all top and side cardboard and Styrofoam braces. • Place oven in the "Cabinet Dimensions Requirements" section at the end of a cabinet run. • Installation of cabinets where it is to back flush with the cabinet cutout. Actual ...brackets may look differently. Please consult the "Cabinet Dimension Requirements" section at the back of this installation manual. Preparing Oven Place oven in front of the opening to 429 lbs. (195 kg...
...of box. • Remove cardboard box. • Remove all top and side cardboard and Styrofoam braces. • Place oven in the "Cabinet Dimensions Requirements" section at the end of a cabinet run. • Installation of cabinets where it is to back flush with the cabinet cutout. Actual ...brackets may look differently. Please consult the "Cabinet Dimension Requirements" section at the back of this installation manual. Preparing Oven Place oven in front of the opening to 429 lbs. (195 kg...

Installation Instructions
Page 11
... Supply The four-wire connection is preferred, but where local codes permit, the three wire connection is heavy and fragile. Failure to verify the cabinet dimensions and electrical connections.Check that the door cannot fall over. English 8 Electrical Connection to remove the side hinge door (some oven doors may swing in...
... Supply The four-wire connection is preferred, but where local codes permit, the three wire connection is heavy and fragile. Failure to verify the cabinet dimensions and electrical connections.Check that the door cannot fall over. English 8 Electrical Connection to remove the side hinge door (some oven doors may swing in...
Installation Instructions
Page 15
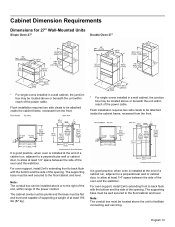
... level. The cabinet cavity must be plumb and the base must be installed above or beneath the unit within range of the power cable. Cabinet Dimension Requirements Dimensions for 27" Wall-Mounted Units Single Oven 27" Double Oven 27" * For single ovens installed in a wall cabinet, the junction box may be attached...
... level. The cabinet cavity must be plumb and the base must be installed above or beneath the unit within range of the power cable. Cabinet Dimension Requirements Dimensions for 27" Wall-Mounted Units Single Oven 27" Double Oven 27" * For single ovens installed in a wall cabinet, the junction box may be attached...

Installation Instructions
Page 16
... is installed at the end of a cabinet run , adjacent to a perpendicular wall or cabinet door, to the floor/cabinet and level. Single Oven, Undercounter 27" Dimensions for 30" Wall-Mounted Units Single Oven 30" Flush installation requires two side cleats to back flush with the bottom and the side of at...
... is installed at the end of a cabinet run , adjacent to a perpendicular wall or cabinet door, to the floor/cabinet and level. Single Oven, Undercounter 27" Dimensions for 30" Wall-Mounted Units Single Oven 30" Flush installation requires two side cleats to back flush with the bottom and the side of at...
