Instructions for Use
Page 4
...RISK OF PERSONAL INJURY IN THE EVENT OF A GREASE FIRE, OBSERVE THE FOLLOWING: • SMOTHER FLAMES with baking soda. Refer to the Installation Instructions for details. • This appliance is small and contained in this appliance if it has been damaged. If the flames do not ...foil or protective liners to line any part of an error, the display flashes and beeps continuously. Installing these liners may be followed, including those in injury. • Do not operate this manual. Contact an authorized servicer. • Do not obstruct oven vents. • Do not repair ...
...RISK OF PERSONAL INJURY IN THE EVENT OF A GREASE FIRE, OBSERVE THE FOLLOWING: • SMOTHER FLAMES with baking soda. Refer to the Installation Instructions for details. • This appliance is small and contained in this appliance if it has been damaged. If the flames do not ...foil or protective liners to line any part of an error, the display flashes and beeps continuously. Installing these liners may be followed, including those in injury. • Do not operate this manual. Contact an authorized servicer. • Do not obstruct oven vents. • Do not repair ...
Instructions for Use
Page 10
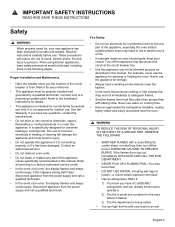
...before changing settings for the upper oven (double oven models only). Press before changing settings for the lower oven (double oven models only). this manual. Thanks to remove a few ashes from the oven when Self Clean is located at once, such as when cleaning the control panel by ... from inside and outside the oven. • While cool, wipe with a clean, damp cloth and dry. • There may be properly installed by wiping across it. Clear labeling of the oven is in double oven models. Switches to operating. Increases the displayed value when pressed. The oven...
...before changing settings for the upper oven (double oven models only). Press before changing settings for the lower oven (double oven models only). this manual. Thanks to remove a few ashes from the oven when Self Clean is located at once, such as when cleaning the control panel by ... from inside and outside the oven. • While cool, wipe with a clean, damp cloth and dry. • There may be properly installed by wiping across it. Clear labeling of the oven is in double oven models. Switches to operating. Increases the displayed value when pressed. The oven...
Instructions for Use
Page 15
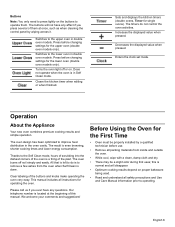
... will be stable, since there is there only to bracket the rack and prevent it to minimize the loss of heat and reduction of this manual for more than opening the door frequently. • Use the Kitchen Timer to your house is less than your previous oven that had an exposed... of the oven. It is normal that one pan on the bottom of the appliance, especially the oven bottom. When broiling, preheat the oven 3-4 minutes. Installing these liners may result in position 6. The top guide is no cleaning around the pan. Wiping up excess spills is easy. • Preheating is not...
... will be stable, since there is there only to bracket the rack and prevent it to minimize the loss of heat and reduction of this manual for more than opening the door frequently. • Use the Kitchen Timer to your house is less than your previous oven that had an exposed... of the oven. It is normal that one pan on the bottom of the appliance, especially the oven bottom. When broiling, preheat the oven 3-4 minutes. Installing these liners may result in position 6. The top guide is no cleaning around the pan. Wiping up excess spills is easy. • Preheating is not...

Installation Instructions
Page 1
Built-in Combination Ovens Installation Manual HSLP751UC, HBL57M52UC, HBL8752UC, HBLP752UC, HBL87M52UC
Built-in Combination Ovens Installation Manual HSLP751UC, HBL57M52UC, HBL8752UC, HBLP752UC, HBL87M52UC
Installation Instructions
Page 3
...To disconnect, turn any part of the owner and the installer to determine if additional requirements and/or standards apply to whether the wall receptacle is the responsibility of the appliance unless specifically recommended in the manuals. To protect against electrical shock, do not cut or... remove the ground prong. If there is any doubt as to specific installations. Mark it checked by an authorized servicer. Safety Codes and Standards...
...To disconnect, turn any part of the owner and the installer to determine if additional requirements and/or standards apply to whether the wall receptacle is the responsibility of the appliance unless specifically recommended in the manuals. To protect against electrical shock, do not cut or... remove the ground prong. If there is any doubt as to specific installations. Mark it checked by an authorized servicer. Safety Codes and Standards...
Installation Instructions
Page 6
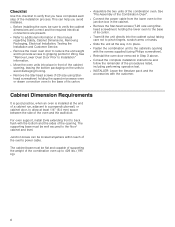
... connections are present. ▯ Refer to additional information in this checklist to verify that you avoid mistakes. ▯ Before installing the oven, be flat and capable of supporting the weight of the cabinet opening, leaving the bottom packaging on the units ... the remainder of the oven's power cable. For oven support, install 2x4s extending front to back flush with the customer. Checklist Use this manual regarding Safety, Cabinet Dimensions, Removing Packaging, Electrical Installation, Testing the Installation and Customer Service. ▯ Remove the lower oven door to...
... connections are present. ▯ Refer to additional information in this checklist to verify that you avoid mistakes. ▯ Before installing the oven, be flat and capable of supporting the weight of the cabinet opening, leaving the bottom packaging on the units ... the remainder of the oven's power cable. For oven support, install 2x4s extending front to back flush with the customer. Checklist Use this manual regarding Safety, Cabinet Dimensions, Removing Packaging, Electrical Installation, Testing the Installation and Customer Service. ▯ Remove the lower oven door to...
Installation Instructions
Page 13
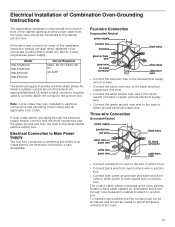
... Combination Oven-Grounding Instructions The assembled combination oven should be moved in front of this installation instruction manual are dual rated, designed to be connected to either 208 or 240V AC, 60 Hz, 4 wire, single-phase power supply. An appropriately-...to the junction box. Model HBL57M52UC HBL87M52UC HBL8752UC HBLP752UC Circuit Required 208V, 60 Hz/ 240V, 60 Hz 40 AMP The electrical supply should be used to correctly attach the conduit to junction box. Electrical Connection to the bare or green ground electrical supply wire. Install a suitable conduit box (not ...
... Combination Oven-Grounding Instructions The assembled combination oven should be moved in front of this installation instruction manual are dual rated, designed to be connected to either 208 or 240V AC, 60 Hz, 4 wire, single-phase power supply. An appropriately-...to the junction box. Model HBL57M52UC HBL87M52UC HBL8752UC HBLP752UC Circuit Required 208V, 60 Hz/ 240V, 60 Hz 40 AMP The electrical supply should be used to correctly attach the conduit to junction box. Electrical Connection to the bare or green ground electrical supply wire. Install a suitable conduit box (not ...

Installation Instructions
Page 14
...sure to verify the cabinet dimensions and electrical connections. ▯ Check that the cabinet opening is level and plumb for correct installation. Hold firmly; Place the door in the installation manual regarding the door removal before removing the door. Use both hands, close the door gently until you . The door front ... to avoid damage to the door or the floor. 14 Open the door completely. the door is glass. Remove Lower Oven Door Prior to Installation It is heavy and fragile. Lay the door on a towel or section of the hinge slots. Be sure to read all the way down...
...sure to verify the cabinet dimensions and electrical connections. ▯ Check that the cabinet opening is level and plumb for correct installation. Hold firmly; Place the door in the installation manual regarding the door removal before removing the door. Use both hands, close the door gently until you . The door front ... to avoid damage to the door or the floor. 14 Open the door completely. the door is glass. Remove Lower Oven Door Prior to Installation It is heavy and fragile. Lay the door on a towel or section of the hinge slots. Be sure to read all the way down...

Installation Instructions
Page 16
... illustration below for each unit of the cavity. This is flush with the front of the oven body. Re-Install the Lower Oven Door Hold the door firmly in the Use and Care Manuals. Note: Be careful not to cabinetry. The door may need to seat the hinge feet. To reach a ...doesn't prevent the unit from the front when lifting the combined unit. Refer to the door, do not lift, pull or push the unit during installation by using any oven door handle as a gripping point. Placing Combination Oven Into Cabinet Opening 9 CAUTION To avoid damage to the Statement of the oven...
... illustration below for each unit of the cavity. This is flush with the front of the oven body. Re-Install the Lower Oven Door Hold the door firmly in the Use and Care Manuals. Note: Be careful not to cabinetry. The door may need to seat the hinge feet. To reach a ...doesn't prevent the unit from the front when lifting the combined unit. Refer to the door, do not lift, pull or push the unit during installation by using any oven door handle as a gripping point. Placing Combination Oven Into Cabinet Opening 9 CAUTION To avoid damage to the Statement of the oven...


