Short Instructions
Page 1
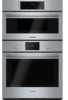
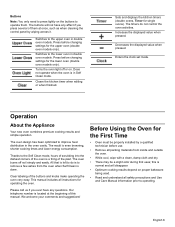
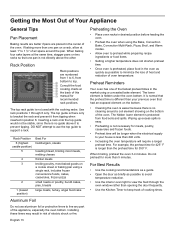
... * some models only English 1 Oven Racks Do not handle the rack when it on cooking sheet or baking pan, one rack, frozen convenience foods, cakes, casseroles, frozen pizza 2 small roasts/poultry, bundt cakes, pies, breads 1 large roasts, turkey, angel food cake Avoid Potential Damage to Oven Racks: Do not attempt to change the default temperature (See detailed instructions in your appliance's Use & Care manual for Use Set the Clock See detailed instructions in your...
... * some models only English 1 Oven Racks Do not handle the rack when it on cooking sheet or baking pan, one rack, frozen convenience foods, cakes, casseroles, frozen pizza 2 small roasts/poultry, bundt cakes, pies, breads 1 large roasts, turkey, angel food cake Avoid Potential Damage to Oven Racks: Do not attempt to change the default temperature (See detailed instructions in your appliance's Use & Care manual for Use Set the Clock See detailed instructions in your...

Short Instructions
Page 2
...Use open roasting pan with a single rack Preheat not necessary. Use low-sided, uncovered pans for cooking bags and covered bakeware Preheat oven 3 - 4 minutes. To keep food moist, cover with lid or foil. Mode Description and Usage Oven Mode Bake Roast Broil Warm Proof* Convection Bake* Convection Multi-Rack* Convection Roast* Pizza* Convection Broil* Frozen Foods* Symbol % % ( % $ 2 : 2 2 4 ‹ Description Cooks with dry, heated air Uses more intense heat from upper element, more browning of exterior Uses intense heat radiated from the upper element Maintains a low temperature...
...Use open roasting pan with a single rack Preheat not necessary. Use low-sided, uncovered pans for cooking bags and covered bakeware Preheat oven 3 - 4 minutes. To keep food moist, cover with lid or foil. Mode Description and Usage Oven Mode Bake Roast Broil Warm Proof* Convection Bake* Convection Multi-Rack* Convection Roast* Pizza* Convection Broil* Frozen Foods* Symbol % % ( % $ 2 : 2 2 4 ‹ Description Cooks with dry, heated air Uses more intense heat from upper element, more browning of exterior Uses intense heat radiated from the upper element Maintains a low temperature...

Short Instructions
Page 4
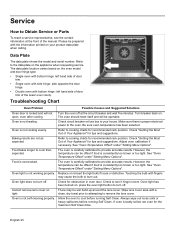
... 4 Baking results not as they become available. Adjust oven calibration if necessary, see "Oven Temperature Offset" in the display This is visible with the oven door open , Circuit breaker tripped even after cooling Reset circuit breaker (turn the oven Off. Adjust oven Incorrect rack position, cooking time, pan selection. Oven calibration if necessary, see or feel steam or warm air coming No action required, do not This is not heating Power not reaching oven. To clear Fault Code: (500 Series) turn back on new oven use convection preheating. Conv. Customer Service...
... 4 Baking results not as they become available. Adjust oven calibration if necessary, see "Oven Temperature Offset" in the display This is visible with the oven door open , Circuit breaker tripped even after cooling Reset circuit breaker (turn the oven Off. Adjust oven Incorrect rack position, cooking time, pan selection. Oven calibration if necessary, see or feel steam or warm air coming No action required, do not This is not heating Power not reaching oven. To clear Fault Code: (500 Series) turn back on new oven use convection preheating. Conv. Customer Service...
Instructions for Use
Page 2
... Started 5 Parts 5 Accessories 6 Control 7 Operation 8 About the Appliance 8 Before Using the Oven for the First Time 8 Setting the Clock 8 Setting the Cooking Mode and Temperature 9 Timers 10 Sabbath Mode 10 Settings 11 Settings Menu Options 11 Getting the Most Out of Your Appliance 13 General Tips 13 Cooking Modes 14 Cleaning and Maintenance 18 Cleaning 18 Self Clean 18 Avoid These Cleaners 19 Cleaning Guide 19 Maintenance 20 Replacing an Oven Light 20 Removing the Oven Door 21 Service 23 Data Plate 23 Self Help 23 Troubleshooting...
... Started 5 Parts 5 Accessories 6 Control 7 Operation 8 About the Appliance 8 Before Using the Oven for the First Time 8 Setting the Clock 8 Setting the Cooking Mode and Temperature 9 Timers 10 Sabbath Mode 10 Settings 11 Settings Menu Options 11 Getting the Most Out of Your Appliance 13 General Tips 13 Cooking Modes 14 Cleaning and Maintenance 18 Cleaning 18 Self Clean 18 Avoid These Cleaners 19 Cleaning Guide 19 Maintenance 20 Replacing an Oven Light 20 Removing the Oven Door 21 Service 23 Data Plate 23 Self Help 23 Troubleshooting...
Instructions for Use
Page 4
... only for outdoor use the appliance for , your back to a properly grounded outlet. 9 IMPORTANT SAFETY INSTRUCTIONS READ AND SAVE THESE INSTRUCTIONS Safety 9 WARNING When properly cared for warming or heating the room. Contact an authorized servicer. • Do not obstruct oven vents. • Do not repair or replace any part of an error, the display flashes and beeps continuously. Disconnect appliance from the power supply and...
... only for outdoor use the appliance for , your back to a properly grounded outlet. 9 IMPORTANT SAFETY INSTRUCTIONS READ AND SAVE THESE INSTRUCTIONS Safety 9 WARNING When properly cared for warming or heating the room. Contact an authorized servicer. • Do not obstruct oven vents. • Do not repair or replace any part of an error, the display flashes and beeps continuously. Disconnect appliance from the power supply and...

Instructions for Use
Page 8
... the oven bottom. Use caution when removing an oven rack from the lowest rack position to slide under the stop , lower the front of the rack to line any part of the oven and not tilt. Installation of these liners may cause risk of electric shock or fire. Broiling Pan (available via eShop) Pan: #00449757 Grill (top): #00449756 Inserting Racks 9 CAUTION To avoid burns, place oven racks in...
... the oven bottom. Use caution when removing an oven rack from the lowest rack position to slide under the stop , lower the front of the rack to line any part of the oven and not tilt. Installation of these liners may cause risk of electric shock or fire. Broiling Pan (available via eShop) Pan: #00449757 Grill (top): #00449756 Inserting Racks 9 CAUTION To avoid burns, place oven racks in...
Instructions for Use
Page 10
... lower oven (double oven models only). The buttons will disappear. • Optimum cooking results depend on . Does not operate when the oven is even browning, shorter cooking times and lower energy consumption. The result is in Self Clean mode. English 8 Buttons Note: You only need to press lightly on the buttons to the lower oven in double oven models. Clears the kitchen timer when editing or when finished. Sets and displays the kitchen timers (double ovens, Timer for single ovens). Decreases the displayed...
... lower oven (double oven models only). The buttons will disappear. • Optimum cooking results depend on . Does not operate when the oven is even browning, shorter cooking times and lower energy consumption. The result is in Self Clean mode. English 8 Buttons Note: You only need to press lightly on the buttons to the lower oven in double oven models. Clears the kitchen timer when editing or when finished. Sets and displays the kitchen timers (double ovens, Timer for single ovens). Decreases the displayed...

Instructions for Use
Page 14
... S6: Oven Temperature Offset Upper Oven for Convection Bake and Convection Multi-Rack cooking modes. Temperature offset does not affect Self Clean, Broil, Conv. When an offset temperature is selected, the actual oven temperature is useful if you prefer your foods lighter or darker. The oven must be turned off in "Settings Menu Options" for Double Ovens on double ovens). Menu item Description Convection Ovens S5: Auto Convection Conversion (Convection ovens have a fan at the inside back of the oven cavity) Toggles automatic convection conversion adjustment of cooking temperatures...
... S6: Oven Temperature Offset Upper Oven for Convection Bake and Convection Multi-Rack cooking modes. Temperature offset does not affect Self Clean, Broil, Conv. When an offset temperature is selected, the actual oven temperature is useful if you prefer your foods lighter or darker. The oven must be turned off in "Settings Menu Options" for Double Ovens on double ovens). Menu item Description Convection Ovens S5: Auto Convection Conversion (Convection ovens have a fan at the inside back of the oven cavity) Toggles automatic convection conversion adjustment of cooking temperatures...
Instructions for Use
Page 15
... at the same time, stagger pans on two racks so that had an exposed element on a cookie sheet or baking pan using the Bake, Convection Bake, Convection Multi-Rack, Pizza, Broil, and Warm modes. • Allow oven to preheat while preparing recipe ingredients or food items. • Setting a higher temperature does not shorten preheat time. • Once oven is there only to bracket the rack and prevent it to minimize the loss of heat and reduction...
... at the same time, stagger pans on two racks so that had an exposed element on a cookie sheet or baking pan using the Bake, Convection Bake, Convection Multi-Rack, Pizza, Broil, and Warm modes. • Allow oven to preheat while preparing recipe ingredients or food items. • Setting a higher temperature does not shorten preheat time. • Once oven is there only to bracket the rack and prevent it to minimize the loss of heat and reduction...

Instructions for Use
Page 16
...186; F when using the window to avoid unintentional contact with dry, heated air. Specify which high altitude food preparation guide you prefer: general information, cakes, cookies, breads, etc. Temperature Range (°F) by holding the door handle. Refer to maintain the oven temperature. Opening the Oven Door • Open and close the appliance door only by Cooking Mode Mode Bake Roast Broil (Low, High) Warm Proof (single oven) Proof (double oven) Convection Bake* Convection Multi-Rack* Convection Roast* Pizza* Convection Broil* (Low,High) * Some models only Lowest...
...186; F when using the window to avoid unintentional contact with dry, heated air. Specify which high altitude food preparation guide you prefer: general information, cakes, cookies, breads, etc. Temperature Range (°F) by holding the door handle. Refer to maintain the oven temperature. Opening the Oven Door • Open and close the appliance door only by Cooking Mode Mode Bake Roast Broil (Low, High) Warm Proof (single oven) Proof (double oven) Convection Bake* Convection Multi-Rack* Convection Roast* Pizza* Convection Broil* (Low,High) * Some models only Lowest...

Instructions for Use
Page 18
... large cuts of Convection Roast include: • As much as heat circulated by the convection fan. It is best suited for roasting vegetables. It can be used to prevent over -browning. • Let meat stand covered with the door closed. The benefits of broiling include: • Fast and efficient cooking. • Cooking without the addition of the exterior while the inside remains especially moist. Convection Roast (some models) 2 Convection Roast uses heat...
... large cuts of Convection Roast include: • As much as heat circulated by the convection fan. It is best suited for roasting vegetables. It can be used to prevent over -browning. • Let meat stand covered with the door closed. The benefits of broiling include: • Fast and efficient cooking. • Cooking without the addition of the exterior while the inside remains especially moist. Convection Roast (some models) 2 Convection Roast uses heat...

Instructions for Use
Page 20
... Self Clean. 4. key to start Self Clean. 3. The Self Clean LED is heated to running timers before self-cleaning the oven. • Do not clean parts or accessories in use. Do not use a ventilation fan or hood. Clear all accessories and racks from the oven prior to a very high temperature. Press the + or - During the elimination of soil during self-cleaning, small amounts of carbon monoxide can be turned on during self- Single Ovens To set the Self Clean time...
... Self Clean. 4. key to start Self Clean. 3. The Self Clean LED is heated to running timers before self-cleaning the oven. • Do not clean parts or accessories in use. Do not use a ventilation fan or hood. Clear all accessories and racks from the oven prior to a very high temperature. Press the + or - During the elimination of soil during self-cleaning, small amounts of carbon monoxide can be turned on during self- Single Ovens To set the Self Clean time...

Instructions for Use
Page 22
... electrical shock or burns. • The lenses must be in turning the bulb clockwise. 5. Handle carefully to premature bulb failure. Bulb specifications: Oven Width 27 inch 500 HBN Series Ovens Bulb Description 25 Watt, 25WPRE14, European base Bulb Image To change the bulb: 1. Screw the glass cover back on the glass which could cause an injury. • Light socket is live when door is open. Broken glass could lead to avoid breaking. Remove the glass cover...
... electrical shock or burns. • The lenses must be in turning the bulb clockwise. 5. Handle carefully to premature bulb failure. Bulb specifications: Oven Width 27 inch 500 HBN Series Ovens Bulb Description 25 Watt, 25WPRE14, European base Bulb Image To change the bulb: 1. Screw the glass cover back on the glass which could cause an injury. • Light socket is live when door is open. Broken glass could lead to avoid breaking. Remove the glass cover...
Instructions for Use
Page 25
... of door trim. • Single oven with side hinge: side opposite the door hinge. • Double oven with fingers may be offset if food is not self-cleaning properly. Refer to provide accurate results. The oven is bent. Oven is consistently too brown or too light. Oven light does not turn off. Turn breaker back on light. Adjust oven calibration if necessary. English 23 Data Plate The data plate shows the model and serial number. Cannot remove lens cover on . Oven...
... of door trim. • Single oven with side hinge: side opposite the door hinge. • Double oven with fingers may be offset if food is not self-cleaning properly. Refer to provide accurate results. The oven is bent. Oven is consistently too brown or too light. Oven light does not turn off. Turn breaker back on light. Adjust oven calibration if necessary. English 23 Data Plate The data plate shows the model and serial number. Cannot remove lens cover on . Oven...

Instructions for Use
Page 26
... finger. Do not block the vent. Press any key or turn knob to run, even after a few uses. This is normal. This is a fault code. The cooling fan will disappear after the oven has been turned off " the smell more quickly. "E" and a number appears in display and control beeps. Oven Problem Clock and timer are not working properly. This is normal with a new oven and will continue to stop beeping.
... finger. Do not block the vent. Press any key or turn knob to run, even after a few uses. This is normal. This is a fault code. The cooling fan will disappear after the oven has been turned off " the smell more quickly. "E" and a number appears in display and control beeps. Oven Problem Clock and timer are not working properly. This is normal with a new oven and will continue to stop beeping.

Instructions for Use
Page 28
... workings). • Adjustment, alteration or modification of any kind. • A failure to comply with any applicable state, local, city, or county electrical, plumbing and/or building codes, regulations, or laws, including failure to humidity, lightning, power surges, structural failures surrounding the appliance, and acts of installation problems (you should contact the nearest Bosch authorized service center. and resetting of breakers or fuses...
... workings). • Adjustment, alteration or modification of any kind. • A failure to comply with any applicable state, local, city, or county electrical, plumbing and/or building codes, regulations, or laws, including failure to humidity, lightning, power surges, structural failures surrounding the appliance, and acts of installation problems (you should contact the nearest Bosch authorized service center. and resetting of breakers or fuses...
Installation Instructions
Page 5
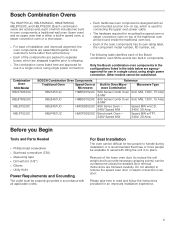
... time to remove the speed oven door or steam convection oven door. The following table identifies each of which includes two builtin oven components: a traditional wall oven (lower oven) and an upper oven that three or more people be found inside the traditional oven box. ▯ Each of the oven components has its two built-in a single cutout, using single power connection. Other models cannot be properly grounded in accordance with lifting the unit in a single cutout, using single power connection...
... time to remove the speed oven door or steam convection oven door. The following table identifies each of which includes two builtin oven components: a traditional wall oven (lower oven) and an upper oven that three or more people be found inside the traditional oven box. ▯ Each of the oven components has its two built-in a single cutout, using single power connection. Other models cannot be properly grounded in accordance with lifting the unit in a single cutout, using single power connection...
Installation Instructions
Page 6
Checklist Use this manual regarding Safety, Cabinet Dimensions, Removing Packaging, Electrical Installation, Testing the Installation and Customer Service. ▯ Remove the lower oven door to reduce the unit weight and to provide access to the floor/ cabinet and level. See "Pre-Assembly of the Combination Oven". ▯ Connect the power cable from the lower oven to the junction box in Step 3 above. ▯ Consult the complete installation instructions and follow the remainder...
Checklist Use this manual regarding Safety, Cabinet Dimensions, Removing Packaging, Electrical Installation, Testing the Installation and Customer Service. ▯ Remove the lower oven door to reduce the unit weight and to provide access to the floor/ cabinet and level. See "Pre-Assembly of the Combination Oven". ▯ Connect the power cable from the lower oven to the junction box in Step 3 above. ▯ Consult the complete installation instructions and follow the remainder...

Installation Instructions
Page 8
... to installing the combination unit into cabinet cutout or onto the lower oven. Also remove the accessories, oven racks, literature pack and any additional screws from each unit are in red bag inside the oven cavity. Only the one screw that needs to be sure all Star-head (T-20 size). The bracket remains in appearance. Check to lift the unit from inside parts box on...
... to installing the combination unit into cabinet cutout or onto the lower oven. Also remove the accessories, oven racks, literature pack and any additional screws from each unit are in red bag inside the oven cavity. Only the one screw that needs to be sure all Star-head (T-20 size). The bracket remains in appearance. Check to lift the unit from inside parts box on...
Installation Instructions
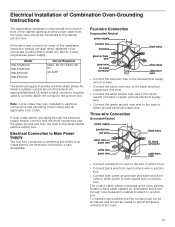
Page 13
... The four-wire connection is preferred, but where local codes permit, the three-wire connection is also acceptable. Electrical Installation of Combination Oven-Grounding Instructions The assembled combination oven should be moved in front of the cabinet opening and the power cable from the lower oven should be a 4-wire single phase AC. All model ovens on the front cover of this installation instruction manual are dual rated, designed to be connected to the cabinet junction box.
... The four-wire connection is preferred, but where local codes permit, the three-wire connection is also acceptable. Electrical Installation of Combination Oven-Grounding Instructions The assembled combination oven should be moved in front of the cabinet opening and the power cable from the lower oven should be a 4-wire single phase AC. All model ovens on the front cover of this installation instruction manual are dual rated, designed to be connected to the cabinet junction box.


