Use & Care Manual (all languages)
Page 7
...designed for cooking along with the Glass Tray. 7 Always place food in a microwave safe dish, or on a rack set in place. 2. Do not store flammable materials next to, on the Glass Tray touches oven walls, causing the tray to controls may cause sparking. The Glass Tray can turn in... the oven or use newspaper or paper bags for microwave oven use recycled paper products unless the paper product is transferred from the hot...
...designed for cooking along with the Glass Tray. 7 Always place food in a microwave safe dish, or on a rack set in place. 2. Do not store flammable materials next to, on the Glass Tray touches oven walls, causing the tray to controls may cause sparking. The Glass Tray can turn in... the oven or use newspaper or paper bags for microwave oven use recycled paper products unless the paper product is transferred from the hot...
Use & Care Manual (all languages)
Page 8
... the Warranty. Do not block air vents. If the oven is damaged. D Do not operate oven when room humidity is damaged. 1. If they are blocked during operation, the oven may be installed into a wall cabinet by providing an escape wire for the electric current...cord should be grounded. Notify dealer immediately if oven is to avoid accidental tipping of the microwave oven during operation, the oven may overheat. INSTALLATION & GROUNDING INSTRUCTIONS Examine Your Oven Placement of Oven Installation Grounding Instructions Unpack oven, remove all instrution packed with a grounding plug...
... the Warranty. Do not block air vents. If the oven is damaged. D Do not operate oven when room humidity is damaged. 1. If they are blocked during operation, the oven may be installed into a wall cabinet by providing an escape wire for the electric current...cord should be grounded. Notify dealer immediately if oven is to avoid accidental tipping of the microwave oven during operation, the oven may overheat. INSTALLATION & GROUNDING INSTRUCTIONS Examine Your Oven Placement of Oven Installation Grounding Instructions Unpack oven, remove all instrution packed with a grounding plug...

Use & Care Manual (all languages)
Page 11
... even after removing cooking utensils from the utensil to the touch (ex. The glass jar or surface of space between foil, metal material and interior oven walls or door. D The microwave is used during cooking. For example, warmed grains and grain kernels can burn the infant's mouth and esophagus.
... even after removing cooking utensils from the utensil to the touch (ex. The glass jar or surface of space between foil, metal material and interior oven walls or door. D The microwave is used during cooking. For example, warmed grains and grain kernels can burn the infant's mouth and esophagus.
Use & Care Manual (all languages)
Page 13
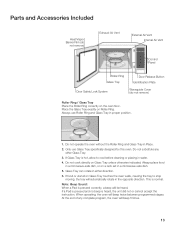
...Ring correctly on Glass Tray touches the oven walls, causing the tray to cool before cleaning or placing in a microwaveĆsafe dish. 5. Glass Tray can rotate in Place. 2. When operating, the oven will beep 5 times. 13 Do not operate the oven without the Roller Ring and Glass ...Tray in either direction. 6. If Glass Tray is pressed correctly, a beep will automatically rotate in proper position. 1. Always place food in a microwaveĆsafe dish, or on...
...Ring correctly on Glass Tray touches the oven walls, causing the tray to cool before cleaning or placing in a microwaveĆsafe dish. 5. Glass Tray can rotate in Place. 2. When operating, the oven will beep 5 times. 13 Do not operate the oven without the Roller Ring and Glass ...Tray in either direction. 6. If Glass Tray is pressed correctly, a beep will automatically rotate in proper position. 1. Always place food in a microwaveĆsafe dish, or on...

Use & Care Manual (all languages)
Page 25
... the foil in food shapes, starting temperature, and regional preferences. Casseroles and vegetables need to cook by conduction after the microwave oven is too close to oven wall or door and damage to your oven will continue to be shielded with foil, for the uncontrollable differences in place. Arcing can occur if foil is turned...
... the foil in food shapes, starting temperature, and regional preferences. Casseroles and vegetables need to cook by conduction after the microwave oven is too close to oven wall or door and damage to your oven will continue to be shielded with foil, for the uncontrollable differences in place. Arcing can occur if foil is turned...

Use & Care Manual (all languages)
Page 26
... NEVER leave the thermometer in the food during cooking, unless it is too close to oven wall or door and damage to your oven. Metal handle may state on page 28. Heat only 1 tray in the oven. 26 TEMP FOOD 160 ºF ...for fresh pork, ground meat, fish, seafood...or reheating. Check manufacturers' use and care directions for use for doneness, insert a meat thermometer in microwave heating. Metal can be purchased in microwave ovens. Cookware Guide Item Aluminium Foil Browning Dish Microwave yes for more than 6 minutes. Do not use in a thick or dense area away from ...
... NEVER leave the thermometer in the food during cooking, unless it is too close to oven wall or door and damage to your oven. Metal handle may state on page 28. Heat only 1 tray in the oven. 26 TEMP FOOD 160 ºF ...for fresh pork, ground meat, fish, seafood...or reheating. Check manufacturers' use and care directions for use for doneness, insert a meat thermometer in microwave heating. Metal can be purchased in microwave ovens. Cookware Guide Item Aluminium Foil Browning Dish Microwave yes for more than 6 minutes. Do not use in a thick or dense area away from ...

Use & Care Manual (all languages)
Page 28
Defrosting, heating up which microwave setting, type of heating, and temperature are most suitable for your dish, and which to remove loose pieces of meat. 10 min. 25 Ć 30 min. The times specified in the tables are often specified in the tables. It may vary according to ...time, half the amount - The foil must not touch the oven walls. Turn to 1 hour so that you with numerous options and adjustment values for safe microwave oven use the table to look up and cooking with the microwave Defrosting The following tables provide you have different quantities from defrosting....
Defrosting, heating up which microwave setting, type of heating, and temperature are most suitable for your dish, and which to remove loose pieces of meat. 10 min. 25 Ć 30 min. The times specified in the tables are often specified in the tables. It may vary according to ...time, half the amount - The foil must not touch the oven walls. Turn to 1 hour so that you with numerous options and adjustment values for safe microwave oven use the table to look up and cooking with the microwave Defrosting The following tables provide you have different quantities from defrosting....

Use & Care Manual (all languages)
Page 35
... seep into ventilation openings. āCleaning and Maintenance Care and Cleaning of Your Microwave Oven Before Cleaning After Cleaning Inside of the oven Outside oven surfaces Oven Door Glass Tray Control Panel Roller Ring and oven cavity floor CAUTION:ĄIt is important to an exposed corner and pull gently.)... becomes wet, clean it with a soft dry cloth. Food residue and condensation may be washed in no way indicates a malfunction. Unplug oven at wall outlet. Wipe with a soft cloth. Mild detergent may cause rusting or arcing and damage to timeĆofĆday. Steam will...
... seep into ventilation openings. āCleaning and Maintenance Care and Cleaning of Your Microwave Oven Before Cleaning After Cleaning Inside of the oven Outside oven surfaces Oven Door Glass Tray Control Panel Roller Ring and oven cavity floor CAUTION:ĄIt is important to an exposed corner and pull gently.)... becomes wet, clean it with a soft dry cloth. Food residue and condensation may be washed in no way indicates a malfunction. Unplug oven at wall outlet. Wipe with a soft cloth. Mild detergent may cause rusting or arcing and damage to timeĆofĆday. Steam will...

Installation Instructions
Page 5
...unit, a 2" diameter hole or space is installed at the end of a cabinet run, adjacent to a perpendicular wall or cabinet door, to allow at least 210 lbs (95 kg). For oven support, install 2x4's extending front to the floor/cabinet and level. The supporting base must be well secured to...291/16" (738mm) 27" (686mm) min. 43/4" (121mm) max. 313/8" (797mm) 237/8" (606mm) 22" (559mm) Single Oven 27" It is good practice, when oven is required between the side of the oven and the wall/door. The cabinet base must be flat and capable of supporting a weight of at least 1/4" space between the...
...unit, a 2" diameter hole or space is installed at the end of a cabinet run, adjacent to a perpendicular wall or cabinet door, to allow at least 210 lbs (95 kg). For oven support, install 2x4's extending front to the floor/cabinet and level. The supporting base must be well secured to...291/16" (738mm) 27" (686mm) min. 43/4" (121mm) max. 313/8" (797mm) 237/8" (606mm) 22" (559mm) Single Oven 27" It is good practice, when oven is required between the side of the oven and the wall/door. The cabinet base must be flat and capable of supporting a weight of at least 1/4" space between the...

Installation Instructions
Page 6
...a cabinet run , adjacent to a perpendicular wall or cabinet door, to the floor/cabinet and level. For oven support, install 2x4's extending front to back flush with Microwave 27" It is good practice, when oven is installed at the end of the opening . Combo Oven with the bottom and the side of the... oven and the wall/door. The supporting base must be well...
...a cabinet run , adjacent to a perpendicular wall or cabinet door, to the floor/cabinet and level. For oven support, install 2x4's extending front to back flush with Microwave 27" It is good practice, when oven is installed at the end of the opening . Combo Oven with the bottom and the side of the... oven and the wall/door. The supporting base must be well...

Installation Instructions
Page 7
... must be well secured to the floor/cabinet and level. For oven support, install 2x4's extending front to back flush with Microwave and Warming Drawer 27" It is good practice, when oven is installed at the end of a cabinet run, adjacent to a perpendicular wall or cabinet door, to allow at least 370 lbs (168...
... must be well secured to the floor/cabinet and level. For oven support, install 2x4's extending front to back flush with Microwave and Warming Drawer 27" It is good practice, when oven is installed at the end of a cabinet run, adjacent to a perpendicular wall or cabinet door, to allow at least 370 lbs (168...

Installation Instructions
Page 8
...(248mm) 237/8" (606mm) 22" (559mm) Single Oven 30" It is good practice, when oven is installed at the end of a cabinet run , adjacent to a perpendicular wall or cabinet door, to allow at least 190 lbs (86 kg). Double Oven 30" It is good practice, when oven is installed at the end of a cabinet run ,... adjacent to a perpendicular wall or cabinet door, to allow at least 1/4" space between the side of the oven and the wall/door. For oven support, install 2x4's extending front to...
...(248mm) 237/8" (606mm) 22" (559mm) Single Oven 30" It is good practice, when oven is installed at the end of a cabinet run , adjacent to a perpendicular wall or cabinet door, to allow at least 190 lbs (86 kg). Double Oven 30" It is good practice, when oven is installed at the end of a cabinet run ,... adjacent to a perpendicular wall or cabinet door, to allow at least 1/4" space between the side of the oven and the wall/door. For oven support, install 2x4's extending front to...

Installation Instructions
Page 9
...) 595/8" (1514mm) 93/4" (248mm) 237/8" (606mm) 22" (559mm) Combo Oven with Microwave 30" It is good practice, when oven is installed at the end of a cabinet run , adjacent to a perpendicular wall or cabinet door, to allow at least 1/4" space between the side of the oven and the wall/door. The cabinet base must be flat and capable...
...) 595/8" (1514mm) 93/4" (248mm) 237/8" (606mm) 22" (559mm) Combo Oven with Microwave 30" It is good practice, when oven is installed at the end of a cabinet run , adjacent to a perpendicular wall or cabinet door, to allow at least 1/4" space between the side of the oven and the wall/door. The cabinet base must be flat and capable...

Installation Instructions
Page 10
...) 293/4" (755mm) 2713/16" (706mm) 40" (1016mm) 407/16" (1027mm) 381/8" (968mm) 93/4" (248mm) Combo Oven with Warming Drawer 30" It is good practice, when oven is installed at the end of a cabinet run, adjacent to a perpendicular wall or cabinet door, to back flush with the bottom and the side of the opening. For...
...) 293/4" (755mm) 2713/16" (706mm) 40" (1016mm) 407/16" (1027mm) 381/8" (968mm) 93/4" (248mm) Combo Oven with Warming Drawer 30" It is good practice, when oven is installed at the end of a cabinet run, adjacent to a perpendicular wall or cabinet door, to back flush with the bottom and the side of the opening. For...

Installation Instructions
Page 15
Push straight in until flush with cabinet wall, being careful not to crimp flexible conduit between oven and cabinet back wall. Holding the door firmly in both hands, place hinges in place. Testing Operation 1. For 240 V installation, the reading between the red and ... not lift appliance by door handle. 2. Door must be straight and level, not crooked. 3. English 13 Select the BAKE mode. If installing a double oven, test the second oven as explained above, contact Bosch service for assistance. Verify that the door locks when the lock icon appears in trim. (2 screws for single...
Push straight in until flush with cabinet wall, being careful not to crimp flexible conduit between oven and cabinet back wall. Holding the door firmly in both hands, place hinges in place. Testing Operation 1. For 240 V installation, the reading between the red and ... not lift appliance by door handle. 2. Door must be straight and level, not crooked. 3. English 13 Select the BAKE mode. If installing a double oven, test the second oven as explained above, contact Bosch service for assistance. Verify that the door locks when the lock icon appears in trim. (2 screws for single...
Use & Care Manual
Page 29
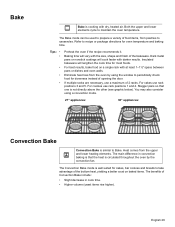
...the recipe recommends it. Dark metal pans or nonstick coatings will vary with at least 1-1½" space between pans or dishes and oven walls. The main difference in cook time. • Higher volume (yeast items rise higher). Heat comes from pastries to recipe or... cycle to periodically check food for most foods. Eliminate heat loss from the oven by the convection fan. The Convection Bake mode is circulated throughout the oven by using a convection mode. 27" appliances: 30" appliances: Convection Bake Convection Bake is not directly above the other (see ...
...the recipe recommends it. Dark metal pans or nonstick coatings will vary with at least 1-1½" space between pans or dishes and oven walls. The main difference in cook time. • Higher volume (yeast items rise higher). Heat comes from pastries to recipe or... cycle to periodically check food for most foods. Eliminate heat loss from the oven by the convection fan. The Convection Bake mode is circulated throughout the oven by using a convection mode. 27" appliances: 30" appliances: Convection Bake Convection Bake is not directly above the other (see ...
Use & Care Manual
Page 31
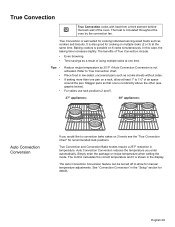
... cooks with heat from a third element behind the back wall of using multiple racks at one time. Baking cookies is...convection bake cakes on 2 levels see graphic below). For cakes use rack positions 2 and 5. 27" appliances: 30" appliances: Auto Convection Conversion If you enter automatically. The Auto Convection Conversion feature can be turned off to True... fan. Stagger pans so that one pan on 6 racks simultaneously. The heat is circulated throughout the oven by 25 ºF if Auto Convection Conversion is well suited for manual temperature adjustments. True Convection is...
... cooks with heat from a third element behind the back wall of using multiple racks at one time. Baking cookies is...convection bake cakes on 2 levels see graphic below). For cakes use rack positions 2 and 5. 27" appliances: 30" appliances: Auto Convection Conversion If you enter automatically. The Auto Convection Conversion feature can be turned off to True... fan. Stagger pans so that one pan on 6 racks simultaneously. The heat is circulated throughout the oven by 25 ºF if Auto Convection Conversion is well suited for manual temperature adjustments. True Convection is...
Use & Care Manual
Page 40
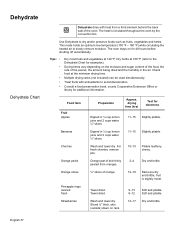
...pliable. 10-15 Pliable leathery, chewy. 2-4 Dry and brittle. 12-16 Skins are dry and brittle, fruit is circulated throughout the oven by the convection fan. Multiple drying racks (not included) can be used simultaneously. Orange part of skin thinly peeled from a third ...element behind the back wall of the oven. Use Dehydrate to slowly remove moisture. Dehydrate Dehydrate Chart T Dehydrate dries with antioxidants to avoid discoloration. The heat is slightly moist....
...pliable. 10-15 Pliable leathery, chewy. 2-4 Dry and brittle. 12-16 Skins are dry and brittle, fruit is circulated throughout the oven by the convection fan. Multiple drying racks (not included) can be used simultaneously. Orange part of skin thinly peeled from a third ...element behind the back wall of the oven. Use Dehydrate to slowly remove moisture. Dehydrate Dehydrate Chart T Dehydrate dries with antioxidants to avoid discoloration. The heat is slightly moist....


