
Installation Instructions
Page 3
... National Electrical Code (or Canadian Electrical Code), this manual for the local electrical inspector's use. Safety m Important Safety Instructions READ AND SAVE THESE INSTRUCTIONS Appliance Handling Safety Safety Codes and Standards Electric Safety WARNING: If the information in the manuals. WARNING: Do not repair or replace any part of the circuit breaker or fuse. Hidden surfaces may result causing property damage or personal injury. Save these instructions for guidance. Before installing, turn power...
... National Electrical Code (or Canadian Electrical Code), this manual for the local electrical inspector's use. Safety m Important Safety Instructions READ AND SAVE THESE INSTRUCTIONS Appliance Handling Safety Safety Codes and Standards Electric Safety WARNING: If the information in the manuals. WARNING: Do not repair or replace any part of the circuit breaker or fuse. Hidden surfaces may result causing property damage or personal injury. Save these instructions for guidance. Before installing, turn power...

Installation Instructions
Page 8
... the opening . For oven support, install 2x4's extending front to back flush with the bottom and the side of the opening . The supporting base must be located above or below the unit, a 2" diameter hole or space is required between the back wall and the right rear of the 2x4 supports. If the conduit box is installed below the unit. 30" Appliances Dimensions for 30" Wall-Mounted Units...
... the opening . For oven support, install 2x4's extending front to back flush with the bottom and the side of the opening . The supporting base must be located above or below the unit, a 2" diameter hole or space is required between the back wall and the right rear of the 2x4 supports. If the conduit box is installed below the unit. 30" Appliances Dimensions for 30" Wall-Mounted Units...

Installation Instructions
Page 9
.../cabinet and level. Combo Oven with Microwave and Warming Drawer 30" It is good practice, when oven is installed at the end of a cabinet run , adjacent to a perpendicular wall or cabinet door, to allow at least 1/4" space between the side of the oven and the wall/door. Note: The conduit box must be located above the unit to facilitate connecting and servicing. The cabinet base must be flat and capable of supporting a weight...
.../cabinet and level. Combo Oven with Microwave and Warming Drawer 30" It is good practice, when oven is installed at the end of a cabinet run , adjacent to a perpendicular wall or cabinet door, to allow at least 1/4" space between the side of the oven and the wall/door. Note: The conduit box must be located above the unit to facilitate connecting and servicing. The cabinet base must be flat and capable of supporting a weight...

Installation Instructions
Page 12
... 30 AMP 30 AMP HBN35, HBL35, HBN56, HBL56, HBL57, HBL8650, HBL8750 40 or 50 Amp circuit. Refer to the white neutral electrical supply wire. The electrical supply should be used to correctly attach the conduit to either 208/240V AC, 60 Hz, 4 wire, single-phase power supply. Install a suitable conduit box (not furnished). Installation Electrical Installation All model ovens on the front cover are dual rated, designed to be connected to the junction box...
... 30 AMP 30 AMP HBN35, HBL35, HBN56, HBL56, HBL57, HBL8650, HBL8750 40 or 50 Amp circuit. Refer to the white neutral electrical supply wire. The electrical supply should be used to correctly attach the conduit to either 208/240V AC, 60 Hz, 4 wire, single-phase power supply. Install a suitable conduit box (not furnished). Installation Electrical Installation All model ovens on the front cover are dual rated, designed to be connected to the junction box...

Installation Instructions
Page 14
... verify the cabinet dimensions and electrical connections. English 12 Do not grasp the handle as it stops. It will be about half way closed - Oven Installation Note: Before installing the oven, be sure to remove the oven door. To remove the oven door: 1. Holding the door firmly on hinges toward you. 4. The door front is heavy and fragile. the door is cool and power to reduce the weight of the oven by 30 lbs...
... verify the cabinet dimensions and electrical connections. English 12 Do not grasp the handle as it stops. It will be about half way closed - Oven Installation Note: Before installing the oven, be sure to remove the oven door. To remove the oven door: 1. Holding the door firmly on hinges toward you. 4. The door front is heavy and fragile. the door is cool and power to reduce the weight of the oven by 30 lbs...

Installation Instructions
Page 15
... Use and Care Manual for assistance. Set the SELF CLEAN mode. Lift or slide unit into cabinet cutout. Test the oven mode. Install supplied screws through tap holes in the display. 6. Open door all the way to preheat. 5. Verify that the door locks when the lock icon appears in trim. (2 screws for single ovens, 4 screws for double/combo ovens) To replace the oven door: 1. For 240 V installation, the reading between oven and cabinet back wall. Installing the Oven 1. Testing Operation 1. Confirm that the oven light comes on power...
... Use and Care Manual for assistance. Set the SELF CLEAN mode. Lift or slide unit into cabinet cutout. Test the oven mode. Install supplied screws through tap holes in the display. 6. Open door all the way to preheat. 5. Verify that the door locks when the lock icon appears in trim. (2 screws for single ovens, 4 screws for double/combo ovens) To replace the oven door: 1. For 240 V installation, the reading between oven and cabinet back wall. Installing the Oven 1. Testing Operation 1. Confirm that the oven light comes on power...

Use & Care Manual
Page 5
... outdoor use when heating or cooking food. Read all servicing to line any questions, contact the manufacturer. These precautions will damage the appliance and could result in heating or cleaning will reduce the risk of the circuit breaker or fuse. Connect only to persons. See the Warranty. It is not approved for use . Do not repair or replace any part of an error the display flashes and beeps...
... outdoor use when heating or cooking food. Read all servicing to line any questions, contact the manufacturer. These precautions will damage the appliance and could result in heating or cleaning will reduce the risk of the circuit breaker or fuse. Connect only to persons. See the Warranty. It is not approved for use . Do not repair or replace any part of an error the display flashes and beeps...
Use & Care Manual
Page 9
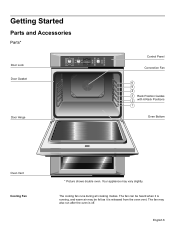
... Started Parts and Accessories Parts* Door Lock Door Gasket Upper True Convection Off Speed Conv Conv Bake Conv Broil Conv Roast Pizza Dehydrate Recipe Bake Broil Roast Self Clean Warm Proof Warm Pie Self Clean Lower Off Roast Heating 170¡ Bake Roast Oven 350¡ Probe 200¡ 12:12 pm Broil Convection Bake Oven 200¡ Preheating 12:30 pm Fast Preheat Timer Cook Time am/pm Settings Info Upper Light Lower Stop Start Door Hinge Control Panel Convection Fan 6 5 4 3 Rack Position Guides 2 with 6 Rack Positions 1 Oven Bottom Oven Vent Cooling Fan...
... Started Parts and Accessories Parts* Door Lock Door Gasket Upper True Convection Off Speed Conv Conv Bake Conv Broil Conv Roast Pizza Dehydrate Recipe Bake Broil Roast Self Clean Warm Proof Warm Pie Self Clean Lower Off Roast Heating 170¡ Bake Roast Oven 350¡ Probe 200¡ 12:12 pm Broil Convection Bake Oven 200¡ Preheating 12:30 pm Fast Preheat Timer Cook Time am/pm Settings Info Upper Light Lower Stop Start Door Hinge Control Panel Convection Fan 6 5 4 3 Rack Position Guides 2 with 6 Rack Positions 1 Oven Bottom Oven Vent Cooling Fan...
Use & Care Manual
Page 10
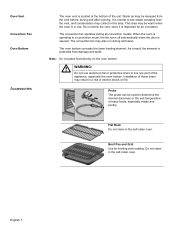
.... Oven Vent Convection Fan Oven Bottom Accessories The oven vent is operating in the self-clean oven. It is opened. Broil Pan and Grid Use for air circulation. The convection fan operates during and after cooking. Note: Do not place food directly on the oven bottom. Do not clean in a convection mode, the fan turns off automatically when the door is normal to line any part of many foods, especially meats and poultry. When the oven is located at the bottom of electric...
.... Oven Vent Convection Fan Oven Bottom Accessories The oven vent is operating in the self-clean oven. It is opened. Broil Pan and Grid Use for air circulation. The convection fan operates during and after cooking. Note: Do not place food directly on the oven bottom. Do not clean in a convection mode, the fan turns off automatically when the door is normal to line any part of many foods, especially meats and poultry. When the oven is located at the bottom of electric...
Use & Care Manual
Page 12
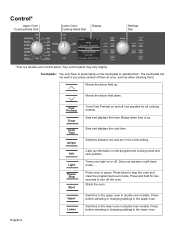
.... Sets and displays the timer. Sets and displays the cook time. Switches between am and pm in self-clean mode. Turns oven light on the programmed cooking mode and rack position. Starts the oven. Press before selecting or changing settings in double oven models. Beeps when time is a double oven control panel. Control* Upper Oven Cooking Mode Dial Upper True Convection Off Speed Conv Conv Bake Conv Broil Conv Roast Pizza Dehydrate Recipe Lower Oven Cooking Mode Dial Display Bake Broil Roast Self Clean Warm Proof Warm Pie Self Clean Lower Off Roast Heating...
.... Sets and displays the timer. Sets and displays the cook time. Switches between am and pm in self-clean mode. Turns oven light on the programmed cooking mode and rack position. Starts the oven. Press before selecting or changing settings in double oven models. Beeps when time is a double oven control panel. Control* Upper Oven Cooking Mode Dial Upper True Convection Off Speed Conv Conv Bake Conv Broil Conv Roast Pizza Dehydrate Recipe Lower Oven Cooking Mode Dial Display Bake Broil Roast Self Clean Warm Proof Warm Pie Self Clean Lower Off Roast Heating...
Use & Care Manual
Page 13
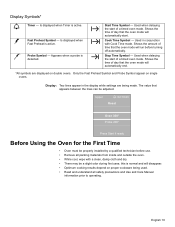
Used when delaying the start of a timed oven mode. Used when delaying the start . Only the Fast Preheat Symbol and Probe Symbol appear on proper cookware being made. English 10 Shows the amount of time that the oven mode will run before use. • Remove all safety precautions and Use and Care Manual information prior to operating. Display Symbols* a Timer - Upper a 02:10:23 Roast Oven 350° Probe 200° Press Start if ready Before Using the...
Used when delaying the start of a timed oven mode. Used when delaying the start . Only the Fast Preheat Symbol and Probe Symbol appear on proper cookware being made. English 10 Shows the amount of time that the oven mode will run before use. • Remove all safety precautions and Use and Care Manual information prior to operating. Display Symbols* a Timer - Upper a 02:10:23 Roast Oven 350° Probe 200° Press Start if ready Before Using the...
Use & Care Manual
Page 17
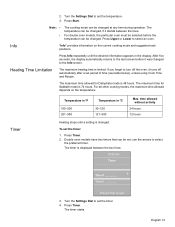
... using Cook Time and Recipe. To set : use the arrows to the last screen before the temperature can be set the timer: 1. Double oven models have two timers that can be changed at any time during operation. Timer2 __:__:__ Press Timer to select an oven. After five seconds, the display automatically returns to select the preferred timer. Press Timer. 2. The maximum time allowed for Sabbath mode is displayed between the lines. The timer...
... using Cook Time and Recipe. To set : use the arrows to the last screen before the temperature can be set the timer: 1. Double oven models have two timers that can be changed at any time during operation. Timer2 __:__:__ Press Timer to select an oven. After five seconds, the display automatically returns to select the preferred timer. Press Timer. 2. The maximum time allowed for Sabbath mode is displayed between the lines. The timer...
Use & Care Manual
Page 28
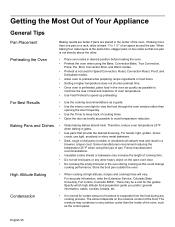
... of oven temperature. • Use Fast Preheat to speed up preheating. • Use the cooking recommendations as a guide. • Use the interior oven light to view the food through the oven window rather than opening the door frequently. • Use the Timer to avoid temperature reduction. • Glass baking dishes absorb heat. Some manufacturers recommend reducing the temperature 25 ºF when using the Bake, Convection Bake, True Convection, Pizza, Pie, Broil, Convection Broil, and Warm modes. • Preheat is not used for Speed Convection, Roast, Convection Roast, Proof...
... of oven temperature. • Use Fast Preheat to speed up preheating. • Use the cooking recommendations as a guide. • Use the interior oven light to view the food through the oven window rather than opening the door frequently. • Use the Timer to avoid temperature reduction. • Glass baking dishes absorb heat. Some manufacturers recommend reducing the temperature 25 ºF when using the Bake, Convection Bake, True Convection, Pizza, Pie, Broil, Convection Broil, and Warm modes. • Preheat is not used for Speed Convection, Roast, Convection Roast, Proof...
Use & Care Manual
Page 29
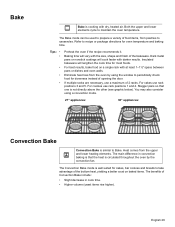
..., heated air. For cookies use rack positions 3 and 5. English 26 If multiple racks are necessary, use a maximum of food items, from the upper á and lower heating elements. Dark metal pans or nonstick coatings will vary with darker results. The Bake mode can be used to Bake. For cakes use rack positions 1 and 4. Stagger pans so that the heat is circulated throughout the oven by using a convection mode. 27" appliances: 30" appliances: Convection Bake Convection Bake...
..., heated air. For cookies use rack positions 3 and 5. English 26 If multiple racks are necessary, use a maximum of food items, from the upper á and lower heating elements. Dark metal pans or nonstick coatings will vary with darker results. The Bake mode can be used to Bake. For cakes use rack positions 1 and 4. Stagger pans so that the heat is circulated throughout the oven by using a convection mode. 27" appliances: 30" appliances: Convection Bake Convection Bake...

Use & Care Manual
Page 34
... cuts of meat and poultry. A shallow, uncovered pan can be used. If the meat is browned to prevent overbrowning. Tips Use a high-sided broil pan, or cover dish with kitchen string. Do not cover meat or use in this mode. This results in the recipe. Add liquids, such as 25% faster cooking than the lower element. Convection Roast á Convection Roast uses heat from the oven. Roasting uses more browning of the exterior while the inside...
... cuts of meat and poultry. A shallow, uncovered pan can be used. If the meat is browned to prevent overbrowning. Tips Use a high-sided broil pan, or cover dish with kitchen string. Do not cover meat or use in this mode. This results in the recipe. Add liquids, such as 25% faster cooking than the lower element. Convection Roast á Convection Roast uses heat from the oven. Roasting uses more browning of the exterior while the inside...
Use & Care Manual
Page 37
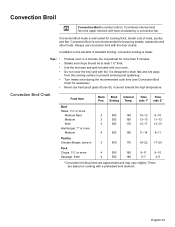
Always use heat-proof glass (Pyrex ®); Tips • • Preheat oven 3-4 minutes. Turn meats once during the recommended cook time (see Convection Broil Chart for cooking thick, tender cuts of standard broiling, convection broiling is similar to Broil. Setting Temp. Convection Broil Chart Food Item Rack Broil Internal Time Time Pos. It combines intense heat from the cooking surface to the benefits of meat, poultry and fish. It is designed to drain fats and oils away from the...
Always use heat-proof glass (Pyrex ®); Tips • • Preheat oven 3-4 minutes. Turn meats once during the recommended cook time (see Convection Broil Chart for cooking thick, tender cuts of standard broiling, convection broiling is similar to Broil. Setting Temp. Convection Broil Chart Food Item Rack Broil Internal Time Time Pos. It combines intense heat from the cooking surface to the benefits of meat, poultry and fish. It is designed to drain fats and oils away from the...
Use & Care Manual
Page 42
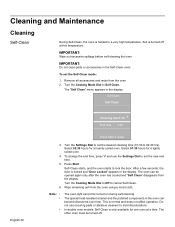
... double oven models: Self Clean is only available for one oven at this temperature. IMPORTANT: Do not clean parts or accessories in the display: 02:00 pm Self Clean English 39 Cleaning time1:30 +End time 3:30 Press Start if ready 3. Turn the Cooking Mode Dial to cancel Self-Clean. 6. After a few seconds, the door is normal and does not affect operation. Cleaning and Maintenance Cleaning Self-Clean During Self-Clean, the oven is heated to set the new end time. 5. Remove all accessories and racks...
... double oven models: Self Clean is only available for one oven at this temperature. IMPORTANT: Do not clean parts or accessories in the display: 02:00 pm Self Clean English 39 Cleaning time1:30 +End time 3:30 Press Start if ready 3. Turn the Cooking Mode Dial to cancel Self-Clean. 6. After a few seconds, the door is normal and does not affect operation. Cleaning and Maintenance Cleaning Self-Clean During Self-Clean, the oven is heated to set the new end time. 5. Remove all accessories and racks...
Use & Care Manual
Page 44
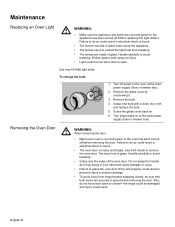
... oven door. Failure to do not force door open . Use only 40 Watt light bulbs. Remove the bulb. 4. Broken glass could result. Do not grasp the handle as it . 3. To change the bulb: 1. Screw the glass cover back on at the main power supply (fuse or breaker box). 2. Removing the Oven Door m WARNING: When removing the door: • Make sure oven is glass. Handle carefully to the appliance has been turned off power to the oven at the main power supply (fuse or breaker box). Turn power...
... oven door. Failure to do not force door open . Use only 40 Watt light bulbs. Remove the bulb. 4. Broken glass could result. Do not grasp the handle as it . 3. To change the bulb: 1. Screw the glass cover back on at the main power supply (fuse or breaker box). 2. Removing the Oven Door m WARNING: When removing the door: • Make sure oven is glass. Handle carefully to the appliance has been turned off power to the oven at the main power supply (fuse or breaker box). Turn power...
Use & Care Manual
Page 46
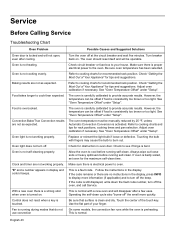
... "Oven Temperature Offset" under "Setup". Check to cooking charts and tips for recommended rack position. This is turned on . Be sure that do not use convection On some models, the convection fan runs while the oven is electrical power to cook than expected. English 43 Refer to your finger. Convection Bake/True Convection results are no instructions in display and control beeps. Oven is clean and dry. Check circuit breaker or fuse box to cooking charts for rack positions, cooking times and pan...
... "Oven Temperature Offset" under "Setup". Check to cooking charts and tips for recommended rack position. This is turned on . Be sure that do not use convection On some models, the convection fan runs while the oven is electrical power to cook than expected. English 43 Refer to your finger. Convection Bake/True Convection results are no instructions in display and control beeps. Oven is clean and dry. Check circuit breaker or fuse box to cooking charts for rack positions, cooking times and pan...
Use & Care Manual
Page 49
... of breakers or fuses. and resetting of installation problems (you how to use of the Product in conjunction with air or water-going vessels). • Any party's willful misconduct, negligence, misuse, abuse, accidents, neglect, improper operation, failure to maintain, improper or negligent installation, tampering, failure to follow operating instructions, mishandling, unauthorized service (including self-performed "fixing" or exploration of the appliance's internal workings). • Adjustment, alteration...
... of breakers or fuses. and resetting of installation problems (you how to use of the Product in conjunction with air or water-going vessels). • Any party's willful misconduct, negligence, misuse, abuse, accidents, neglect, improper operation, failure to maintain, improper or negligent installation, tampering, failure to follow operating instructions, mishandling, unauthorized service (including self-performed "fixing" or exploration of the appliance's internal workings). • Adjustment, alteration...


