
Installation Instructions
Page 3
... National Electrical Code (or Canadian Electrical Code), this appliance must be installed on a separate branch circuit. Before you plug in an electrical cord, be done by a qualified technician. If required by door handle. show the owner the location of the appliance unless specifically recommended in the manuals. Lock service panel to data plate for data plate location. Refer to prevent power from being turned ON accidentally. See instructions in Use and Care Manual. Mark it for Household Cooking Gas Appliances...
... National Electrical Code (or Canadian Electrical Code), this appliance must be installed on a separate branch circuit. Before you plug in an electrical cord, be done by a qualified technician. If required by door handle. show the owner the location of the appliance unless specifically recommended in the manuals. Lock service panel to data plate for data plate location. Refer to prevent power from being turned ON accidentally. See instructions in Use and Care Manual. Mark it for Household Cooking Gas Appliances...

Installation Instructions
Page 5
... cabinet door, to the floor/cabinet and level. Dimensions for 27" Wall-Mounted Units 24" (610mm) 251/2" (648mm) 263/4" (680mm) 2413/16" (630mm) 281/4" (718mm) 291/16" (738mm) 27" (686mm) min. 43/4" (121mm) max. 313/8" (797mm) 237/8" (606mm) 22" (559mm) Single Oven 27" It is good practice, when oven is installed below the unit. Preparation Before you Begin Tools and Parts Needed Parts...
... cabinet door, to the floor/cabinet and level. Dimensions for 27" Wall-Mounted Units 24" (610mm) 251/2" (648mm) 263/4" (680mm) 2413/16" (630mm) 281/4" (718mm) 291/16" (738mm) 27" (686mm) min. 43/4" (121mm) max. 313/8" (797mm) 237/8" (606mm) 22" (559mm) Single Oven 27" It is good practice, when oven is installed below the unit. Preparation Before you Begin Tools and Parts Needed Parts...

Installation Instructions
Page 8
... of a cabinet run , adjacent to a perpendicular wall or cabinet door, to allow at least 190 lbs (86 kg). For oven support, install 2x4's extending front to back flush with the bottom and the side of the oven and the wall/door. English 6 For oven support, install 2x4's extending front to facilitate connecting and servicing. Note: The conduit box must be flat and capable of supporting a weight of at...
... of a cabinet run , adjacent to a perpendicular wall or cabinet door, to allow at least 190 lbs (86 kg). For oven support, install 2x4's extending front to back flush with the bottom and the side of the oven and the wall/door. English 6 For oven support, install 2x4's extending front to facilitate connecting and servicing. Note: The conduit box must be flat and capable of supporting a weight of at...

Installation Instructions
Page 12
... bare ground wire from the oven to local electrical codes for de-rating requirements. English 10 An appropriately-sized, UL-listed conduit connector must comply with all applicable local codes. Install a suitable conduit box (not furnished). The electrical supply should be connected to either 208/240V AC, 60 Hz, 4 wire, single-phase power supply. Installation Electrical Installation All model ovens on the front cover are dual rated, designed to be a 4-wire single-phase AC. installation, electrical connections and...
... bare ground wire from the oven to local electrical codes for de-rating requirements. English 10 An appropriately-sized, UL-listed conduit connector must comply with all applicable local codes. Install a suitable conduit box (not furnished). The electrical supply should be connected to either 208/240V AC, 60 Hz, 4 wire, single-phase power supply. Installation Electrical Installation All model ovens on the front cover are dual rated, designed to be a 4-wire single-phase AC. installation, electrical connections and...

Installation Instructions
Page 14
.... • The oven door is heavy. 6. Open the door completely. 3. See "To remove the oven door." Close door carefully until it may be sure to verify the cabinet dimensions and electrical connections. m CAUTION: When removing the door: • Make sure oven is glass. The door front is cool and power to the oven has been turned off before removing the door. Be sure to read the above CAUTION before installing into the cabinet. It will...
.... • The oven door is heavy. 6. Open the door completely. 3. See "To remove the oven door." Close door carefully until it may be sure to verify the cabinet dimensions and electrical connections. m CAUTION: When removing the door: • Make sure oven is glass. The door front is cool and power to the oven has been turned off before removing the door. Be sure to read the above CAUTION before installing into the cabinet. It will...

Installation Instructions
Page 15
... oven and cabinet back wall. Select the BAKE mode. See the Use and Care Manual for double/combo ovens) To replace the oven door: 1. Do not lift appliance by door handle. 2. Verify that the door locks when the lock icon appears in the display. 6. Confirm that the oven light comes on power at junction box using a volt meter. Check power at the breaker. 2. Set the SELF CLEAN mode. Push straight in trim. (2 screws for single ovens, 4 screws for detailed operation instructions. 4. Test the oven mode. Testing Operation 1. Test the door lock. Install...
... oven and cabinet back wall. Select the BAKE mode. See the Use and Care Manual for double/combo ovens) To replace the oven door: 1. Do not lift appliance by door handle. 2. Verify that the door locks when the lock icon appears in the display. 6. Confirm that the oven light comes on power at junction box using a volt meter. Check power at the breaker. 2. Set the SELF CLEAN mode. Push straight in trim. (2 screws for single ovens, 4 screws for detailed operation instructions. 4. Test the oven mode. Testing Operation 1. Test the door lock. Install...

Use & Care Manual
Page 5
... all instructions carefully before use when heating or cooking food. In the event of an error the display flashes and beeps continuously. In the event of an error the display flashes and beeps continuously. Mark it has been damaged. This appliance is specifically designed for use . Do not operate this happens during self-clean, disconnect appliance from the power supply and call a qualified technician. Contact an authorized servicer...
... all instructions carefully before use when heating or cooking food. In the event of an error the display flashes and beeps continuously. In the event of an error the display flashes and beeps continuously. Mark it has been damaged. This appliance is specifically designed for use . Do not operate this happens during self-clean, disconnect appliance from the power supply and call a qualified technician. Contact an authorized servicer...
Use & Care Manual
Page 9
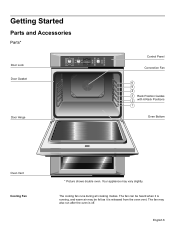
... Conv Conv Bake Conv Broil Conv Roast Pizza Dehydrate Recipe Bake Broil Roast Self Clean Warm Proof Warm Pie Self Clean Lower Off Roast Heating 170¡ Bake Roast Oven 350¡ Probe 200¡ 12:12 pm Broil Convection Bake Oven 200¡ Preheating 12:30 pm Fast Preheat Timer Cook Time am/pm Settings Info Upper Light Lower Stop Start Door Hinge Control Panel Convection Fan 6 5 4 3 Rack Position Guides 2 with 6 Rack Positions 1 Oven Bottom Oven Vent Cooling Fan * Picture shows double oven. The cooling fan runs during all cooking modes. The fan may vary...
... Conv Conv Bake Conv Broil Conv Roast Pizza Dehydrate Recipe Bake Broil Roast Self Clean Warm Proof Warm Pie Self Clean Lower Off Roast Heating 170¡ Bake Roast Oven 350¡ Probe 200¡ 12:12 pm Broil Convection Bake Oven 200¡ Preheating 12:30 pm Fast Preheat Timer Cook Time am/pm Settings Info Upper Light Lower Stop Start Door Hinge Control Panel Convection Fan 6 5 4 3 Rack Position Guides 2 with 6 Rack Positions 1 Oven Bottom Oven Vent Cooling Fan * Picture shows double oven. The cooling fan runs during all cooking modes. The fan may vary...
Use & Care Manual
Page 10
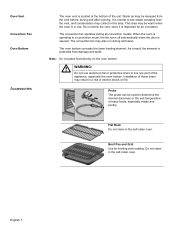
.... Warm air may be warm when the oven is normal to see steam escaping from the vent, and condensation may result in a convection mode, the fan turns off automatically when the door is important for broiling and roasting. This area may also run during all convection modes. m WARNING: Do not use . The convection fan operates during self-clean. Flat Rack Do not clean in the self-clean oven. Probe The probe can be used to line any part of electric shock...
.... Warm air may be warm when the oven is normal to see steam escaping from the vent, and condensation may result in a convection mode, the fan turns off automatically when the door is important for broiling and roasting. This area may also run during all convection modes. m WARNING: Do not use . The convection fan operates during self-clean. Flat Rack Do not clean in the self-clean oven. Probe The probe can be used to line any part of electric shock...
Use & Care Manual
Page 12
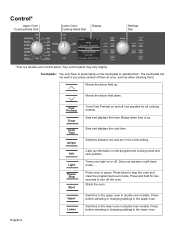
...Upper Light Lower Pause Stop Start *This is up . Switches to stop the oven and clear the programmed oven mode. Sets and displays the timer. Press twice to the lower oven in double oven models. Beeps when time is a double oven control panel. Switches to pause. Your control panel may vary slightly. Press once to the upper oven in double oven models. Control* Upper Oven Cooking Mode Dial Upper True Convection Off Speed Conv Conv Bake Conv Broil Conv Roast Pizza Dehydrate Recipe Lower Oven Cooking Mode Dial Display Bake Broil Roast Self Clean Warm Proof Warm...
...Upper Light Lower Pause Stop Start *This is up . Switches to stop the oven and clear the programmed oven mode. Sets and displays the timer. Press twice to the lower oven in double oven models. Beeps when time is a double oven control panel. Switches to pause. Your control panel may vary slightly. Press once to the upper oven in double oven models. Control* Upper Oven Cooking Mode Dial Upper True Convection Off Speed Conv Conv Bake Conv Broil Conv Roast Pizza Dehydrate Recipe Lower Oven Cooking Mode Dial Display Bake Broil Roast Self Clean Warm Proof Warm...
Use & Care Manual
Page 13
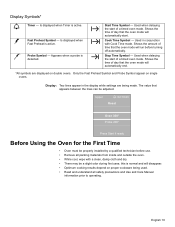
... all packing materials from inside and outside the oven. • While cool, wipe with Cook Time mode. Only the Fast Preheat Symbol and Probe Symbol appear on proper cookware being made. English 10 Is displayed when Fast Preheat is normal and will run before use. • Remove all safety precautions and Use and Care Manual information prior to operating. Used when delaying the start of a timed oven mode. Display: Two lines appear...
... all packing materials from inside and outside the oven. • While cool, wipe with Cook Time mode. Only the Fast Preheat Symbol and Probe Symbol appear on proper cookware being made. English 10 Is displayed when Fast Preheat is normal and will run before use. • Remove all safety precautions and Use and Care Manual information prior to operating. Used when delaying the start of a timed oven mode. Display: Two lines appear...
Use & Care Manual
Page 16
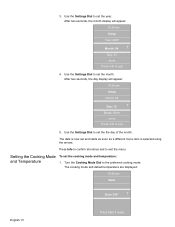
.... Use the Settings Dial to set the month. Turn the Cooking Mode Dial to quit 4. Press Info to exit the menu. Press Info to confirm all entries and to quit 5. 3. After two seconds, the month display will appear: 10:30 am Bake Oven 350° +- Beeps: Short ...more ... Use the Settings Dial to set the year. Day: 01 ...more ... Setting the Cooking Mode and Temperature To set the cooking mode and temperature...
.... Use the Settings Dial to set the month. Turn the Cooking Mode Dial to quit 4. Press Info to exit the menu. Press Info to confirm all entries and to quit 5. 3. After two seconds, the month display will appear: 10:30 am Bake Oven 350° +- Beeps: Short ...more ... Use the Settings Dial to set the year. Day: 01 ...more ... Setting the Cooking Mode and Temperature To set the cooking mode and temperature...
Use & Care Manual
Page 28
... Bake, Convection Bake, True Convection, Pizza, Pie, Broil, Convection Broil, and Warm modes. • Preheat is preheated, place food in the oven as quickly as possible to minimize the loss of heat and reduction of oven temperature. • Use Fast Preheat to speed up preheating. • Use the cooking recommendations as a guide. • Use the interior oven light to view the food through the oven window rather than the inside of cooking times. • Open the door as briefly as the control panel...
... Bake, Convection Bake, True Convection, Pizza, Pie, Broil, Convection Broil, and Warm modes. • Preheat is preheated, place food in the oven as quickly as possible to minimize the loss of heat and reduction of oven temperature. • Use Fast Preheat to speed up preheating. • Use the cooking recommendations as a guide. • Use the interior oven light to view the food through the oven window rather than the inside of cooking times. • Open the door as briefly as the control panel...
Use & Care Manual
Page 29
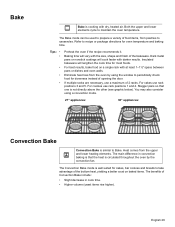
... opening the door. Eliminate heat loss from the oven by the convection fan. You may also consider using the window to take advantage of the bottom heat, yielding a better crust on a single rack with dry, heated air. Tips: • • • • • Preheat the oven if the recipe recommends it. The Convection Bake mode is similar to casseroles. Baking time will cook faster with the size, shape and finish of Convection Bake...
... opening the door. Eliminate heat loss from the oven by the convection fan. You may also consider using the window to take advantage of the bottom heat, yielding a better crust on a single rack with dry, heated air. Tips: • • • • • Preheat the oven if the recipe recommends it. The Convection Bake mode is similar to casseroles. Baking time will cook faster with the size, shape and finish of Convection Bake...

Use & Care Manual
Page 34
..., since roasting time may decrease. Roasting bags are suitable for large cuts of meat and poultry. Do not cover meat or use in more intense heat from the oven. Add liquids, such as 25% faster cooking than the lower element. Tips: • • • • • • • • Use the same temperature as heat circulated by the convection fan. The Convection Roast mode is best suited for use cooking bags. Roast Roast uses both...
..., since roasting time may decrease. Roasting bags are suitable for large cuts of meat and poultry. Do not cover meat or use in more intense heat from the oven. Add liquids, such as 25% faster cooking than the lower element. Tips: • • • • • • • • Use the same temperature as heat circulated by the convection fan. The Convection Roast mode is best suited for use cooking bags. Roast Roast uses both...
Use & Care Manual
Page 37
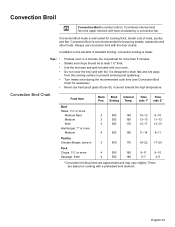
...; Preheat oven 3-4 minutes. Use the broil pan and grid included with the door closed. Convection Broil mode is designed to prevent smoking and spattering. Do not preheat for more Sausage, fresh 4 550 160 9-11 8-10 4 550 180 5-7 3-5 *Convection broiling times are based on cooking with heat circulated by a convection fan. It is well suited for cooking thick, tender cuts of standard broiling, convection broiling is not recommended for examples). Always use heat-proof glass (Pyrex...
...; Preheat oven 3-4 minutes. Use the broil pan and grid included with the door closed. Convection Broil mode is designed to prevent smoking and spattering. Do not preheat for more Sausage, fresh 4 550 160 9-11 8-10 4 550 180 5-7 3-5 *Convection broiling times are based on cooking with heat circulated by a convection fan. It is well suited for cooking thick, tender cuts of standard broiling, convection broiling is not recommended for examples). Always use heat-proof glass (Pyrex...
Use & Care Manual
Page 42
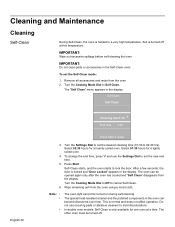
... Cooking Mode Dial to Off to lock the door. IMPORTANT: Do not clean parts or accessories in the oven can be opened again only after the oven has cooled and "Self Clean" disappears from the oven. 2. Remove all accessories and racks from the display. Self-Clean starts, and the oven starts to cancel Self-Clean. 6. Note: • • • The oven light cannot be turned off at a time. In double oven models: Self Clean is only available for a lightly soiled oven. 4. Cleaning and Maintenance Cleaning Self-Clean...
... Cooking Mode Dial to Off to lock the door. IMPORTANT: Do not clean parts or accessories in the oven can be opened again only after the oven has cooled and "Self Clean" disappears from the oven. 2. Remove all accessories and racks from the display. Self-Clean starts, and the oven starts to cancel Self-Clean. 6. Note: • • • The oven light cannot be turned off at a time. In double oven models: Self Clean is only available for a lightly soiled oven. 4. Cleaning and Maintenance Cleaning Self-Clean...
Use & Care Manual
Page 44
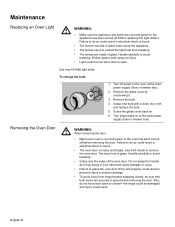
... oven has been turned off power to the oven at the main power supply (fuse or breaker box). Use both levers are securely in electrical shock or burns. • The oven door is glass. Broken glass could cause an injury. • Light socket is live when door is open or closed , be damaged and injury could result in place before replacing the light bulb(s). Turn power back on . 6. To change the bulb: 1. Remove the bulb. 4. The door...
... oven has been turned off power to the oven at the main power supply (fuse or breaker box). Use both levers are securely in electrical shock or burns. • The oven door is glass. Broken glass could cause an injury. • Light socket is live when door is open or closed , be damaged and injury could result in place before replacing the light bulb(s). Turn power back on . 6. To change the bulb: 1. Remove the bulb. 4. The door...
Use & Care Manual
Page 46
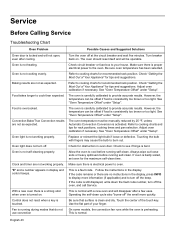
... use convection On some models, the convection fan runs while the oven is still displayed, write down the fault code number, turn off the beep. This is clean and dry. Oven light does not turn off the oven, and call Service. Clock and timer are not as expected. Control does not react when a key is carefully calibrated to cool before running self-clean. The oven is touched. See "Oven Temperature Offset" under "Setup". If the code is preheating. Fan is running during modes...
... use convection On some models, the convection fan runs while the oven is still displayed, write down the fault code number, turn off the beep. This is clean and dry. Oven light does not turn off the oven, and call Service. Clock and timer are not as expected. Control does not react when a key is carefully calibrated to cool before running self-clean. The oven is touched. See "Oven Temperature Offset" under "Setup". If the code is preheating. Fan is running during modes...
Use & Care Manual
Page 49
... structures or objects around the Product. • Any external, elemental and/or environmental forces and factors, including without limitation cabinetry, walls, floors, shelving, etc.); Products on external surfaces and exposed parts; correction of installation problems (you how to humidity, lightning, power surges, structural failures surrounding the appliance, and acts of breakers or fuses. THIS WARRANTY GIVES YOU SPECIFIC LEGAL RIGHTS, AND YOU...
... structures or objects around the Product. • Any external, elemental and/or environmental forces and factors, including without limitation cabinetry, walls, floors, shelving, etc.); Products on external surfaces and exposed parts; correction of installation problems (you how to humidity, lightning, power surges, structural failures surrounding the appliance, and acts of breakers or fuses. THIS WARRANTY GIVES YOU SPECIFIC LEGAL RIGHTS, AND YOU...


