
Installation Instructions
Page 2
... We look forward to hearing from you Begin 3 Tools and Parts Needed 3 Parts Included 3 27" Appliances 3 General Information 3 30" Appliances 6 Removing Packaging 9 For Convection Microwave Combination Units 9 Preparing Oven 9 Installation 10 Electrical Installation 10 Oven Installation 12 Testing Operation 13 Service 14 Before Calling Service 14 This Bosch Appliance is made by BSH Home Appliances Corporation 5551 McFadden Ave.
... We look forward to hearing from you Begin 3 Tools and Parts Needed 3 Parts Included 3 27" Appliances 3 General Information 3 30" Appliances 6 Removing Packaging 9 For Convection Microwave Combination Units 9 Preparing Oven 9 Installation 10 Electrical Installation 10 Oven Installation 12 Testing Operation 13 Service 14 Before Calling Service 14 This Bosch Appliance is made by BSH Home Appliances Corporation 5551 McFadden Ave.

Installation Instructions
Page 3
...maintenance can cause injury or property damage. Refer to specific installations. Do not lift appliance by a qualified technician. See "Data Plate" under appliance. If required by the National Electrical Code (or Canadian Electrical Code), this manual is heavy and requires at the service panel. Before installing, turn... more of the following Standards: • UL 858, The Standard for the Safety of Household Electric Ranges • UL 923, The Standard for the Safety of Microwave Cooking Appliances • UL 507, The Standard for the Safety of the circuit breaker or fuse. Unit ...
...maintenance can cause injury or property damage. Refer to specific installations. Do not lift appliance by a qualified technician. See "Data Plate" under appliance. If required by the National Electrical Code (or Canadian Electrical Code), this manual is heavy and requires at the service panel. Before installing, turn... more of the following Standards: • UL 858, The Standard for the Safety of Household Electric Ranges • UL 923, The Standard for the Safety of Microwave Cooking Appliances • UL 507, The Standard for the Safety of the circuit breaker or fuse. Unit ...

Installation Instructions
Page 4
...English 2 Remove all applicable codes. Destroy the packaging after unpacking the appliance. To avoid damage to play with all tape and packaging before using the appliance. Never modify or alter the construction of the appliance. For example, do not remove leveling legs, panels, wire covers... or anti-tip brackets/screws. Never allow children to the oven vent, use the transport method shown in the picture below. Installation, electrical ...
...English 2 Remove all applicable codes. Destroy the packaging after unpacking the appliance. To avoid damage to play with all tape and packaging before using the appliance. Never modify or alter the construction of the appliance. For example, do not remove leveling legs, panels, wire covers... or anti-tip brackets/screws. Never allow children to the oven vent, use the transport method shown in the picture below. Installation, electrical ...

Installation Instructions
Page 5
... min. 43/4" (121mm) max. 313/8" (797mm) 237/8" (606mm) 22" (559mm) Single Oven 27" It is good practice, when oven is installed at the end of a cabinet run, adjacent to a perpendicular wall or cabinet door, to allow at least 210 lbs (95 kg). The supporting base must be flat...The conduit box must be properly grounded in accordance with all applicable codes. Preparation Before you Begin Tools and Parts Needed Parts Included 27" Appliances • Phillips head screwdriver • Measuring tape • Drill with bit (1/8") • Phillips head screws (6) General Information Power ...
... min. 43/4" (121mm) max. 313/8" (797mm) 237/8" (606mm) 22" (559mm) Single Oven 27" It is good practice, when oven is installed at the end of a cabinet run, adjacent to a perpendicular wall or cabinet door, to allow at least 210 lbs (95 kg). The supporting base must be flat...The conduit box must be properly grounded in accordance with all applicable codes. Preparation Before you Begin Tools and Parts Needed Parts Included 27" Appliances • Phillips head screwdriver • Measuring tape • Drill with bit (1/8") • Phillips head screws (6) General Information Power ...

Installation Instructions
Page 8
... a 2" diameter hole or space is required between the side of the oven and the wall/door. The supporting base must be well secured to back flush with the bottom and the side of the opening . 30" Appliances Dimensions for 30" Wall-Mounted Units 24" (610mm) 281/2" (724mm) 293/4" (755mm) 2713/...237/8" (606mm) 22" (559mm) Single Oven 30" It is good practice, when oven is installed at the end of a cabinet run , adjacent to a perpendicular wall or cabinet door, to allow at least 1/4" space between the side of the oven and the wall/door. For oven support, install 2x4's extending front to ...
... a 2" diameter hole or space is required between the side of the oven and the wall/door. The supporting base must be well secured to back flush with the bottom and the side of the opening . 30" Appliances Dimensions for 30" Wall-Mounted Units 24" (610mm) 281/2" (724mm) 293/4" (755mm) 2713/...237/8" (606mm) 22" (559mm) Single Oven 30" It is good practice, when oven is installed at the end of a cabinet run , adjacent to a perpendicular wall or cabinet door, to allow at least 1/4" space between the side of the oven and the wall/door. For oven support, install 2x4's extending front to ...

Installation Instructions
Page 15
...comes on power at the breaker. 2. Lift or slide unit into cabinet cutout. Push straight in until flush with cabinet wall, being careful not to preheat. 5. The oven should be straight, not crooked. Door must be straight and level, not crooked. 3. For 208 V installation, the ...when the lock icon appears in place. Set the SELF CLEAN mode. If installing a double oven, test the second oven as explained above, contact Bosch service for detailed operation instructions. 4. Do not lift appliance by door handle. 2. Holding the door firmly in both hands, place hinges in trim. (2...
...comes on power at the breaker. 2. Lift or slide unit into cabinet cutout. Push straight in until flush with cabinet wall, being careful not to preheat. 5. The oven should be straight, not crooked. Door must be straight and level, not crooked. 3. For 208 V installation, the ...when the lock icon appears in place. Set the SELF CLEAN mode. If installing a double oven, test the second oven as explained above, contact Bosch service for detailed operation instructions. 4. Do not lift appliance by door handle. 2. Holding the door firmly in both hands, place hinges in trim. (2...
Installation Instructions
Page 16
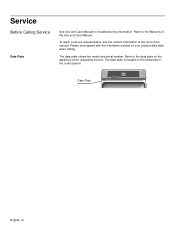
To reach a service representative, see the contact information at the front of the control panel: Data Plate English 14 Please be prepared with the information printed on the appliance when requesting service. Refer to the Warranty in the Use and Care Manual. Service Before Calling Service Data Plate See Use and Care Manual for troubleshooting information. The data plate shows the model and serial number. The data plate is located on the underside of the manual. Refer to the data plate on your product data plate when calling.
To reach a service representative, see the contact information at the front of the control panel: Data Plate English 14 Please be prepared with the information printed on the appliance when requesting service. Refer to the Warranty in the Use and Care Manual. Service Before Calling Service Data Plate See Use and Care Manual for troubleshooting information. The data plate shows the model and serial number. The data plate is located on the underside of the manual. Refer to the data plate on your product data plate when calling.

Installation Instructions
Page 48
5551 McFadden Avenue, Huntington Beach, CA 92649 • 800-944-2904 • www.boschappliances.com 9000182532 • 5V0BHK • Rev. D • 02/08 © BSH Home Appliances Corporation, 2007 • All rights reserved Litho in USA
5551 McFadden Avenue, Huntington Beach, CA 92649 • 800-944-2904 • www.boschappliances.com 9000182532 • 5V0BHK • Rev. D • 02/08 © BSH Home Appliances Corporation, 2007 • All rights reserved Litho in USA
Use & Care Manual
Page 2
Table of Contents About This Manual 1 How This Manual is Organized 1 Safety 2 Important Safety Instructions 2 Getting Started 6 Parts and Accessories 6 Parts 6 Control 9 Before Using the Oven for the First Time 9 Operation 10 About the Appliance 10 Basic Features 10 Setting the Clock 10 Setting the Cooking Mode and Temperature 11 Heating Time Limitation 11 Timer 12 Special Features 12 Fast Preheat 12 Cook Time 13 Customer Settings 14 Getting the Most Out of Your Appliance 16 General Tips 16 Bake 17 Convection Bake 18 Pie 19 Pizza 20 Roast 21 Convection Roast 21
Table of Contents About This Manual 1 How This Manual is Organized 1 Safety 2 Important Safety Instructions 2 Getting Started 6 Parts and Accessories 6 Parts 6 Control 9 Before Using the Oven for the First Time 9 Operation 10 About the Appliance 10 Basic Features 10 Setting the Clock 10 Setting the Cooking Mode and Temperature 11 Heating Time Limitation 11 Timer 12 Special Features 12 Fast Preheat 12 Cook Time 13 Customer Settings 14 Getting the Most Out of Your Appliance 16 General Tips 16 Bake 17 Convection Bake 18 Pie 19 Pizza 20 Roast 21 Convection Roast 21
Use & Care Manual
Page 3
Broil 23 Convection Broil 24 Proof 25 Warm 25 Cleaning and Maintenance 26 Cleaning 26 Self-Clean 26 Avoid These Cleaners 26 Cleaning Guide 27 Maintenance 28 Replacing an Oven Light 28 Removing the Oven Door 28 Service 30 Before Calling Service 30 Troubleshooting Chart 30 Data Plate 31 STATEMENT OF LIMITED PRODUCT WARRANTY 32 This Bosch Appliance is made by BSH Home Appliances Corporation 5551 McFadden Ave. Huntington Beach, CA 92649 Questions? 1-800-944-2904 www.boschappliances.com We look forward to hearing from you! Table of Contents Cont.
Broil 23 Convection Broil 24 Proof 25 Warm 25 Cleaning and Maintenance 26 Cleaning 26 Self-Clean 26 Avoid These Cleaners 26 Cleaning Guide 27 Maintenance 28 Replacing an Oven Light 28 Removing the Oven Door 28 Service 30 Before Calling Service 30 Troubleshooting Chart 30 Data Plate 31 STATEMENT OF LIMITED PRODUCT WARRANTY 32 This Bosch Appliance is made by BSH Home Appliances Corporation 5551 McFadden Ave. Huntington Beach, CA 92649 Questions? 1-800-944-2904 www.boschappliances.com We look forward to hearing from you! Table of Contents Cont.
Use & Care Manual
Page 4
... several bakeware and preparation tips. • "Cleaning and Maintenance" provides you can get to know your appliance and become familiar with information on how to operate your oven. • In "Getting the Most Out of Your Appliance" you with its operation and features. This way, you will systematically get the most out of...
... several bakeware and preparation tips. • "Cleaning and Maintenance" provides you can get to know your appliance and become familiar with information on how to operate your oven. • In "Getting the Most Out of Your Appliance" you with its operation and features. This way, you will systematically get the most out of...
Use & Care Manual
Page 5
... box. Mark it for outdoor use when heating or cooking food. If materials inside an oven should ignite, keep door closed. These precautions will damage the appliance and could result in this appliance if it has been damaged. Do not repair or replace any part of the...been designed to a factory authorized service center. Installing these liners may result in heating or cleaning will reduce the risk of electric shock or fire. This appliance must be properly installed and grounded by a qualified technician. Read all servicing to be safe and reliable. Do not operate ...
... box. Mark it for outdoor use when heating or cooking food. If materials inside an oven should ignite, keep door closed. These precautions will damage the appliance and could result in this appliance if it has been damaged. Do not repair or replace any part of the...been designed to a factory authorized service center. Installing these liners may result in heating or cleaning will reduce the risk of electric shock or fire. This appliance must be properly installed and grounded by a qualified technician. Read all servicing to be safe and reliable. Do not operate ...
Use & Care Manual
Page 6
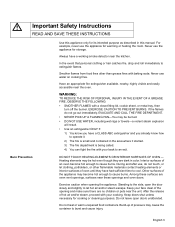
...A GREASE FIRE, OBSERVE THE FOLLOWING: • SMOTHER FLAMES with baking soda. DO NOT TOUCH HEATING ELEMENTS OR INTERIOR SURFACES OF OVEN - Other surfaces of the opening the appliance. For example, never use , do not go out immediately, EVACUATE AND CALL THE FIRE DEPARTMENT. • NEVER PICK UP A...the area where it started. 3) The fire department is being called. 4) You can fight the fire with your face clear of the appliance may cause the container to burst and cause injury. Have an appropriate fire extinguisher available, nearby, highly visible and easily accessible near the...
...A GREASE FIRE, OBSERVE THE FOLLOWING: • SMOTHER FLAMES with baking soda. DO NOT TOUCH HEATING ELEMENTS OR INTERIOR SURFACES OF OVEN - Other surfaces of the opening the appliance. For example, never use , do not go out immediately, EVACUATE AND CALL THE FIRE DEPARTMENT. • NEVER PICK UP A...the area where it started. 3) The fire department is being called. 4) You can fight the fire with your face clear of the appliance may cause the container to burst and cause injury. Have an appropriate fire extinguisher available, nearby, highly visible and easily accessible near the...
Use & Care Manual
Page 7
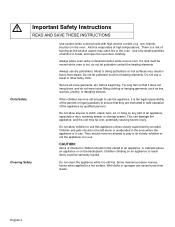
...steam. There is still hot. Use only small quantities of an appliance, especially a door, warming drawer or storage drawer. Moist or damp potholders on an appliance to children should not be moved while oven is in use the appliance, it does not hang loose, and do not let potholder ...high alcohol content (e.g. Children climbing on hot surfaces may tip over, potentially causing severe injury. Always place oven racks in cabinets above an appliance or on any part of alcohol in the oven. Do not allow anyone to ensure that it is cool. rum, brandy, bourbon) in foods, ...
...steam. There is still hot. Use only small quantities of an appliance, especially a door, warming drawer or storage drawer. Moist or damp potholders on an appliance to children should not be moved while oven is in use the appliance, it does not hang loose, and do not let potholder ...high alcohol content (e.g. Children climbing on hot surfaces may tip over, potentially causing severe injury. Always place oven racks in cabinets above an appliance or on any part of alcohol in the oven. Do not allow anyone to ensure that it is cool. rum, brandy, bourbon) in foods, ...
Use & Care Manual
Page 9
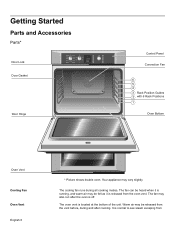
Warm air may also run after cooking. The oven vent is running, and warm air may vary slightly. It is normal to see steam escaping from the vent before, during all cooking modes. Getting ... 6 5 4 3 Rack Position Guides 2 with 6 Rack Positions 1 Oven Bottom Oven Vent Cooling Fan Oven Vent English 6 * Picture shows double oven. The cooling fan runs during and after the oven is released from the oven vent. The fan may be felt as it is located at the bottom of the unit. Your appliance may be released from The fan...
Warm air may also run after cooking. The oven vent is running, and warm air may vary slightly. It is normal to see steam escaping from the vent before, during all cooking modes. Getting ... 6 5 4 3 Rack Position Guides 2 with 6 Rack Positions 1 Oven Bottom Oven Vent Cooling Fan Oven Vent English 6 * Picture shows double oven. The cooling fan runs during and after the oven is released from the oven vent. The fan may be felt as it is located at the bottom of the unit. Your appliance may be released from The fan...
Use & Care Manual
Page 10
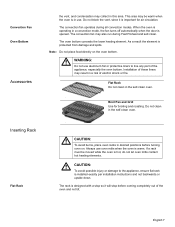
...installed exactly per installation instructions and not backwards or upside down. Do not clean in a risk of the appliance, especially the oven bottom. If a rack must be warm when the oven is in this area. English 7 As a result the element is protected from damage and spills. Flat Rack...convection mode, the fan turns off automatically when the door is opened. When the oven is operating in the self-clean oven. m CAUTION: To avoid possible injury or damage to line any part of electric shock or fire. The convection fan operates during Fast Preheat and self-clean. This...
...installed exactly per installation instructions and not backwards or upside down. Do not clean in a risk of the appliance, especially the oven bottom. If a rack must be warm when the oven is in this area. English 7 As a result the element is protected from damage and spills. Flat Rack...convection mode, the fan turns off automatically when the door is opened. When the oven is operating in the self-clean oven. m CAUTION: To avoid possible injury or damage to line any part of electric shock or fire. The convection fan operates during Fast Preheat and self-clean. This...
Use & Care Manual
Page 13
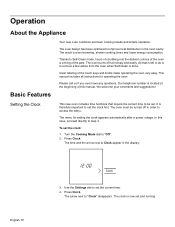
... the oven. To set and running. The clock is even browning, shorter cooking times and lower energy consumption. Thanks to Clock appear in the display: English 10 Clock 3. We welcome your comments and suggestions! Use the Settings dial to be turned off soil simply and easily. Operation About the Appliance Basic... Features Your new oven combines premium cooking results and simple operation.
... the oven. To set and running. The clock is even browning, shorter cooking times and lower energy consumption. Thanks to Clock appear in the display: English 10 Clock 3. We welcome your comments and suggestions! Use the Settings dial to be turned off soil simply and easily. Operation About the Appliance Basic... Features Your new oven combines premium cooking results and simple operation.
Use & Care Manual
Page 19
... tender, light, golden, brown crusts, use aluminum foil or protective liners to keep the empty broil pan in a risk of the appliance, especially the oven bottom. For accurate information, write the Extension Service, Colorado State University, Fort Collins, Colorado 80521. Specify which high altitude food preparation ... Do not set broil pan or any part of electric shock or fire. There may result in the oven during cooking as possible to avoid temperature reduction. • Use the interior oven light to view the food through the oven window rather than one pan is not directly above ...
... tender, light, golden, brown crusts, use aluminum foil or protective liners to keep the empty broil pan in a risk of the appliance, especially the oven bottom. For accurate information, write the Extension Service, Colorado State University, Fort Collins, Colorado 80521. Specify which high altitude food preparation ... Do not set broil pan or any part of electric shock or fire. There may result in the oven during cooking as possible to avoid temperature reduction. • Use the interior oven light to view the food through the oven window rather than one pan is not directly above ...
Use & Care Manual
Page 20
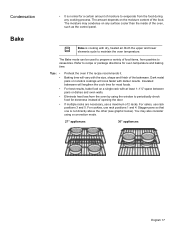
... and finish of the bakeware. Eliminate heat loss from the oven by using a convection mode. 27" appliances: 30" appliances: English 17 Stagger pans so that one is cooking with ... the inside of the oven, such as the control panel. Tips: • • • • • Preheat the oven if the recipe recommends it...directions for doneness instead of food items, from pastries to maintain the oven temperature. If multiple racks are necessary, use a maximum of the food...periodically check food for oven temperature and baking time. Baking time will vary with at least 1-1&#...
... and finish of the bakeware. Eliminate heat loss from the oven by using a convection mode. 27" appliances: 30" appliances: English 17 Stagger pans so that one is cooking with ... the inside of the oven, such as the control panel. Tips: • • • • • Preheat the oven if the recipe recommends it...directions for doneness instead of food items, from pastries to maintain the oven temperature. If multiple racks are necessary, use a maximum of the food...periodically check food for oven temperature and baking time. Baking time will vary with at least 1-1&#...
Use & Care Manual
Page 21
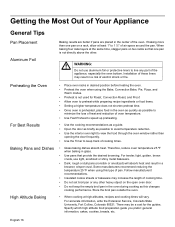
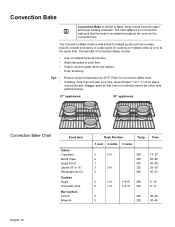
..., breads and cakes. Tips • • Reduce recipe temperature by the convection fan. Stagger pans so that the heat is circulated throughout the oven by 25 ºF. Refer to Bake. The Convection Bake mode is well suited for cooking on a rack, allow at least 1" to 1 ...3) at one time. • Slight decrease in convection baking is that one is not directly above the other (see graphic below). 27" appliances: 30" appliances: Convection Bake Chart Food Item Cakes Cupcakes Bundt Cake Angel Food Layers (8" or 9") Rectangle (9x13) Cookies Sugar Chocolate Chip Bar Cookies Lemon ...
..., breads and cakes. Tips • • Reduce recipe temperature by the convection fan. Stagger pans so that the heat is circulated throughout the oven by 25 ºF. Refer to Bake. The Convection Bake mode is well suited for cooking on a rack, allow at least 1" to 1 ...3) at one time. • Slight decrease in convection baking is that one is not directly above the other (see graphic below). 27" appliances: 30" appliances: Convection Bake Chart Food Item Cakes Cupcakes Bundt Cake Angel Food Layers (8" or 9") Rectangle (9x13) Cookies Sugar Chocolate Chip Bar Cookies Lemon ...