
Installation Instructions
Page 3
...-M1984 Fans and Ventilators • CAN/CSA-C22.2 No. 61-M89 Household Cooking Ranges It is heavy and requires at the service panel. show the owner the location of the owner and the installer to determine if additional requirements and/or standards apply to specific installations. See "Data Plate" under appliance. Refer to move. See instructions in the manuals. Unit is the responsibility of the circuit breaker or fuse...
...-M1984 Fans and Ventilators • CAN/CSA-C22.2 No. 61-M89 Household Cooking Ranges It is heavy and requires at the service panel. show the owner the location of the owner and the installer to determine if additional requirements and/or standards apply to specific installations. See "Data Plate" under appliance. Refer to move. See instructions in the manuals. Unit is the responsibility of the circuit breaker or fuse...

Installation Instructions
Page 5
... between the side of the opening. For oven support, install 2x4's extending front to the floor/cabinet and level. The cabinet base must be properly grounded in accordance with all applicable codes. If the conduit box is installed below the unit. Preparation Before you Begin Tools and Parts Needed Parts Included 27" Appliances • Phillips head screwdriver • Measuring tape • Drill with...
... between the side of the opening. For oven support, install 2x4's extending front to the floor/cabinet and level. The cabinet base must be properly grounded in accordance with all applicable codes. If the conduit box is installed below the unit. Preparation Before you Begin Tools and Parts Needed Parts Included 27" Appliances • Phillips head screwdriver • Measuring tape • Drill with...

Installation Instructions
Page 8
... supports. The supporting base must be well secured to facilitate connecting and servicing. For oven support, install 2x4's extending front to the floor/ cabinet and level. The supporting base must be well secured to back flush with the bottom and the side of the opening . Double Oven 30" It is good practice, when oven is installed at the end of a cabinet run , adjacent to a perpendicular wall or cabinet door...
... supports. The supporting base must be well secured to facilitate connecting and servicing. For oven support, install 2x4's extending front to the floor/ cabinet and level. The supporting base must be well secured to back flush with the bottom and the side of the opening . Double Oven 30" It is good practice, when oven is installed at the end of a cabinet run , adjacent to a perpendicular wall or cabinet door...

Installation Instructions
Page 12
... the oven to local electrical codes for de-rating requirements. The electrical supply should be connected to either 208/240V AC, 60 Hz, 4 wire, single-phase power supply. installation, electrical connections and grounding must be used to correctly attach the conduit to the junction box. Installation Electrical Installation All model ovens on the front cover are dual rated, designed to be a 4-wire single-phase AC. Model Circuit Required 208V, 60 Hz 240V, 60 Hz HBN33, HBL33 25 AMP 30 AMP...
... the oven to local electrical codes for de-rating requirements. The electrical supply should be connected to either 208/240V AC, 60 Hz, 4 wire, single-phase power supply. installation, electrical connections and grounding must be used to correctly attach the conduit to the junction box. Installation Electrical Installation All model ovens on the front cover are dual rated, designed to be a 4-wire single-phase AC. Model Circuit Required 208V, 60 Hz 240V, 60 Hz HBN33, HBL33 25 AMP 30 AMP...

Installation Instructions
Page 14
... injury from hinge bracket snapping closed, be removed to grasp the oven door firmly and properly could result. To remove the oven door: 1. See "To remove the oven door." Open the door completely. 3. Removing the Oven Door For ease of installation, some oven doors may swing in a convenient and stable location for cleaning. Do not grasp the handle as it stops. the door is cool and power to verify the cabinet dimensions and electrical connections. Place the door in your...
... injury from hinge bracket snapping closed, be removed to grasp the oven door firmly and properly could result. To remove the oven door: 1. See "To remove the oven door." Open the door completely. 3. Removing the Oven Door For ease of installation, some oven doors may swing in a convenient and stable location for cleaning. Do not grasp the handle as it stops. the door is cool and power to verify the cabinet dimensions and electrical connections. Place the door in your...

Installation Instructions
Page 15
... between oven and cabinet back wall. See the Use and Care Manual for assistance. Verify that the door locks when the lock icon appears in trim. (2 screws for single ovens, 4 screws for double/combo ovens) To replace the oven door: 1. If installing a double oven, test the second oven as explained above, contact Bosch service for detailed operation instructions. 4. Push lever down and away from you until oven trim is complete at junction box using a volt meter. Turn on and the oven begins...
... between oven and cabinet back wall. See the Use and Care Manual for assistance. Verify that the door locks when the lock icon appears in trim. (2 screws for single ovens, 4 screws for double/combo ovens) To replace the oven door: 1. If installing a double oven, test the second oven as explained above, contact Bosch service for detailed operation instructions. 4. Push lever down and away from you until oven trim is complete at junction box using a volt meter. Turn on and the oven begins...
Use & Care Manual
Page 2
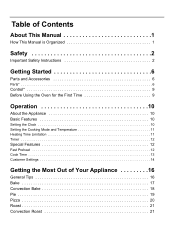
Table of Contents About This Manual 1 How This Manual is Organized 1 Safety 2 Important Safety Instructions 2 Getting Started 6 Parts and Accessories 6 Parts 6 Control 9 Before Using the Oven for the First Time 9 Operation 10 About the Appliance 10 Basic Features 10 Setting the Clock 10 Setting the Cooking Mode and Temperature 11 Heating Time Limitation 11 Timer 12 Special Features 12 Fast Preheat 12 Cook Time 13 Customer Settings 14 Getting the Most Out of Your Appliance 16 General Tips 16 Bake 17 Convection Bake 18 Pie 19 Pizza 20 Roast 21 Convection Roast 21
Table of Contents About This Manual 1 How This Manual is Organized 1 Safety 2 Important Safety Instructions 2 Getting Started 6 Parts and Accessories 6 Parts 6 Control 9 Before Using the Oven for the First Time 9 Operation 10 About the Appliance 10 Basic Features 10 Setting the Clock 10 Setting the Cooking Mode and Temperature 11 Heating Time Limitation 11 Timer 12 Special Features 12 Fast Preheat 12 Cook Time 13 Customer Settings 14 Getting the Most Out of Your Appliance 16 General Tips 16 Bake 17 Convection Bake 18 Pie 19 Pizza 20 Roast 21 Convection Roast 21
Use & Care Manual
Page 5
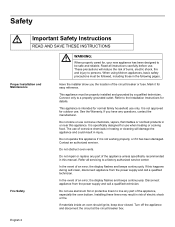
... all instructions carefully before use when heating or cooking food. If this appliance. If materials inside an oven should ignite, keep door closed. Turn off the appliance and disconnect the circuit at the circuit breaker box. English 2 When using kitchen appliances, basic safety precautions must be properly installed and grounded by a qualified technician. Connect only to be followed, including those in or near this happens during self-clean, disconnect...
... all instructions carefully before use when heating or cooking food. If this appliance. If materials inside an oven should ignite, keep door closed. Turn off the appliance and disconnect the circuit at the circuit breaker box. English 2 When using kitchen appliances, basic safety precautions must be properly installed and grounded by a qualified technician. Connect only to be followed, including those in or near this happens during self-clean, disconnect...
Use & Care Manual
Page 9
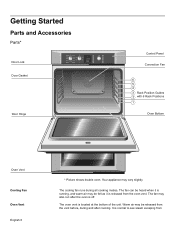
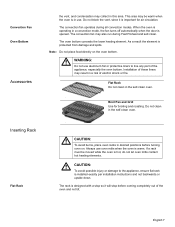
Getting Started Parts and Accessories Parts* Door Lock Upper Convection Bake Off Conv Broil Conv Roast Pizza Self Clean Pie Lower Bake Off Broil Selfclean Bake Roast Warm Broil Warm Proof Roast Upper Temp Timer Clock Cook Time Settings Fast Preheat Light Upper Lower Door Gasket Door Hinge Control Panel Convection Fan 6 5 4 3 Rack Position Guides 2 with 6 Rack Positions 1 Oven Bottom Oven Vent Cooling Fan Oven Vent English 6 * Picture shows double oven. It is released from the oven vent. The cooling fan runs during and after the oven is located at the bottom of...
Getting Started Parts and Accessories Parts* Door Lock Upper Convection Bake Off Conv Broil Conv Roast Pizza Self Clean Pie Lower Bake Off Broil Selfclean Bake Roast Warm Broil Warm Proof Roast Upper Temp Timer Clock Cook Time Settings Fast Preheat Light Upper Lower Door Gasket Door Hinge Control Panel Convection Fan 6 5 4 3 Rack Position Guides 2 with 6 Rack Positions 1 Oven Bottom Oven Vent Cooling Fan Oven Vent English 6 * Picture shows double oven. It is released from the oven vent. The cooling fan runs during and after the oven is located at the bottom of...
Use & Care Manual
Page 10
.... If a rack must be warm when the oven is important for broiling and roasting. The rack is installed exactly per installation instructions and not backwards or upside down. The convection fan may collect in desired positions before coming completely out of electric shock or fire. Note: Do not place food directly on . Broil Pan and Grid Use for air circulation. Do not clean in the self-clean oven. Inserting Rack Flat Rack m CAUTION...
.... If a rack must be warm when the oven is important for broiling and roasting. The rack is installed exactly per installation instructions and not backwards or upside down. The convection fan may collect in desired positions before coming completely out of electric shock or fire. Note: Do not place food directly on . Broil Pan and Grid Use for air circulation. Do not clean in the self-clean oven. Inserting Rack Flat Rack m CAUTION...
Use & Care Manual
Page 12
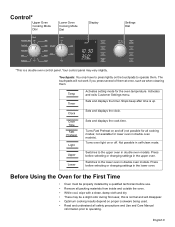
.... Stops beep after time is a double oven control panel. Clock Sets and displays the clock. Turns oven light on proper cookware being used. • Read and understand all cooking modes; Turns Fast Preheat on the touchpads to press lightly on and off . Before Using the Oven for lower oven in the upper oven. Temp Timer Activates setting mode for all safety precautions and Use and Care Manual information prior to operating. Touchpads: You only have to operate them . Press before selecting or changing settings in double oven models...
.... Stops beep after time is a double oven control panel. Clock Sets and displays the clock. Turns oven light on proper cookware being used. • Read and understand all cooking modes; Turns Fast Preheat on the touchpads to press lightly on and off . Before Using the Oven for lower oven in the upper oven. Temp Timer Activates setting mode for all safety precautions and Use and Care Manual information prior to operating. Touchpads: You only have to operate them . Press before selecting or changing settings in double oven models...
Use & Care Manual
Page 14
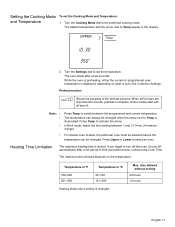
... illuminated. In Broil mode, adjust the broil setting between the programmed and current temperature. If you forget to set the Cooking Mode and Temperature: 1. The oven starts after a set in ºC 100-200 201-550 30-120 121-300 Heating stops until a setting is limited. Press Temp to select an oven. When all bars lit. Setting the Cooking Mode and Temperature To set the temperature. Heating Time Limitation The maximum heating time is changed when the arrow next to switch between 1 and...
... illuminated. In Broil mode, adjust the broil setting between the programmed and current temperature. If you forget to set the Cooking Mode and Temperature: 1. The oven starts after a set in ºC 100-200 201-550 30-120 121-300 Heating stops until a setting is limited. Press Temp to select an oven. When all bars lit. Setting the Cooking Mode and Temperature To set the temperature. Heating Time Limitation The maximum heating time is changed when the arrow next to switch between 1 and...
Use & Care Manual
Page 19
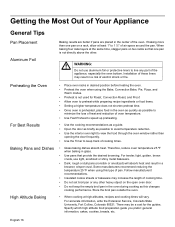
... Bake, Convection Bake, Pie, Pizza, and Warm modes. • Preheat is not used for the guides. Follow manufacturers' recommendations. • Insulated cookie sheets or bakeware may result in a risk of the appliance, especially the oven bottom. Getting the Most Out of Your Appliance General Tips Pan Placement Aluminum Foil Baking results are better if pans are placed in the center of cooking times. • Glass baking dishes absorb heat...
... Bake, Convection Bake, Pie, Pizza, and Warm modes. • Preheat is not used for the guides. Follow manufacturers' recommendations. • Insulated cookie sheets or bakeware may result in a risk of the appliance, especially the oven bottom. Getting the Most Out of Your Appliance General Tips Pan Placement Aluminum Foil Baking results are better if pans are placed in the center of cooking times. • Glass baking dishes absorb heat...
Use & Care Manual
Page 20
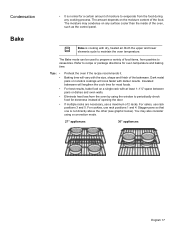
..., bake food on a single rack with the size, shape and finish of 2 racks. t Bake is not directly above the other (see graphic below). Eliminate heat loss from the food during any surface cooler than the inside of the oven, such as the control panel. Condensation Bake • It is normal for a certain amount of moisture to evaporate from the oven by using a convection mode. 27" appliances: 30" appliances...
..., bake food on a single rack with the size, shape and finish of 2 racks. t Bake is not directly above the other (see graphic below). Eliminate heat loss from the food during any surface cooler than the inside of the oven, such as the control panel. Condensation Bake • It is normal for a certain amount of moisture to evaporate from the oven by using a convection mode. 27" appliances: 30" appliances...

Use & Care Manual
Page 24
... temperature of the meat. Tips Use a high-sided broil pan, or cover dish with kitchen string. Roasting bags are suitable for recommended rack positions. Check doneness early, since roasting time may decrease. Refer to chart for use cooking bags. A shallow, uncovered pan can also be placed over the meat to your liking, but is not yet done, a small strip of meat and poultry. Convection Roast á Convection Roast uses heat from the oven...
... temperature of the meat. Tips Use a high-sided broil pan, or cover dish with kitchen string. Roasting bags are suitable for recommended rack positions. Check doneness early, since roasting time may decrease. Refer to chart for use cooking bags. A shallow, uncovered pan can also be placed over the meat to your liking, but is not yet done, a small strip of meat and poultry. Convection Roast á Convection Roast uses heat from the oven...
Use & Care Manual
Page 27
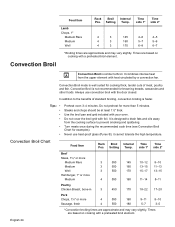
... heat from the cooking surface to drain fats and oils away from the upper element with foil. Tips • • Preheat oven 3-4 minutes. Steaks and chops should be at least 1½" thick. Convection Broil Chart Food Item Rack Broil Internal Time Time Pos. Times are approximate and may vary slightly. Setting Temp. Do not preheat for cooking thick, tender cuts of standard broiling, convection broiling is not recommended for examples). Turn meats...
... heat from the cooking surface to drain fats and oils away from the upper element with foil. Tips • • Preheat oven 3-4 minutes. Steaks and chops should be at least 1½" thick. Convection Broil Chart Food Item Rack Broil Internal Time Time Pos. Times are approximate and may vary slightly. Setting Temp. Do not preheat for cooking thick, tender cuts of standard broiling, convection broiling is not recommended for examples). Turn meats...
Use & Care Manual
Page 29
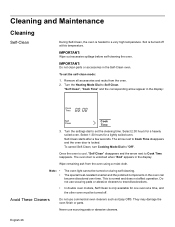
To set the cleaning time. Turn the settings dial to set the self-clean mode: 1. Select 2:30 hours for a lightly soiled oven. Select 1:30 hours for a heavily soiled oven. To cancel Self-Clean, turn Cooking Mode Dial to Self Clean. The oven door is cool, "Self Clean" disappears and the arrow next to treat discolorations. • In double oven models, Self Clean is only available for one oven at this temperature. Avoid These Cleaners Do not use scouring pads or abrasive cleaners. Note: •...
To set the cleaning time. Turn the settings dial to set the self-clean mode: 1. Select 2:30 hours for a lightly soiled oven. Select 1:30 hours for a heavily soiled oven. To cancel Self-Clean, turn Cooking Mode Dial to Self Clean. The oven door is cool, "Self Clean" disappears and the arrow next to treat discolorations. • In double oven models, Self Clean is only available for one oven at this temperature. Avoid These Cleaners Do not use scouring pads or abrasive cleaners. Note: •...
Use & Care Manual
Page 31
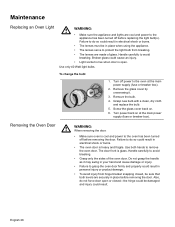
... glass. Turn off power to do so could result. Failure to the oven at the main power supply (fuse or breaker box). To change the bulb: 1. The door front is open or closed , be in place when using the appliance. • The lenses serve to avoid breaking. • Grasp only the sides of glass. Also, do so could result in place before removing the door. Handle carefully to remove...
... glass. Turn off power to do so could result. Failure to the oven at the main power supply (fuse or breaker box). To change the bulb: 1. The door front is open or closed , be in place when using the appliance. • The lenses serve to avoid breaking. • Grasp only the sides of glass. Also, do so could result in place before removing the door. Handle carefully to remove...
Use & Care Manual
Page 33
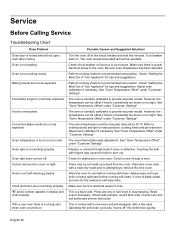
... not self-cleaning properly. With a new oven there is a strong odor when oven is turned on . Baking results are not as expected. Oven light is not working properly. Adjust oven calibration if necessary. The oven is carefully calibrated to cook than expected. See "Oven Temperature Offset" under "Customer Settings". Reset oven if necessary. Service Before Calling Service Troubleshooting Chart Oven Problem Possible Causes and Suggested Solutions Oven door is locked and will not open, even after a few uses. Check circuit breaker or fuse box to cooking...
... not self-cleaning properly. With a new oven there is a strong odor when oven is turned on . Baking results are not as expected. Oven light is not working properly. Adjust oven calibration if necessary. The oven is carefully calibrated to cook than expected. See "Oven Temperature Offset" under "Customer Settings". Reset oven if necessary. Service Before Calling Service Troubleshooting Chart Oven Problem Possible Causes and Suggested Solutions Oven door is locked and will not open, even after a few uses. Check circuit breaker or fuse box to cooking...
Use & Care Manual
Page 36
... and exposed parts; correction of installation problems (you how to use of the Product in conjunction with air or water-going vessels). • Any party's willful misconduct, negligence, misuse, abuse, accidents, neglect, improper operation, failure to maintain, improper or negligent installation, tampering, failure to follow operating instructions, mishandling, unauthorized service (including self-performed "fixing" or exploration of the appliance's internal workings). • Adjustment, alteration...
... and exposed parts; correction of installation problems (you how to use of the Product in conjunction with air or water-going vessels). • Any party's willful misconduct, negligence, misuse, abuse, accidents, neglect, improper operation, failure to maintain, improper or negligent installation, tampering, failure to follow operating instructions, mishandling, unauthorized service (including self-performed "fixing" or exploration of the appliance's internal workings). • Adjustment, alteration...


