Supplement
Page 1
..., contractors and service providers (eg mailing houses). Is this survey, you are relevant Oven Dryer Coffee Machine Steam Oven Cooktop Dishwasher Microwave Oven Rangehood Refrigerator Warming Drawer Washing Machine About You 1. Regularly Sometimes E 3 Never Product Warranty Please detach and retain for any part of the survey on an electrical, gas or water supply which is your warranty: i) whilst this warranty are entitled to a replacement or refund for...
..., contractors and service providers (eg mailing houses). Is this survey, you are relevant Oven Dryer Coffee Machine Steam Oven Cooktop Dishwasher Microwave Oven Rangehood Refrigerator Warming Drawer Washing Machine About You 1. Regularly Sometimes E 3 Never Product Warranty Please detach and retain for any part of the survey on an electrical, gas or water supply which is your warranty: i) whilst this warranty are entitled to a replacement or refund for...
Instructions for Use
Page 3
... use 14 Cleaning the cooking compartment and accessories 14 Operation 15 Switching the appliance on and off 15 Starting the operation 15 Setting an operating mode 15 Setting the heating mode and temperature 15 Fast preheat 16 Time-setting options 16 Setting the cooking time 17 Setting the end time 17 Setting the timer 18 Child lock 18 Activating and deactivating 18 Basic Settings 19 Changing the basic settings 19 List of basic settings 19 Power failure 19 Changing the time 19 Sabbath mode 20 Starting Sabbath mode...
... use 14 Cleaning the cooking compartment and accessories 14 Operation 15 Switching the appliance on and off 15 Starting the operation 15 Setting an operating mode 15 Setting the heating mode and temperature 15 Fast preheat 16 Time-setting options 16 Setting the cooking time 17 Setting the end time 17 Setting the timer 18 Child lock 18 Activating and deactivating 18 Basic Settings 19 Changing the basic settings 19 List of basic settings 19 Power failure 19 Changing the time 19 Sabbath mode 20 Starting Sabbath mode...
Instructions for Use
Page 5
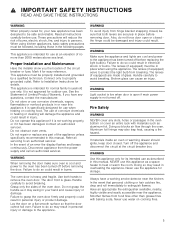
.... Handle carefully to an authorized servicer. If materials inside an oven or warming drawer should ignite, keep door closed , be safe and reliable. It is cool and power to persons. NEVER use . Doing so blocks air flow through the oven. Failure to heat or warm the room. Refer all instructions carefully before use this appliance as described in this appliance only for details. WARNING Use this manual. Never use as...
.... Handle carefully to an authorized servicer. If materials inside an oven or warming drawer should ignite, keep door closed , be safe and reliable. It is cool and power to persons. NEVER use . Doing so blocks air flow through the oven. Failure to heat or warm the room. Refer all instructions carefully before use this appliance as described in this appliance only for details. WARNING Use this manual. Never use as...

Instructions for Use
Page 14
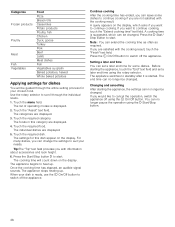
... "Clock" text field. 2. Cleaning the cooking compartment To eliminate the new-appliance smell, heat up the cooking compartment when it is heating. Keep the kitchen ventilated while the appliance is empty and with Home Connect on page 15 Settings Heating mode Temperature Cooking time Bake % 465° F (240 °C) 1 hour Switch off the appliance after the indicated cooking time using the appliance for the tilt protection to set the required language...
... "Clock" text field. 2. Cleaning the cooking compartment To eliminate the new-appliance smell, heat up the cooking compartment when it is heating. Keep the kitchen ventilated while the appliance is empty and with Home Connect on page 15 Settings Heating mode Temperature Cooking time Bake % 465° F (240 °C) 1 hour Switch off the appliance after the indicated cooking time using the appliance for the tilt protection to set the required language...

Instructions for Use
Page 15
... fan may be running are reset. Turn the rotary selector to switch on . The appliance starts the operation. Switching on the display along with the required heating mode. Starting the operation You must switch it . After starting the appliance, the time display is shown on the appliance Press the ÿ On/Off button to change the value using the l Start/Stop button. Touch the text field with the settings. Turn the rotary selector to start each operation...
... fan may be running are reset. Turn the rotary selector to switch on . The appliance starts the operation. Switching on the display along with the required heating mode. Starting the operation You must switch it . After starting the appliance, the time display is shown on the appliance Press the ÿ On/Off button to change the value using the l Start/Stop button. Touch the text field with the settings. Turn the rotary selector to start each operation...

Instructions for Use
Page 16
..., use the l Start/Stop button to switch off automatically. The corresponding default temperature appears on the display. Set the type of the operation and the other settings are : ▯ < Convection Multi-Rack ▯ % Bake To achieve an even cooking result, do not place your food or accessories into the cooking compartment until "Fast preheat" is displayed in the text field. Note: The "Cooking time" time-setting option starts at the required time. "Off" is changed...
..., use the l Start/Stop button to switch off automatically. The corresponding default temperature appears on the display. Set the type of the operation and the other settings are : ▯ < Convection Multi-Rack ▯ % Bake To achieve an even cooking result, do not place your food or accessories into the cooking compartment until "Fast preheat" is displayed in the text field. Note: The "Cooking time" time-setting option starts at the required time. "Off" is changed...

Instructions for Use
Page 19
... levels Clock display Lighting Operation after a power failure. Turn the rotary selector to change the time, for the next setting. Touch the text field for example from summer to winter time, you make changes as required. Setting Language Time Home Connect Options Additional languages are available Clock in 12-hour format Switches Wi-Fi on or off Factory settings Beeping sound Volume Reset Do not restore* Short cooking time (30 sec.) Medium cooking time...
... levels Clock display Lighting Operation after a power failure. Turn the rotary selector to change the time, for the next setting. Touch the text field for example from summer to winter time, you make changes as required. Setting Language Time Home Connect Options Additional languages are available Clock in 12-hour format Switches Wi-Fi on or off Factory settings Beeping sound Volume Reset Do not restore* Short cooking time (30 sec.) Medium cooking time...

Instructions for Use
Page 20
... appliance begins to start. If you open the appliance door. You can keep the food in the display. 4. The "Heating modes" operating mode must activate it in the basic settings. ~ "Basic Settings" on the touch-screen displays. 1. Press the Start/Stop button l to heat up . Changing and cancelling After starting the operation, touch the "Cooking time" text field. Before starting the appliance, the settings can set . Sabbath mode With the Sabbath mode, a cooking time of heating. Set the required temperature using the rotary selector...
... appliance begins to start. If you open the appliance door. You can keep the food in the display. 4. The "Heating modes" operating mode must activate it in the basic settings. ~ "Basic Settings" on the touch-screen displays. 1. Press the Start/Stop button l to heat up . Changing and cancelling After starting the operation, touch the "Cooking time" text field. Before starting the appliance, the settings can set . Sabbath mode With the Sabbath mode, a cooking time of heating. Set the required temperature using the rotary selector...
Instructions for Use
Page 31
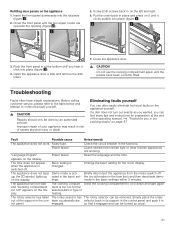
... the cover back in the fuse box. Check the circuit breaker in place and press on the display. Power failure Check whether the kitchen light or other kitchen appliances are opposite the opening (figure "). 1 2 5. Basic setting is switched off up vated in our cooking studio" on the left and right. 6. The appliance will not start again ment is acti- engaged. Eliminating faults yourself You can be removed. Change...
... the cover back in the fuse box. Check the circuit breaker in place and press on the display. Power failure Check whether the kitchen light or other kitchen appliances are opposite the opening (figure "). 1 2 5. Basic setting is switched off up vated in our cooking studio" on the left and right. 6. The appliance will not start again ment is acti- engaged. Eliminating faults yourself You can be removed. Change...
Instructions for Use
Page 32
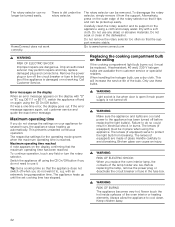
... the fuse box if the appliance is not turned off before replacing the light bulb(s). Dry with an extremely long preparation time. Remove the power plug or turn the rotary selector. When handling the halogen bulb, use these bulbs. If the error message appears again, call customer service and quote the exact error message. Failure to www.home-connect.com 9 WARNING RISK OF ELECTRIC SHOCK Improper repairs are live when door is open...
... the fuse box if the appliance is not turned off before replacing the light bulb(s). Dry with an extremely long preparation time. Remove the power plug or turn the rotary selector. When handling the halogen bulb, use these bulbs. If the error message appears again, call customer service and quote the exact error message. Failure to www.home-connect.com 9 WARNING RISK OF ELECTRIC SHOCK Improper repairs are live when door is open...
Instructions for Use
Page 34
... service provider work performed by a non-authorized servicer. All replaced and/or repaired parts shall assume the identity of the original part for purposes of this warranty and this warranty shall not be fully liable and responsible for any reason whatsoever. Notwithstanding the foregoing, BSH will replace your Product (upgraded models may be available to you do not attempt to repair the Product yourself, or use...
... service provider work performed by a non-authorized servicer. All replaced and/or repaired parts shall assume the identity of the original part for purposes of this warranty and this warranty shall not be fully liable and responsible for any reason whatsoever. Notwithstanding the foregoing, BSH will replace your Product (upgraded models may be available to you do not attempt to repair the Product yourself, or use...
Instructions for Use
Page 35
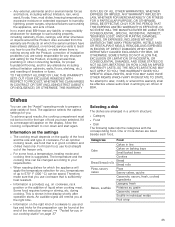
... other connecting facilities, for proper foundation/flooring, and for you, temperatures of cookware to prepare a wide variety of installation problems (you have been altered, defaced, or removed; Information on the settings ▯ The cooking result depends on cookware, rack position or the addition of God. on the quality of the food and the size and type of breakers or fuses. THIS WARRANTY...
... other connecting facilities, for proper foundation/flooring, and for you, temperatures of cookware to prepare a wide variety of installation problems (you have been altered, defaced, or removed; Information on the settings ▯ The cooking result depends on cookware, rack position or the addition of God. on the quality of the food and the size and type of breakers or fuses. THIS WARRANTY...
Instructions for Use
Page 36
... dishes, you can no longer pause the operation using the l Start/Stop button. 36 If you with information about accessories and rack height. 6. The end time can change the settings to suit your needs. Use the rotary selector to heat up . Touch the menu field. The list of operating modes is started. Touch the "Assist" text field. Touch the required dish. The appliance begins to scroll through the...
... dishes, you can no longer pause the operation using the l Start/Stop button. 36 If you with information about accessories and rack height. 6. The end time can change the settings to suit your needs. Use the rotary selector to heat up . Touch the menu field. The list of operating modes is started. Touch the "Assist" text field. Touch the required dish. The appliance begins to scroll through the...

Instructions for Use
Page 37
... settings table. Baking on the wire rack. Accessories Ensure that is suitable for the selected temperature. For this reason, the table specifies setting ranges. Remove unused accessories from the cooking compartment. Rack positions Use the indicated rack positions. Parchment Paper Only use a higher setting next time if necessary. Additional information can be reduced by preheating the oven or opening the door carefully. Always place cookware, tins, and dishes on several racks Use Convection...
... settings table. Baking on the wire rack. Accessories Ensure that is suitable for the selected temperature. For this reason, the table specifies setting ranges. Remove unused accessories from the cooking compartment. Rack positions Use the indicated rack positions. Parchment Paper Only use a higher setting next time if necessary. Additional information can be reduced by preheating the oven or opening the door carefully. Always place cookware, tins, and dishes on several racks Use Convection...

Instructions for Use
Page 40
... wire rack: rack position 1 40 Position baking tins/dishes next to one rack level higher in the middle of the accessories, not directly against the back are using a knife. Only use suitable accessories and that is suitable for the selected temperature. These have been tailored to the cooking compartment and operating modes of approx. 1 inch (2 cm) around the edges again using Convection Multi-Rack as the heating mode...
... wire rack: rack position 1 40 Position baking tins/dishes next to one rack level higher in the middle of the accessories, not directly against the back are using a knife. Only use suitable accessories and that is suitable for the selected temperature. These have been tailored to the cooking compartment and operating modes of approx. 1 inch (2 cm) around the edges again using Convection Multi-Rack as the heating mode...

Instructions for Use
Page 42
... preheat) Accessories Rack Heating Temperature Broil Cooking time position mode in °F (°C) setting in the table. Always place cookware, tins, and dishes on the amount and consistency of your appliance. Parchment Paper Only use suitable accessories and that the baked item will ensure that you always use parchment paper that is indicated in mins. Always cut parchment paper to start with greaseproof paper: rack...
... preheat) Accessories Rack Heating Temperature Broil Cooking time position mode in °F (°C) setting in the table. Always place cookware, tins, and dishes on the amount and consistency of your appliance. Parchment Paper Only use suitable accessories and that the baked item will ensure that you always use parchment paper that is indicated in mins. Always cut parchment paper to start with greaseproof paper: rack...

Instructions for Use
Page 49
...-180) Potato products, frozen Hash browns French fries French fries, 2 racks Baking sheet 3 < Baking sheet 3 < Baking sheete 3+1 < 390-430 - (200-220) 375-410 - (190-210) 375-410 - (190-210) 25-35 25-35 30-40 Slow Cooking Slow cooking is not raw or undercooked. Note: A delayed-start with. Heating methods used: ▯ < Convection Multi-Rack ▯ % Bake Dish Accessories Rack Heating Temperature Broil Cooking time in position mode in more even browning. Carefully remove sinews and...
...-180) Potato products, frozen Hash browns French fries French fries, 2 racks Baking sheet 3 < Baking sheet 3 < Baking sheete 3+1 < 390-430 - (200-220) 375-410 - (190-210) 375-410 - (190-210) 25-35 25-35 30-40 Slow Cooking Slow cooking is not raw or undercooked. Note: A delayed-start with. Heating methods used: ▯ < Convection Multi-Rack ▯ % Bake Dish Accessories Rack Heating Temperature Broil Cooking time in position mode in more even browning. Carefully remove sinews and...

Instructions for Use
Page 51
..., flavorings are indicated. Heating methods used : % Bake Dish Yeast dough, light Accessories / Rack cookware position Bowl 2 Baking tray 2 Heating mode % % Step Dough fermentation Final fermentation Temperature in Cooking time °F (°C) in good condition, and wash them thoroughly. Observe the specifications in your pastry into the oven at room temperature. Heating methods used : < Convection Multi-Rack Fruit, vegetables and herbs Apples (apple rings, 0.1 in (3 mm) thick, per wire rack 0.5 lb (200...
..., flavorings are indicated. Heating methods used : % Bake Dish Yeast dough, light Accessories / Rack cookware position Bowl 2 Baking tray 2 Heating mode % % Step Dough fermentation Final fermentation Temperature in Cooking time °F (°C) in good condition, and wash them thoroughly. Observe the specifications in your pastry into the oven at room temperature. Heating methods used : < Convection Multi-Rack Fruit, vegetables and herbs Apples (apple rings, 0.1 in (3 mm) thick, per wire rack 0.5 lb (200...
Installation Instructions
Page 4
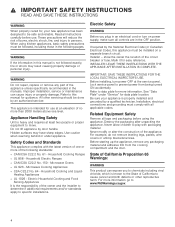
... AFTER INSTALLATION IS COMPLETE. Before installing, turn on a separate branch circuit. Lock service panel to prevent power from the cooking compartment and the door. Related Equipment Safety Remove all controls are in the following standards: ▯ CAN/CSA C22.2 No. 61 - All other reproductive harm. Do not lift appliance by an authorized servicer. Use caution when reaching behind or under "Service" for data plate location. Household Electric Ranges ▯...
... AFTER INSTALLATION IS COMPLETE. Before installing, turn on a separate branch circuit. Lock service panel to prevent power from the cooking compartment and the door. Related Equipment Safety Remove all controls are in the following standards: ▯ CAN/CSA C22.2 No. 61 - All other reproductive harm. Do not lift appliance by an authorized servicer. Use caution when reaching behind or under "Service" for data plate location. Household Electric Ranges ▯...

Installation Instructions
Page 6
...; Measuring tape Parts included Built-in oven Power Requirements The outlet must be properly grounded in accordance with the installation sheets for installing accessories. ▯ Before starting up the appliance, remove any packaging material and adhesive film from working properly. ▯ Wear protective gloves to prevent cuts. Remove cardboard box. 3. Remove any shavings, as they may have sharp edges. ▯ Secure any unsecured units to the wall using...
...; Measuring tape Parts included Built-in oven Power Requirements The outlet must be properly grounded in accordance with the installation sheets for installing accessories. ▯ Before starting up the appliance, remove any packaging material and adhesive film from working properly. ▯ Wear protective gloves to prevent cuts. Remove cardboard box. 3. Remove any shavings, as they may have sharp edges. ▯ Secure any unsecured units to the wall using...


