
Use and Care Manual
Page 3
... when plugged in the instructions. The vacuum cleaner must be present. ■ Do not pick up anything that may reduce air flow. ■ Do not use to pick up damp substances or liquids to avoid electrical shock hazards. ■ Do not operate the brush on or next to people or animals or let the tube or nozzles get close a door on cord. Important Safeguards Use as directed...
... when plugged in the instructions. The vacuum cleaner must be present. ■ Do not pick up anything that may reduce air flow. ■ Do not use to pick up damp substances or liquids to avoid electrical shock hazards. ■ Do not operate the brush on or next to people or animals or let the tube or nozzles get close a door on cord. Important Safeguards Use as directed...

Use and Care Manual
Page 4
...; Use extra care when cleaning on stairs. ■ Hold plug when rewinding onto cord reel. If it stops sucking or at the event of electric shock, this appliance has a polarized plug (one way. Do not change the plug in accordance with the information stipulated on the identification plate. ■ Do protect the vacuum cleaner from external weather conditions, dampness and heat sources. ■ Do switch...
...; Use extra care when cleaning on stairs. ■ Hold plug when rewinding onto cord reel. If it stops sucking or at the event of electric shock, this appliance has a polarized plug (one way. Do not change the plug in accordance with the information stipulated on the identification plate. ■ Do protect the vacuum cleaner from external weather conditions, dampness and heat sources. ■ Do switch...

Use and Care Manual
Page 5
9 7 6 5 10 - 11 \sag 12 13 14 4 1 Adjustable floor nozzle* 2 Hard floor nozzle* 3 2-parts steel tube* 4 Combination nozzle 5 Attachment support for the combination nozzle 6 Telescopic tube* 7 Sliding sleeve 8 Hose grip 9 Suction hose 10 Plug 11 On / off switch with electronic suction regulator 20 19 18 17 16 15 12 Exhaust filter 13 Parking aid 14 Microsan filter 15 Storing aid 16 Dust bag 17 Lid 18 Handle 19 Exhaust grid 20 Dust bag change display `Depending on version 5
9 7 6 5 10 - 11 \sag 12 13 14 4 1 Adjustable floor nozzle* 2 Hard floor nozzle* 3 2-parts steel tube* 4 Combination nozzle 5 Attachment support for the combination nozzle 6 Telescopic tube* 7 Sliding sleeve 8 Hose grip 9 Suction hose 10 Plug 11 On / off switch with electronic suction regulator 20 19 18 17 16 15 12 Exhaust filter 13 Parking aid 14 Microsan filter 15 Storing aid 16 Dust bag 17 Lid 18 Handle 19 Exhaust grid 20 Dust bag change display `Depending on version 5
Use and Care Manual
Page 6
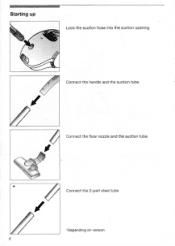
Connect the floor nozzle and the suction tube. Connect the 2-part steel tube •Depending on version 6 Starting up Lock the suction hose into the suction opening Connect the handle and the suction tube.
Connect the floor nozzle and the suction tube. Connect the 2-part steel tube •Depending on version 6 Starting up Lock the suction hose into the suction opening Connect the handle and the suction tube.
Use and Care Manual
Page 7
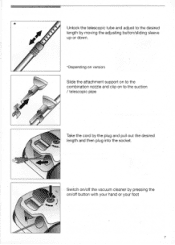
Switch on /off the vacuum cleaner by the plug and pull out the desired length and then plug into the socket. Unlock the telescopic tube and adjust to the desired length by moving the adjusting button/sliding sleeve up or down. *Depending on version Slide the attachment support on to the combination nozzle and clip on to the suction / telescopic pipe Take the cord by pressing the on /off button with your hand or your foot 7
Switch on /off the vacuum cleaner by the plug and pull out the desired length and then plug into the socket. Unlock the telescopic tube and adjust to the desired length by moving the adjusting button/sliding sleeve up or down. *Depending on version Slide the attachment support on to the combination nozzle and clip on to the suction / telescopic pipe Take the cord by pressing the on /off button with your hand or your foot 7

Use and Care Manual
Page 8
Vacuuming with accessories (connect to the handle or the suction tube as required) Combination nozzle For vacuuming in corners, joints, upholstery, curtains etc. Suction 8 Adjusting the floor nozzle: • For cleaning rugs and carpet => 04511 • For cleaning hard floors => This enables an optimum cleaning effect for the different flooring. Set the level of suction by turning the on/off button left or right.
Vacuuming with accessories (connect to the handle or the suction tube as required) Combination nozzle For vacuuming in corners, joints, upholstery, curtains etc. Suction 8 Adjusting the floor nozzle: • For cleaning rugs and carpet => 04511 • For cleaning hard floors => This enables an optimum cleaning effect for the different flooring. Set the level of suction by turning the on/off button left or right.
Use and Care Manual
Page 9
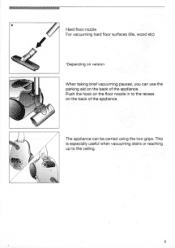
The appliance can use the parking aid on the back of the appliance. Hard floor nozzle For vacuuming hard floor surfaces (tile, wood etc) *Depending on version When taking brief vacuuming pauses, you can be carried using the two grips. This is especially useful when vacuuming stairs or reaching up to the recess on the back of the appliance. s2 Push the hook on the floor nozzle in to the ceiling. 9
The appliance can use the parking aid on the back of the appliance. Hard floor nozzle For vacuuming hard floor surfaces (tile, wood etc) *Depending on version When taking brief vacuuming pauses, you can be carried using the two grips. This is especially useful when vacuuming stairs or reaching up to the recess on the back of the appliance. s2 Push the hook on the floor nozzle in to the ceiling. 9
Use and Care Manual
Page 10
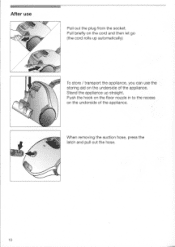
After use the storing aid on the underside of the appliance. When removing the suction hose, press the latch and pull out the hose. 10 Stand the appliance up automatically) To store / transport the appliance, you can use Pull out the plug from the socket. Push the hook on the floor nozzle in to the recess on the cord and then let go (the cord rolls up straight. Pull briefly on the underside of the appliance.
After use the storing aid on the underside of the appliance. When removing the suction hose, press the latch and pull out the hose. 10 Stand the appliance up automatically) To store / transport the appliance, you can use Pull out the plug from the socket. Push the hook on the floor nozzle in to the recess on the cord and then let go (the cord rolls up straight. Pull briefly on the underside of the appliance.
Use and Care Manual
Page 11
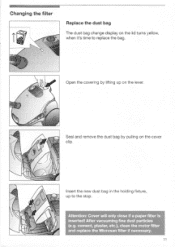
Changing the filter Replace the dust bag The dust bag change display on the lever. Meat 4 • Man nottMt 11 Seal and remove the dust bag by lifting up to replace the bag. Atte kAS4Fikegigfigo'gsMili, insert . 1400- Open the covering by pulling on the cover clip Insert the new dust bag in the holding fixture, up on the lid turns yellow, when it's time to the stop.
Changing the filter Replace the dust bag The dust bag change display on the lever. Meat 4 • Man nottMt 11 Seal and remove the dust bag by lifting up to replace the bag. Atte kAS4Fikegigfigo'gsMili, insert . 1400- Open the covering by pulling on the cover clip Insert the new dust bag in the holding fixture, up on the lid turns yellow, when it's time to the stop.
Use and Care Manual
Page 12
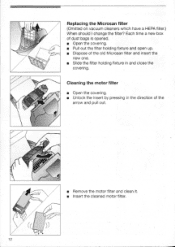
... of dust bags is opened. • Open the covering. • Pull out the filter holding fixture in the direction of the arrow and pull out. • Remove the motor filter and clean it. • Insert the cleaned motor filter. )) of the old Microsan filter and insert the new one. • Slide the filter holding fixture and open up. • Dispose of to.. 12 Replacing the Microsan filter (Omitted on vacuum cleaners...
... of dust bags is opened. • Open the covering. • Pull out the filter holding fixture in the direction of the arrow and pull out. • Remove the motor filter and clean it. • Insert the cleaned motor filter. )) of the old Microsan filter and insert the new one. • Slide the filter holding fixture and open up. • Dispose of to.. 12 Replacing the Microsan filter (Omitted on vacuum cleaners...

Use and Care Manual
Page 13
... is cleaned, ensure that it has been switched off and unplugged. ■ Vacuum cleaners and accessories made of plastic can be cleaned using another vacuum cleaner, or simply cleaned with a dry dust cloth / dust brush. noWse , etuffn 4,4 Inipters OW* vf, ■ If necessary, the dust compartment can be cleaned using a general commercial plastic cleaner. b) Push in the insert below the two lateral support ribs and engage. Subject to change without...
... is cleaned, ensure that it has been switched off and unplugged. ■ Vacuum cleaners and accessories made of plastic can be cleaned using another vacuum cleaner, or simply cleaned with a dry dust cloth / dust brush. noWse , etuffn 4,4 Inipters OW* vf, ■ If necessary, the dust compartment can be cleaned using a general commercial plastic cleaner. b) Push in the insert below the two lateral support ribs and engage. Subject to change without...
Use and Care Manual
Page 14
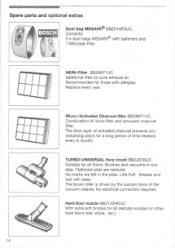
... vacuums in the piles. Lifts fluff, threads and hair with allergies. Recommended for pure exhaust air. Flattened piles are left in one step. Micro-/Activated Charcoal filter BBZ8KF1UC Combination of time (replace every 6 month). No marks are restored. The brush roller is driven by the suction force of the vacuum cleaner. TURBO-UNIVERSAL-floor brush BBZ28TBUC Suitable for all floors. No electrical connection required. Replace...
... vacuums in the piles. Lifts fluff, threads and hair with allergies. Recommended for pure exhaust air. Flattened piles are left in one step. Micro-/Activated Charcoal filter BBZ8KF1UC Combination of time (replace every 6 month). No marks are restored. The brush roller is driven by the suction force of the vacuum cleaner. TURBO-UNIVERSAL-floor brush BBZ28TBUC Suitable for all floors. No electrical connection required. Replace...

Use and Care Manual
Page 15
..; ;K:L4fec
..; ;K:L4fec
Use and Care Manual
Page 16
BSH Home Appliances Corporation 5551 McFadden Avenue Huntington Beach, CA 92649 USA Web site: www.boschvacuums.com Customer Service (toll free): 1-866-44BOSCH (1-866-442-6724) GA 5100 401 362 B
BSH Home Appliances Corporation 5551 McFadden Avenue Huntington Beach, CA 92649 USA Web site: www.boschvacuums.com Customer Service (toll free): 1-866-44BOSCH (1-866-442-6724) GA 5100 401 362 B
Parts List
Page 1
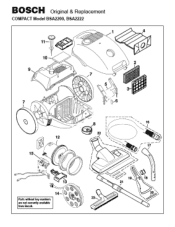
BOSCH Original & Replacement COMPACT Model BSA2200, 6SA2222 1110 7 12 15 13 Parts without key numbers are not currently available horn Bosch. 16 22 O • 21 19 20
BOSCH Original & Replacement COMPACT Model BSA2200, 6SA2222 1110 7 12 15 13 Parts without key numbers are not currently available horn Bosch. 16 22 O • 21 19 20

Parts List
Page 2
... Filer HEPA 3 80-484349 Secondary Frame. BOSCH Original & Replacement COMPACTModel BSA2200,BSA2222 IMY • ART NO. Filter 4 80-14000 Paper Bag.Type G Moro5 Plt 4 80R-1437 Paper Bag.Type 6 Envirocare 5Plc 5 804 M141 Bag Frame Holder 6 80-170403 Bag Spring Holder 7 80-71000 Rear Wheel 8 80-030169 Front Cast, 9 80-387347 Rear Housing 10 80-172139 &boost Fiter 11 80-189500 Motor...
... Filer HEPA 3 80-484349 Secondary Frame. BOSCH Original & Replacement COMPACTModel BSA2200,BSA2222 IMY • ART NO. Filter 4 80-14000 Paper Bag.Type G Moro5 Plt 4 80R-1437 Paper Bag.Type 6 Envirocare 5Plc 5 804 M141 Bag Frame Holder 6 80-170403 Bag Spring Holder 7 80-71000 Rear Wheel 8 80-030169 Front Cast, 9 80-387347 Rear Housing 10 80-172139 &boost Fiter 11 80-189500 Motor...

