Installation Instructions
Page 5
... Warranty. Immediately repair or replace electric service cords that minor or moderate injuries or damage may occur as a result of a local code: In the U.S.A., in accordance with your Owner's Manual for water, electrical power and grounding must comply with local codes and ordinances and be properly grounded. Unplug the appliance or switch off the fuse before cleaning or making repairs. Product failure due to improper installation...
... Warranty. Immediately repair or replace electric service cords that minor or moderate injuries or damage may occur as a result of a local code: In the U.S.A., in accordance with your Owner's Manual for water, electrical power and grounding must comply with local codes and ordinances and be properly grounded. Unplug the appliance or switch off the fuse before cleaning or making repairs. Product failure due to improper installation...

Installation Instructions
Page 7
... room (no possibility of the installation enclosure, this may not close properly. 7 The ambient temperature should not be checked by suitable means. Furniture The new appliance must be flat and level. Installation , WARNING: Do not install the appliance: outdoors, in an environment with dripping water, in rooms which are connected securely to the floor or the...
... room (no possibility of the installation enclosure, this may not close properly. 7 The ambient temperature should not be checked by suitable means. Furniture The new appliance must be flat and level. Installation , WARNING: Do not install the appliance: outdoors, in an environment with dripping water, in rooms which are connected securely to the floor or the...

Installation Instructions
Page 8
... listed 3 wire power supply cord. Never ground the appliance to drinking water! Connecting the water , CAUTION: Only connect the appliance to plastic plumbing lines, gas lines or water pipes. The installation must be behind the appliance. The shut-off valve for the water connection must be located at the side on the left (b) or underneath (c). It is required for the appliance water connection. Maximum outer diameter of the automatic ice maker. The...
... listed 3 wire power supply cord. Never ground the appliance to drinking water! Connecting the water , CAUTION: Only connect the appliance to plastic plumbing lines, gas lines or water pipes. The installation must be behind the appliance. The shut-off valve for the water connection must be located at the side on the left (b) or underneath (c). It is required for the appliance water connection. Maximum outer diameter of the automatic ice maker. The...

Installation Instructions
Page 15
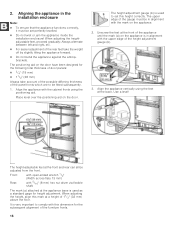
... rear panel of the appliance. Carefully push the appliance into the socket. 4. Put the electric plug into the installation enclosure. 7. Pushing the appliance into the installation enclosure , CAUTION: Caution when pushing the appliance into the installation enclosure. 1. Do not damage the water line or power cord. When pushing in comparison to pinch the power cord. Take care not to the installation enclosure adjust height adjustable wheels...
... rear panel of the appliance. Carefully push the appliance into the socket. 4. Put the electric plug into the installation enclosure. 7. Pushing the appliance into the installation enclosure , CAUTION: Caution when pushing the appliance into the installation enclosure. 1. Do not damage the water line or power cord. When pushing in comparison to pinch the power cord. Take care not to the installation enclosure adjust height adjustable wheels...
Installation Instructions
Page 16
... used to comply with open-ended wrench 1/2" (Width across flats 13 mm) Rear: swhitahft5. /16" (8 mm) hex nut driver via flexible The mark (a) attached at the appliance base is very important to set perfectly levelled. Do not twist or jam the appliance inside the installation enclosure! 2. The height adjustment gauge (b) is in alignment with the upper edge of door panels...
... used to comply with open-ended wrench 1/2" (Width across flats 13 mm) Rear: swhitahft5. /16" (8 mm) hex nut driver via flexible The mark (a) attached at the appliance base is very important to set perfectly levelled. Do not twist or jam the appliance inside the installation enclosure! 2. The height adjustment gauge (b) is in alignment with the upper edge of door panels...

Installation Instructions
Page 19
... with weights in the appliance with a water connection: In order to shut off valve closed. 4. Press the POWER button again to avoid the risk of the overall kitchen front later on the rear. Open the appliance door. 2. These door panels must not exceed the following working steps and thus the appearance of damage caused by leaking water from damage possibly caused to ensure that...
... with weights in the appliance with a water connection: In order to shut off valve closed. 4. Press the POWER button again to avoid the risk of the overall kitchen front later on the rear. Open the appliance door. 2. These door panels must not exceed the following working steps and thus the appearance of damage caused by leaking water from damage possibly caused to ensure that...
Instructions for Use
Page 3
... 5 Installation Location 5 Ventilation 5 Scope of Delivery 5 Connecting the Appliance 6 Water Connection 6 Electrical Connection 6 Getting to Know Your Appliance 7 2 door model 7 3 door model 8 Controls 9 Switching the Appliance On 10 Operating Tips 10 Setting the Language 10 Setting the Temperature Unit 10 Setting the Temperature 10 Refrigerator Compartment 10 Freezer Compartment 10 Special Functions 11 Setup Mode 11 Vacation Mode 11 Sabbath Mode 12 Energy saving Mode 12 Door Rail Heater 12 Alarm Function 12 Door Alarm 12 Temperature Alarm 12 Switching Off the Alarm...
... 5 Installation Location 5 Ventilation 5 Scope of Delivery 5 Connecting the Appliance 6 Water Connection 6 Electrical Connection 6 Getting to Know Your Appliance 7 2 door model 7 3 door model 8 Controls 9 Switching the Appliance On 10 Operating Tips 10 Setting the Language 10 Setting the Temperature Unit 10 Setting the Temperature 10 Refrigerator Compartment 10 Freezer Compartment 10 Special Functions 11 Setup Mode 11 Vacation Mode 11 Sabbath Mode 12 Energy saving Mode 12 Door Rail Heater 12 Alarm Function 12 Door Alarm 12 Temperature Alarm 12 Switching Off the Alarm...

Instructions for Use
Page 4
... from the Freezer Compartment into your mouth. spray cans) or explosive substances in an upright position. ■ Keep plastic parts and the door seal free of appliance, drawers or doors, etc ■ To clean the appliance, pull out the mains plug or switch off the electrical breaker or fuse! WARNING: Before You Switch the Appliance On Please read the Operating and Installation Instructions carefully, including...
... from the Freezer Compartment into your mouth. spray cans) or explosive substances in an upright position. ■ Keep plastic parts and the door seal free of appliance, drawers or doors, etc ■ To clean the appliance, pull out the mains plug or switch off the electrical breaker or fuse! WARNING: Before You Switch the Appliance On Please read the Operating and Installation Instructions carefully, including...
Instructions for Use
Page 5
...; Built-in appliance ■ Interior fittings (depending on model) ■ Bag containing installation materials ■ Operating Instructions ■ Installation Instructions ■ Customer Service Booklet ■ Warranty enclosure ■ Information on the energy consumption and noises 5 a cooker, radiator, etc. To ensure that tubing of the refrigerant circuit is unavoidable, use in front of injuries and damage to play with the Power Plug. 3. Never cover the ventilation grille or place...
...; Built-in appliance ■ Interior fittings (depending on model) ■ Bag containing installation materials ■ Operating Instructions ■ Installation Instructions ■ Customer Service Booklet ■ Warranty enclosure ■ Information on the energy consumption and noises 5 a cooker, radiator, etc. To ensure that tubing of the refrigerant circuit is unavoidable, use in front of injuries and damage to play with the Power Plug. 3. Never cover the ventilation grille or place...
Instructions for Use
Page 6
... appropriate Water Supply company. Our appliances can be used for the first time, clean the interior of your power supply. en-us Connecting the Appliance Have a technician install and connect the appliance according to 115 V/60 Hz AC through a correctly installed 3-pole grounded receptacle. During transportation the oil in the chapter "Customer Service". , WARNING: Never connect the appliance to the Installation Manual. A cold water connection is easily accessible. Electrical Connection , WARNING...
... appropriate Water Supply company. Our appliances can be used for the first time, clean the interior of your power supply. en-us Connecting the Appliance Have a technician install and connect the appliance according to 115 V/60 Hz AC through a correctly installed 3-pole grounded receptacle. During transportation the oil in the chapter "Customer Service". , WARNING: Never connect the appliance to the Installation Manual. A cold water connection is easily accessible. Electrical Connection , WARNING...

Instructions for Use
Page 7
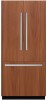
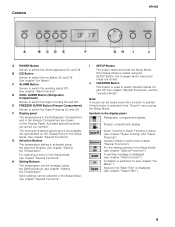
The diagrams may differ. 2 door model en-us A Refrigerator Compartment B Freezer Compartment 1 Light Switch 2 Controls 3 Glass Shelf 4 Light (LED) 5 Fruit and Vegetable Container 6 "Cool-fresh" Container 7 Ice Maker 8 Ventilation 9 Water Filter 10 Butter and Cheese Compartment 11 Door Shelf 12 Storage Compartments for large Bottles 13 Ice Cube Container 14 Tray 15 Door Drawer 7 Getting to Know Your Appliance These Operating Instructions refer to several models.
The diagrams may differ. 2 door model en-us A Refrigerator Compartment B Freezer Compartment 1 Light Switch 2 Controls 3 Glass Shelf 4 Light (LED) 5 Fruit and Vegetable Container 6 "Cool-fresh" Container 7 Ice Maker 8 Ventilation 9 Water Filter 10 Butter and Cheese Compartment 11 Door Shelf 12 Storage Compartments for large Bottles 13 Ice Cube Container 14 Tray 15 Door Drawer 7 Getting to Know Your Appliance These Operating Instructions refer to several models.

Instructions for Use
Page 8
en-us 3 door model A Refrigerator Compartment B Freezer Compartment 1 Light Switch 2 Controls 3 Glass Shelf 4 Light (LED) 5 Fruit and Vegetable Container 6 "Cool-fresh" Container 7 Ice Maker 8 Ventilation 9 Water Filter 10 Butter and Cheese Compartment 11 Door Shelf 12 Storage Compartments for large Bottles 13 Ice Cube Container 14 Tray 15 Door Drawer 8
en-us 3 door model A Refrigerator Compartment B Freezer Compartment 1 Light Switch 2 Controls 3 Glass Shelf 4 Light (LED) 5 Fruit and Vegetable Container 6 "Cool-fresh" Container 7 Ice Maker 8 Ventilation 9 Water Filter 10 Butter and Cheese Compartment 11 Door Shelf 12 Storage Compartments for large Bottles 13 Ice Cube Container 14 Tray 15 Door Drawer 8
Instructions for Use
Page 9
... the Display Panel. Ice Maker is ended using the Setting Buttons, see chapter "Special Functions". F Display panel The temperatures in the Refrigerator Compartment and in the Setup Mode, see chapter "Alarm function"). For the setting options in the Setup Mode. Signal to switch the Super Cooling On and Off. E FREEZER SUPER Button (Freezer Compartment) Serves to switch the Ice Maker On and Off. I SETUP Button This button starts and ends the Setup Mode. B ICE Button Serves to switch the Super Freezing On and Off. Controls...
... the Display Panel. Ice Maker is ended using the Setting Buttons, see chapter "Special Functions". F Display panel The temperatures in the Refrigerator Compartment and in the Setup Mode, see chapter "Alarm function"). For the setting options in the Setup Mode. Signal to switch the Super Cooling On and Off. E FREEZER SUPER Button (Freezer Compartment) Serves to switch the Ice Maker On and Off. I SETUP Button This button starts and ends the Setup Mode. B ICE Button Serves to switch the Super Freezing On and Off. Controls...

Instructions for Use
Page 12
.... Press the SETUP Button, in order to store the setting. en-us Sabbath Mode When Sabbath Mode is switched On, the following settings are switched Off: ■ Ice Maker ■ Acoustic Signal ■ Interior Light ■ Messages in the Display Panel ■ The background illumination of the Display Panel is likewise reduced. Switching On 1. Press and hold down the COOL SUPER Button. 2. The "VACATION" symbol flashes on the Display Panel and "SABBATH...
.... Press the SETUP Button, in order to store the setting. en-us Sabbath Mode When Sabbath Mode is switched On, the following settings are switched Off: ■ Ice Maker ■ Acoustic Signal ■ Interior Light ■ Messages in the Display Panel ■ The background illumination of the Display Panel is likewise reduced. Switching On 1. Press and hold down the COOL SUPER Button. 2. The "VACATION" symbol flashes on the Display Panel and "SABBATH...

Instructions for Use
Page 14
...Vegetables and fruit: up to 12 months 14 Note: Keep food that is open, the frozen food will become covered in airtight containers. 1. Remove air. 3. If the door is to high power consumption! Eggplants, peppers, zucchini and asparagus do not require blanching. Suitable Packaging:...îche and mayonnaise. At a temperature of food. Using the Freezer Compartment ■ To store deep-frozen food. ■ To make ice cubes. ■ To freeze food. Also, energy is already frozen. ■ The following foods are suitable for freezing: Cakes and pastries, fish and seafood...
...Vegetables and fruit: up to 12 months 14 Note: Keep food that is open, the frozen food will become covered in airtight containers. 1. Remove air. 3. If the door is to high power consumption! Eggplants, peppers, zucchini and asparagus do not require blanching. Suitable Packaging:...îche and mayonnaise. At a temperature of food. Using the Freezer Compartment ■ To store deep-frozen food. ■ To make ice cubes. ■ To freeze food. Also, energy is already frozen. ■ The following foods are suitable for freezing: Cakes and pastries, fish and seafood...
Instructions for Use
Page 15
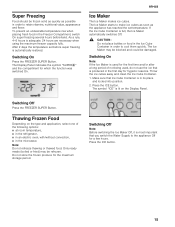
... Ice Maker is used for the first time and/or after a long period of the following options: ■ at room temperature, ■ in the refrigerator, ■ in an electric oven, with/without convection, ■ in the Freezer Compartment, switch On super freezing several hours beforehand. Make sure that is in the first day for a few hours. Switching Off Press the FREEZER SUPER Button...
... Ice Maker is used for the first time and/or after a long period of the following options: ■ at room temperature, ■ in the refrigerator, ■ in an electric oven, with/without convection, ■ in the Freezer Compartment, switch On super freezing several hours beforehand. Make sure that is in the first day for a few hours. Switching Off Press the FREEZER SUPER Button...

Instructions for Use
Page 16
... the used Filter Cartridge. In this option, replace the Water Filter with a Particle Cartridge. Exchanging the filter cartridge 1. To purchase a Water Filter Replacement Cartridge, contact your local dealer or call 1-800-735-4328. 16 A Filter Cartridge for filtering particles can be deactivated to prevent the Filter Change Display. Turn the Filter Cartridge 90-180° in places where the water quality is subject to be used without suitable disinfection, before and after switching On the Ice Maker...
... the used Filter Cartridge. In this option, replace the Water Filter with a Particle Cartridge. Exchanging the filter cartridge 1. To purchase a Water Filter Replacement Cartridge, contact your local dealer or call 1-800-735-4328. 16 A Filter Cartridge for filtering particles can be deactivated to prevent the Filter Change Display. Turn the Filter Cartridge 90-180° in places where the water quality is subject to be used without suitable disinfection, before and after switching On the Ice Maker...

Instructions for Use
Page 21
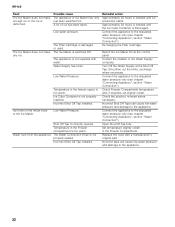
... energy supply company. Ensure that the water is not connected to the power supply. Appliance Fault Possible cause Appliance has no refrigeration capacity. Display indicates "E..". The line voltage exceeds the permitted limiting value. Check Freezer Compartment temperature and, if required, set too low. even if the appliance is switching On more frequently and for longer. Remove obstacles. Switch on the left door. Do not open the appliance unnecessarily. The refrigeration...
... energy supply company. Ensure that the water is not connected to the power supply. Appliance Fault Possible cause Appliance has no refrigeration capacity. Display indicates "E..". The line voltage exceeds the permitted limiting value. Check Freezer Compartment temperature and, if required, set too low. even if the appliance is switching On more frequently and for longer. Remove obstacles. Switch on the left door. Do not open the appliance unnecessarily. The refrigeration...
Instructions for Use
Page 22
... Water Pressure. Check Freezer Compartment temperature and, if required, set slightly colder. Connect the appliance to the appliance. en-us Fault The Ice Maker does not make any ice. Water runs from the appliance. Exchanging the Filter Cartridge. Temperature in the Freezer Compartment is needed until ice production starts. Ice Cube Container is too warm. Shut Off Tap incorrectly opened. Temperature in the freezer space is not properly inserted. Turn Off the Water Supply at the control panel...
... Water Pressure. Check Freezer Compartment temperature and, if required, set slightly colder. Connect the appliance to the appliance. en-us Fault The Ice Maker does not make any ice. Water runs from the appliance. Exchanging the Filter Cartridge. Temperature in the Freezer Compartment is needed until ice production starts. Ice Cube Container is too warm. Shut Off Tap incorrectly opened. Temperature in the freezer space is not properly inserted. Turn Off the Water Supply at the control panel...

Instructions for Use
Page 24
...warranty against rusting of stainless steel parts: Bosch will repair or replace all components which the serial number was changed, disguised or removed; ALL REPRESENTATIONS IMPLIED ACCORDING TO THE LAW, WHETHER WITH REGARD TO MARKETABILTY OR SUITABILITY FOR A SPECIFIC..., improper handling, inadequate maintenance, faulty or negligent installation, tampering, non-observance of the instructions for use, incorrect operation, work performed by unauthorized customer service (including in-house repairs or testing the inner life of the appliance); (3) Adjustments, changes or modifications...
...warranty against rusting of stainless steel parts: Bosch will repair or replace all components which the serial number was changed, disguised or removed; ALL REPRESENTATIONS IMPLIED ACCORDING TO THE LAW, WHETHER WITH REGARD TO MARKETABILTY OR SUITABILITY FOR A SPECIFIC..., improper handling, inadequate maintenance, faulty or negligent installation, tampering, non-observance of the instructions for use, incorrect operation, work performed by unauthorized customer service (including in-house repairs or testing the inner life of the appliance); (3) Adjustments, changes or modifications...


