
Operating Instructions
Page 2
Contents IMPORTANT SAFETY INSTRUCTIONS 3 Congratulations 4 Installation 5 Your new appliance 6 Switching on the appliance 8 Selecting the temperature 8 Switching off and disconnecting the appliance 9 Functions 9 Variable interior design 9 Fridge 10 Freezer compartment 11 Freezing and storing food 11 Automatic ice and water dispenser 12 Water filter 14 How to save energy 16 Operating noises 16 Defrosting 16 Cleaning the appliance 16 Eliminating minor faults yourself 17 Changing the bulb 19 Customer service 19 Installation instructions 20 Français 25...
Contents IMPORTANT SAFETY INSTRUCTIONS 3 Congratulations 4 Installation 5 Your new appliance 6 Switching on the appliance 8 Selecting the temperature 8 Switching off and disconnecting the appliance 9 Functions 9 Variable interior design 9 Fridge 10 Freezer compartment 11 Freezing and storing food 11 Automatic ice and water dispenser 12 Water filter 14 How to save energy 16 Operating noises 16 Defrosting 16 Cleaning the appliance 16 Eliminating minor faults yourself 17 Changing the bulb 19 Customer service 19 Installation instructions 20 Français 25...
Operating Instructions
Page 3
... AND SAVE THESE INSTRUCTIONS! Use this appliance only for just a few days." In freezers with an automatic icemaker, avoid contact with the moving parts of the fuse to turn off the doors. - Unplug your refrigerator before it is used. 3. Before replacing a burnedĆout light bulb, pull out the main plug or switch of the ejector mechanism, or with an UL listed, 3Ćwire power supply cord. Junked...
... AND SAVE THESE INSTRUCTIONS! Use this appliance only for just a few days." In freezers with an automatic icemaker, avoid contact with the moving parts of the fuse to turn off the doors. - Unplug your refrigerator before it is used. 3. Before replacing a burnedĆout light bulb, pull out the main plug or switch of the ejector mechanism, or with an UL listed, 3Ćwire power supply cord. Junked...
Operating Instructions
Page 4
... is removed for future reference. Note to Installer ć Be sure to leave these instructions with the Consumer. Note to something in perfect condition. d CAUTION d CAUTION - This indicates a potentially hazardous situation which leaves our factory is inspected thoroughly to ensure that used to draw the user's attention to Consumer ć Keep these instructions with your new fridgeĆfreezer you...
... is removed for future reference. Note to Installer ć Be sure to leave these instructions with the Consumer. Note to something in perfect condition. d CAUTION d CAUTION - This indicates a potentially hazardous situation which leaves our factory is inspected thoroughly to ensure that used to draw the user's attention to Consumer ć Keep these instructions with your new fridgeĆfreezer you...
Operating Instructions
Page 5
... an electric cooker. - To ensure that the doors can be found on the rating plate and indicates the ambient temperatures at least ½ hour before switching on Appliance dimensions"). Use a spirit level to whether the appliance has been properly grounded. Do not use an adapter. - To ensure that the ice maker functions correctly, the appliance must comply with an UL listed, 3Ćwire power supply cord. A cold water connection...
... an electric cooker. - To ensure that the doors can be found on the rating plate and indicates the ambient temperatures at least ½ hour before switching on Appliance dimensions"). Use a spirit level to whether the appliance has been properly grounded. Do not use an adapter. - To ensure that the ice maker functions correctly, the appliance must comply with an UL listed, 3Ćwire power supply cord. A cold water connection...
Operating Instructions
Page 6
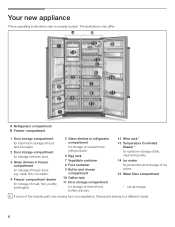
... 9 Butter and cheese compartment 10 Gallon rack 11 Door storage compartment for storage of tinned food, bottles and jars. 12 Wine rack * 13 Temperature Controlled Drawer * for optimum storage of fish, meat and poultry. 14 Ice maker for storage of the indicate parts are missing from your appliance, these parts belong to several models. Your new appliance These operating instructions refer to a different...
... 9 Butter and cheese compartment 10 Gallon rack 11 Door storage compartment for storage of tinned food, bottles and jars. 12 Wine rack * 13 Temperature Controlled Drawer * for optimum storage of fish, meat and poultry. 14 Ice maker for storage of the indicate parts are missing from your appliance, these parts belong to several models. Your new appliance These operating instructions refer to a different...
Operating Instructions
Page 7
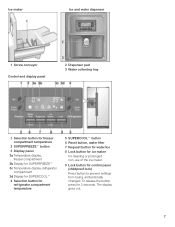
... prevent settings from being unintentionally changed. Ice maker Ice and water dispenser 1 Screw conveyor Control and display panel 2 Dispenser pad 3 Water collecting tray 1 Selection button for freezer compartment temperature 2 SUPERFREEZEt button 3 Display panel 3a Temperature display, freezer compartment 3b Display for SUPERFREEZEt 3c Temperature display, refrigerator compartment 3d Display for SUPERCOOLt 4 Selection button for refrigerator compartment temperature 5 SUPERCOOLt button 6 Reset button, water filter 7 Request button for water/ice 8 Lock button for ice maker for cleaning or...
... prevent settings from being unintentionally changed. Ice maker Ice and water dispenser 1 Screw conveyor Control and display panel 2 Dispenser pad 3 Water collecting tray 1 Selection button for freezer compartment temperature 2 SUPERFREEZEt button 3 Display panel 3a Temperature display, freezer compartment 3b Display for SUPERFREEZEt 3c Temperature display, refrigerator compartment 3d Display for SUPERCOOLt 4 Selection button for refrigerator compartment temperature 5 SUPERCOOLt button 6 Reset button, water filter 7 Request button for water/ice 8 Lock button for ice maker for cleaning or...
Operating Instructions
Page 8
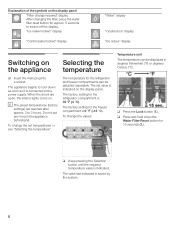
... to cool down the Water Filter Reset button for approx. 5 seconds to 3 hours. q Press the Lock button (1.). i The preset temperatures (factory settings) are open, the interior lights come on. Explanation of the symbols on the display panel Filter change the set value is indicated on the display panel. When the doors are reached after approx. 2 to switch off the display. Ice maker locked" display Control panel locked" display Water" display Crushed ice" display Ice cubes" display Switching on Selecting the the appliance temperature q Insert the main plug...
... to cool down the Water Filter Reset button for approx. 5 seconds to 3 hours. q Press the Lock button (1.). i The preset temperatures (factory settings) are open, the interior lights come on. Explanation of the symbols on the display panel Filter change the set value is indicated on the display panel. When the doors are reached after approx. 2 to switch off the display. Ice maker locked" display Control panel locked" display Water" display Crushed ice" display Ice cubes" display Switching on Selecting the the appliance temperature q Insert the main plug...
Operating Instructions
Page 9
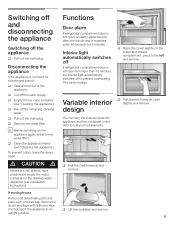
..., install a new water filter! q Cut off the remaining drinking water. q Remove the water filter. Interior light automatically switches off the appliance q Pull out the main plug. This saves energy. q Pull the shelf forwards and remove. q Clean the appliance interior (see Cleaning the appliance"). To prevent odors, leave the doors open. i Before switching on the butter and cheese compartment, press to the left open for the drinking water dispenser (see installation instructions). design You can vary the shelves inside the...
..., install a new water filter! q Cut off the remaining drinking water. q Remove the water filter. Interior light automatically switches off the appliance q Pull out the main plug. This saves energy. q Pull the shelf forwards and remove. q Clean the appliance interior (see Cleaning the appliance"). To prevent odors, leave the doors open. i Before switching on the butter and cheese compartment, press to the left open for the drinking water dispenser (see installation instructions). design You can vary the shelves inside the...
Operating Instructions
Page 11
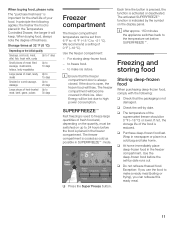
... Freeze button. Use the deepĆfrozen food before SUPERFREEZEt. In principle the following : q Check that the freezer compartment door is cooled as cold as possible in the freezer compartment. The freezer compartment is always closed. The activated SUPERFREEZEt function is reduced. q The temperature of the food is indicated by date. Storage times at 32 °F (0 °C): Depending on the display panel. Use the freezer...
... Freeze button. Use the deepĆfrozen food before SUPERFREEZEt. In principle the following : q Check that the freezer compartment door is cooled as cold as possible in the freezer compartment. The freezer compartment is always closed. The activated SUPERFREEZEt function is reduced. q The temperature of the food is indicated by date. Storage times at 32 °F (0 °C): Depending on the display panel. Use the freezer...
Operating Instructions
Page 12
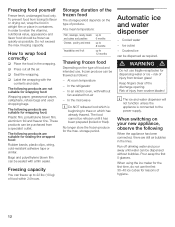
... the air. q Seal the wrapping. In an electric oven, with the contents and date. When switching on the type of food and intended use, frozen produce can be refrozen until it has been prepared (boiled or fried). To prevent food from a specialist outlet. The following When the appliance has been connected, there are suitable for dispensing water or ice...
... the air. q Seal the wrapping. In an electric oven, with the contents and date. When switching on the type of food and intended use, frozen produce can be refrozen until it has been prepared (boiled or fried). To prevent food from a specialist outlet. The following When the appliance has been connected, there are suitable for dispensing water or ice...
Operating Instructions
Page 13
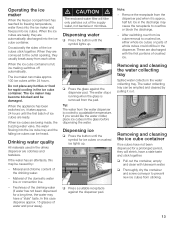
... temperature. These are being made, the buzzing water valve, the water flowing into the ice cube tray and the falling ice cubes can make approx. 100 ice cubes within 24 hours. Removing and cleaning the water collecting tray Spilled water collects in the glass before dispensing the water. Dispensing water q Press the button until the symbol for rapid cooling in the drinks dispenser are ready. Tip: The water from the water dispenser is full, ice making switches off...
... temperature. These are being made, the buzzing water valve, the water flowing into the ice cube tray and the falling ice cubes can make approx. 100 ice cubes within 24 hours. Removing and cleaning the water collecting tray Spilled water collects in the glass before dispensing the water. Dispensing water q Press the button until the symbol for rapid cooling in the drinks dispenser are ready. Tip: The water from the water dispenser is full, ice making switches off...
Operating Instructions
Page 14
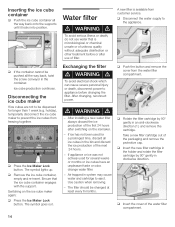
q Disconnect the water supply to prevent the ice cubes from freezing together. Ice cube production continues. holiday), temporarily disconnect the ice cube maker to the appliance. q Press the Ice Maker Lock button. Exchanging the filter12. After changing, reconnect power. Use caution when removing. - A new filter is microbiological or chemical unsafe or of filter. q Remove the ice cube container, empty and reĆinsert. d WARNING d To avoid electrical shock which can cause...
q Disconnect the water supply to prevent the ice cubes from freezing together. Ice cube production continues. holiday), temporarily disconnect the ice cube maker to the appliance. q Press the Ice Maker Lock button. Exchanging the filter12. After changing, reconnect power. Use caution when removing. - A new filter is microbiological or chemical unsafe or of filter. q Remove the ice cube container, empty and reĆinsert. d WARNING d To avoid electrical shock which can cause...
Operating Instructions
Page 16
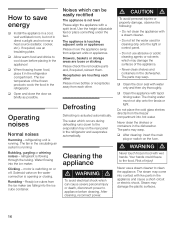
.... Operating noises Normal noises Humming - motor is opening or closing. Solenoid valve on the water connection is switching on or off. Drawers, baskets or storage areas are touching each other Please move the appliance away from the ice maker are falling into the ice maker. Receptacles are loose or sticking Please check the removable parts and, if required, reinsert them. Do not let the water used for cleaning drip onto...
.... Operating noises Normal noises Humming - motor is opening or closing. Solenoid valve on the water connection is switching on or off. Drawers, baskets or storage areas are touching each other Please move the appliance away from the ice maker are falling into the ice maker. Receptacles are loose or sticking Please check the removable parts and, if required, reinsert them. Do not let the water used for cleaning drip onto...
Operating Instructions
Page 17
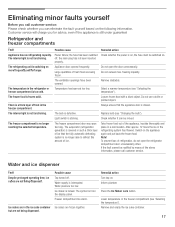
... temperature"). Light switch is switching on the following information. The evaporator (refrigeration generator) is covered in such a thick layer of ice that the appliance door is no longer able to defrost this amount of ice. If the fault cannot be moved. but are not being dispensed. Lower temperature in a cool location. Do not open too long. freezer compartment is not functioning. The interior light is too cold. Replace bulb (see Changing the bulb"). The freezer...
... temperature"). Light switch is switching on the following information. The evaporator (refrigeration generator) is covered in such a thick layer of ice that the appliance door is no longer able to defrost this amount of ice. If the fault cannot be moved. but are not being dispensed. Lower temperature in a cool location. Do not open too long. freezer compartment is not functioning. The interior light is too cold. Replace bulb (see Changing the bulb"). The freezer...
Operating Instructions
Page 18
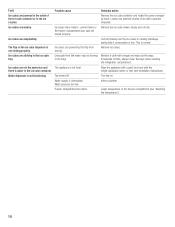
... ice cube tray. Tap turned off. Cold air flowing over the ice cubes is causing shrinkage, particularly if consumption is low .This is not level. Lower temperature in the ice crusher. The appliance is normal. Inform plumber. Ice cubes are jammed in the outlet of ice with vinegar and wipe out the trays. Water dispenser is thick, always clean the trays when cleaning the refrigerator compartment. Freezer compartment too warm. Remove ice...
... ice cube tray. Tap turned off. Cold air flowing over the ice cubes is causing shrinkage, particularly if consumption is low .This is not level. Lower temperature in the ice crusher. The appliance is normal. Inform plumber. Ice cubes are jammed in the outlet of ice with vinegar and wipe out the trays. Water dispenser is thick, always clean the trays when cleaning the refrigerator compartment. Freezer compartment too warm. Remove ice...
Operating Instructions
Page 19
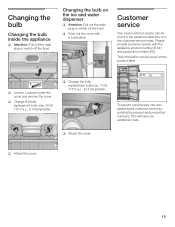
... production number (FD). replacement bulb max. 25 W, 115 V a.c., E14 lampholder. replacement bulb max. 15 W, 115 V a.c., E14 lampholder. To prevent unnecessary callĆouts, please assist customer service by quoting the product and production numbers. Customer service Your local customer service can be found on the ice and water dispenser q Attention: Pull out the main plug or switch off the fuse! q Change the bulb. q Attach the cover. 19 Changing the bulb Changing the bulb inside the...
... production number (FD). replacement bulb max. 25 W, 115 V a.c., E14 lampholder. replacement bulb max. 15 W, 115 V a.c., E14 lampholder. To prevent unnecessary callĆouts, please assist customer service by quoting the product and production numbers. Customer service Your local customer service can be found on the ice and water dispenser q Attention: Pull out the main plug or switch off the fuse! q Change the bulb. q Attach the cover. 19 Changing the bulb Changing the bulb inside the...
Operating Instructions
Page 20
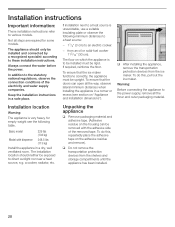
... and remove). Always connect the water before the power. Basic model 229 lbs (104 kg) Model with the adhesive side of the electricity and water supply companies. Installation instructions Important information: These installation instructions refer to be installed must be upright. In addition to the statutory national regulations, observe the connection conditions of the removed tape. q After installing the appliance, remove the transportation protection devices from the ice maker. To...
... and remove). Always connect the water before the power. Basic model 229 lbs (104 kg) Model with the adhesive side of the electricity and water supply companies. Installation instructions Important information: These installation instructions refer to be installed must be upright. In addition to the statutory national regulations, observe the connection conditions of the removed tape. q After installing the appliance, remove the transportation protection devices from the ice maker. To...
Operating Instructions
Page 22
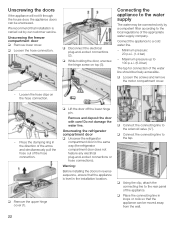
... remove the motor compartment cover. - q Lift the door off the lower hinge pin. q Using the clip, attach the connecting line to the solenoid valve (¼"). q While holding the door, unscrew the hinge screw on the hose connection. - q Connect the connecting line to the rear panel of the hose connection. q Connect the connecting line to a cold water line. - We recommend that installation is level in the installation location. Connecting the appliance to the water supply The water may be connected only by our customer service. Remove...
... remove the motor compartment cover. - q Lift the door off the lower hinge pin. q Using the clip, attach the connecting line to the solenoid valve (¼"). q While holding the door, unscrew the hinge screw on the hose connection. - q Connect the connecting line to the rear panel of the hose connection. q Connect the connecting line to a cold water line. - We recommend that installation is level in the installation location. Connecting the appliance to the water supply The water may be connected only by our customer service. Remove...
Operating Instructions
Page 23
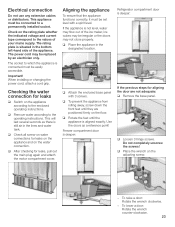
... a door: Rotate the wrench counterĆclockwise. 23 Check on the water connection. The socket to the operating instructions. Electrical connection Do not use any extension cables or distributors. q Remove water according to which the appliance is deeper: If the previous steps for leaks, pull out the main plug again and attach the motor compartment cover. Freezer compartment door is deeper: Refrigerator compartment door is connected must be set level with...
... a door: Rotate the wrench counterĆclockwise. 23 Check on the water connection. The socket to the operating instructions. Electrical connection Do not use any extension cables or distributors. q Remove water according to which the appliance is deeper: If the previous steps for leaks, pull out the main plug again and attach the motor compartment cover. Freezer compartment door is deeper: Refrigerator compartment door is connected must be set level with...
Operating Instructions
Page 24
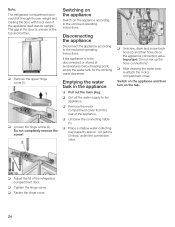
... refrigerator compartment door. q Fasten the hinge cover. 24 Do not completely remove the screw! q Unscrew the connecting cable (1). q After draining the water tank, reĆattach the motor compartment cover. Emptying the water tank in the door is to the enclosed operating instructions. Switch on the appliance and then turn on the appliance connection valve. q Loosen the hinge screw (2). q Place a shallow waterĆcollecting tray (capacity approx. 0.8 gallons (3 litres)) under the connection valve...
... refrigerator compartment door. q Fasten the hinge cover. 24 Do not completely remove the screw! q Unscrew the connecting cable (1). q After draining the water tank, reĆattach the motor compartment cover. Emptying the water tank in the door is to the enclosed operating instructions. Switch on the appliance and then turn on the appliance connection valve. q Loosen the hinge screw (2). q Place a shallow waterĆcollecting tray (capacity approx. 0.8 gallons (3 litres)) under the connection valve...


