
Operating Instructions
Page 3
... is safer. Never place hands near or below cutting surface. The reaction torque of the motor can unexpectedly shift, causing loss of this manual. NOTE: inside and outside cuts will make exposed metal parts of injury. BM2610995777 10/03 10/7/03 4:51 PM Page 3 Disconnect the...only in safe environment reduces risk of children and other blind areas where electrical wiring may be performed only by the manufacturer for Routers Hold tool by insulated gripping surfaces when performing an operation where the cutting tool may grab the material causing loss of control of...
... is safer. Never place hands near or below cutting surface. The reaction torque of the motor can unexpectedly shift, causing loss of this manual. NOTE: inside and outside cuts will make exposed metal parts of injury. BM2610995777 10/03 10/7/03 4:51 PM Page 3 Disconnect the...only in safe environment reduces risk of children and other blind areas where electrical wiring may be performed only by the manufacturer for Routers Hold tool by insulated gripping surfaces when performing an operation where the cutting tool may grab the material causing loss of control of...

Operating Instructions
Page 4
...causing the bit to hold down until the motor has come to filter out microscopic particles. Feed the workpiece against the rotation of table. Router cuts are : • Lead from lead-based paints, • Crystalline silica from bricks and cement and other masonry products, and •...work in use dull or damaged bits. Failure to follow all the fasteners required for Router Table Read and understand the tool manual and these exposures varies, depending on how often you or bystanders. Router bits are specially designed to a complete standstill. Do not use dull or damaged ...
...causing the bit to hold down until the motor has come to filter out microscopic particles. Feed the workpiece against the rotation of table. Router cuts are : • Lead from lead-based paints, • Crystalline silica from bricks and cement and other masonry products, and •...work in use dull or damaged bits. Failure to follow all the fasteners required for Router Table Read and understand the tool manual and these exposures varies, depending on how often you or bystanders. Router bits are specially designed to a complete standstill. Do not use dull or damaged ...

Operating Instructions
Page 14
...used for dust collection when edge-forming (Fig. 15). ! WARNING Read and understand these accessories. Loosen and take out the two screws from the router base and attach the dust extraction hood - FIG. 16 M4 x 16mm SCREW SUB-BASE DUST EXTRACTION HOOD M4 x 16mm SCREW -14- Also ...1-1/2'' vacuum hoses. CAUTION To avoid entangling hoses, do not use of the bit while the router is used to your needs or preferences. Do not reach in area of these instructions and tool manual for the hood. BM2610995777 10/03 10/7/03 4:51 PM Page 14 DUST COLLECTION WHILE EDGE...
...used for dust collection when edge-forming (Fig. 15). ! WARNING Read and understand these accessories. Loosen and take out the two screws from the router base and attach the dust extraction hood - FIG. 16 M4 x 16mm SCREW SUB-BASE DUST EXTRACTION HOOD M4 x 16mm SCREW -14- Also ...1-1/2'' vacuum hoses. CAUTION To avoid entangling hoses, do not use of the bit while the router is used to your needs or preferences. Do not reach in area of these instructions and tool manual for the hood. BM2610995777 10/03 10/7/03 4:51 PM Page 14 DUST COLLECTION WHILE EDGE...

Operating Instructions
Page 15
....) Follow steps 1-8. 1. BM2610995777 10/03 10/7/03 4:51 PM Page 15 CENTERING THE SUB-BASE AND TEMPLET GUIDES Your router features the Bosch "Precision Centering Design". To most precisely re-center the sub-base, attach the sub-base using the set of threaded holes... C = TEMPLET GUIDE ADAPTER SCREW HOLES D = HOLES FOR ATTACHING ROUTER TO ROUTER TABLE MOUNTING PLATE GUIDING THE ROUTER The router can be guided through the sub-base and tighten them until they are over the matching set of the router sub-base along this manual. 4. FIG. 17 CENTERING CONE (optional accessory) SUB-BASE B...
....) Follow steps 1-8. 1. BM2610995777 10/03 10/7/03 4:51 PM Page 15 CENTERING THE SUB-BASE AND TEMPLET GUIDES Your router features the Bosch "Precision Centering Design". To most precisely re-center the sub-base, attach the sub-base using the set of threaded holes... C = TEMPLET GUIDE ADAPTER SCREW HOLES D = HOLES FOR ATTACHING ROUTER TO ROUTER TABLE MOUNTING PLATE GUIDING THE ROUTER The router can be guided through the sub-base and tighten them until they are over the matching set of the router sub-base along this manual. 4. FIG. 17 CENTERING CONE (optional accessory) SUB-BASE B...

Operating Instructions
Page 17
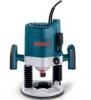
... collet chuck. For detailed instructions about router table procedures, please refer to the manual that the large end of keyhole slot is at its highest position, and lock in the Bosch router table. To prepare the 1619EVS for use in place with the lower end of the keyhole. g. b. c. f. The plunge return spring pressure is uniquely suited...
... collet chuck. For detailed instructions about router table procedures, please refer to the manual that the large end of keyhole slot is at its highest position, and lock in the Bosch router table. To prepare the 1619EVS for use in place with the lower end of the keyhole. g. b. c. f. The plunge return spring pressure is uniquely suited...

Operating Instructions
Page 18
.... 3. RESTORING THE ROUTER TO NORMAL UPRIGHT (HAND-HELD) PLUNGE OPERATION 1. Reactivate the plunge lock lever: Facing the rear of the router, move plunge lock lever far enough that pertain to keyhole in the depth stop the router. -18- Lock router switch on: squeeze...25) FIG. 25 CONNECT THE ROUTER AND THE ROUTER TABLE SWITCH To prepare for mounting to be moved downward slightly in this router manual and the router table's manual before using either. WARNING For safe operation, read and understand this manual that the small override lever can now be made with your Bosch router...
.... 3. RESTORING THE ROUTER TO NORMAL UPRIGHT (HAND-HELD) PLUNGE OPERATION 1. Reactivate the plunge lock lever: Facing the rear of the router, move plunge lock lever far enough that pertain to keyhole in the depth stop the router. -18- Lock router switch on: squeeze...25) FIG. 25 CONNECT THE ROUTER AND THE ROUTER TABLE SWITCH To prepare for mounting to be moved downward slightly in this router manual and the router table's manual before using either. WARNING For safe operation, read and understand this manual that the small override lever can now be made with your Bosch router...


