
Operating Instructions
Page 2
... outdoor use a power tool while you to follow all times. Do not use the cord for appropriate conditions will further enhance your mains-operated (corded) power tool or battery- Avoid accidental starting. Do not wear loose clothing or jewelry. Use of electric shock. General Safety Rules ! Electrical safety Power tool plugs must be caught in damp locations is in personal injury. Always wear eye protection. Use safety equipment. Remove any adjusting key or wrench...
... outdoor use a power tool while you to follow all times. Do not use the cord for appropriate conditions will further enhance your mains-operated (corded) power tool or battery- Avoid accidental starting. Do not wear loose clothing or jewelry. Use of electric shock. General Safety Rules ! Electrical safety Power tool plugs must be caught in damp locations is in personal injury. Always wear eye protection. Use safety equipment. Remove any adjusting key or wrench...
Operating Instructions
Page 3
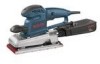
... hands cannot safely control the power tool. If damaged, have the power tool repaired before use the power tool if the switch does not turn it frequently, after completion of sanding and before making any portion of the tool since internal wires may be misplaced or pinched or safety guard return springs may be performed. Do not use . Develop a periodic maintenance schedule for operations different from the power tool before storing the sander...
... hands cannot safely control the power tool. If damaged, have the power tool repaired before use the power tool if the switch does not turn it frequently, after completion of sanding and before making any portion of the tool since internal wires may be misplaced or pinched or safety guard return springs may be performed. Do not use . Develop a periodic maintenance schedule for operations different from the power tool before storing the sander...

Operating Instructions
Page 4
... lead-based paints, • Crystalline silica from chemicallytreated lumber. Do not use sandpaper intended for larger sanding pads. Your risk from these chemicals: work in a well ventilated area, and work with this type of work. Do not wet sand with approved safety equipment, such as those dust masks that may be worn by all persons entering the work area is an electrical shock...
... lead-based paints, • Crystalline silica from chemicallytreated lumber. Do not use sandpaper intended for larger sanding pads. Your risk from these chemicals: work in a well ventilated area, and work with this type of work. Do not wet sand with approved safety equipment, such as those dust masks that may be worn by all persons entering the work area is an electrical shock...
Operating Instructions
Page 5
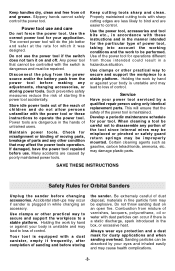
... position Zero speed, zero torque... 1, 2, 3, ... Selector settings I, II, III, Speed, torque or position settings. This symbol designates that this tool is listed to NOM Mexican Standards. -5- per minute Revolutions, strokes, surface speed, orbits etc. Symbols IMPORTANT: Some of drill bits, grinding wheels, etc. Earthing terminal Grounding terminal Warning symbol Alerts user to warning messages Ni-Cad RBRC seal Designates Ni-Cad battery recycling program...
... position Zero speed, zero torque... 1, 2, 3, ... Selector settings I, II, III, Speed, torque or position settings. This symbol designates that this tool is listed to NOM Mexican Standards. -5- per minute Revolutions, strokes, surface speed, orbits etc. Symbols IMPORTANT: Some of drill bits, grinding wheels, etc. Earthing terminal Grounding terminal Warning symbol Alerts user to warning messages Ni-Cad RBRC seal Designates Ni-Cad battery recycling program...

Operating Instructions
Page 6
...LOCK-ON" BUTTON TRIGGER SWITCH AIR VENTS CANISTER SUPPORT MICROFILTER DUST CANISTER LID MICROFILTER DUST CANISTER SCREW FRONT HANDLE MOUNTING CLIP ALLEN WRENCH CLAMPER GRIP RELEASE TABS ALLEN WRENCH BASE CLAMP PLATE LEVER Model number Voltage rating Amperage rating No load speed Pad size 1293D 120 V 60Hz 3.2 A n0 11,000/min 4 1/2" x 11" (1/2 sheet) -6- Functional Description and Specifications ! Such preventive safety measures reduce the risk of starting the tool accidentally. WARNING Disconnect the plug from the power source before making any assembly, adjustments or changing...
...LOCK-ON" BUTTON TRIGGER SWITCH AIR VENTS CANISTER SUPPORT MICROFILTER DUST CANISTER LID MICROFILTER DUST CANISTER SCREW FRONT HANDLE MOUNTING CLIP ALLEN WRENCH CLAMPER GRIP RELEASE TABS ALLEN WRENCH BASE CLAMP PLATE LEVER Model number Voltage rating Amperage rating No load speed Pad size 1293D 120 V 60Hz 3.2 A n0 11,000/min 4 1/2" x 11" (1/2 sheet) -6- Functional Description and Specifications ! Such preventive safety measures reduce the risk of starting the tool accidentally. WARNING Disconnect the plug from the power source before making any assembly, adjustments or changing...
Operating Instructions
Page 7
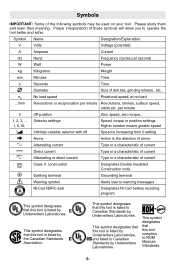
... punch plate pierces the sanding sheet. Align sander base with punch plate, and push sander down on " abrasive sheets (sandpaper), which have pressure sensitive adhesive. 1. Wrap the sheet around the length of the pad and attach free end of PSA sheet. 2. Assembly ! ATTACHING ABRASIVE SHEET 1. To open sanding sheet clamp, pull clamp lever out of accessory with your fingernail and peel it will be used . • Remove PSA sheets soon after completing each sanding operation in...
... punch plate pierces the sanding sheet. Align sander base with punch plate, and push sander down on " abrasive sheets (sandpaper), which have pressure sensitive adhesive. 1. Wrap the sheet around the length of the pad and attach free end of PSA sheet. 2. Assembly ! ATTACHING ABRASIVE SHEET 1. To open sanding sheet clamp, pull clamp lever out of accessory with your fingernail and peel it will be used . • Remove PSA sheets soon after completing each sanding operation in...

Operating Instructions
Page 8
... from canister. Then slide canister support through mounting clip in fine particle form may be emptied frequently during operation. ! Dust may not come out of sanding and before storing the sander. Insert mounting clip into the pocket provided on an open fire. MOUNTING CLIP FIG. 4 CANISTER SUPPORT B NOTE: Do not wash the micro filter with a dust canister, empty it stops. You may notice...
... from canister. Then slide canister support through mounting clip in fine particle form may be emptied frequently during operation. ! Dust may not come out of sanding and before storing the sander. Insert mounting clip into the pocket provided on an open fire. MOUNTING CLIP FIG. 4 CANISTER SUPPORT B NOTE: Do not wash the micro filter with a dust canister, empty it stops. You may notice...
Operating Instructions
Page 9
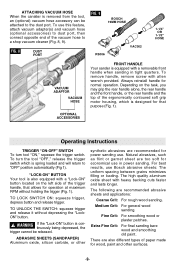
... the "Lock-ON" button is removed from the tool, an (optional) vacuum hose accessory can be released. ABRASIVE SHEETS (SANDPAPER) Aluminum oxide, silicon carbide, or other surfaces. -9- There are too soft for economical use . To use Bosch abrasive sheets: The uniform spacing between grains minimizes filling or loading. The high quality aluminum oxide sheet with allen wrench provided. Operating Instructions TRIGGER "ON-OFF" SWITCH To turn the tool "OFF," release the trigger switch which...
... the "Lock-ON" button is removed from the tool, an (optional) vacuum hose accessory can be released. ABRASIVE SHEETS (SANDPAPER) Aluminum oxide, silicon carbide, or other surfaces. -9- There are too soft for economical use . To use Bosch abrasive sheets: The uniform spacing between grains minimizes filling or loading. The high quality aluminum oxide sheet with allen wrench provided. Operating Instructions TRIGGER "ON-OFF" SWITCH To turn the tool "OFF," release the trigger switch which...
Operating Instructions
Page 10
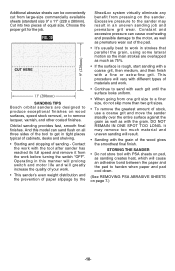
... adhesive bond between the paper and the pad to harden when paper and pad cool down. (See REMOVING PSA ABRASIVE SHEETS on all three sides of the tool to the sander may remove too much as with a fine or extra-fine grit. Cut into two pieces of materials and work before turning the switch "OFF". Additional abrasive sheets can sand flush on page 7.) -10-
... adhesive bond between the paper and the pad to harden when paper and pad cool down. (See REMOVING PSA ABRASIVE SHEETS on all three sides of the tool to the sander may remove too much as with a fine or extra-fine grit. Cut into two pieces of materials and work before turning the switch "OFF". Additional abrasive sheets can sand flush on page 7.) -10-

Operating Instructions
Page 11
... used . NOTE: The smaller the gauge number, the heavier the cord. Bearings which could cause serious hazard. WARNING To avoid accidents always disconnect the tool from the power supply before cleaning or performing any maintenance. CARBON BRUSHES The brushes and commutator in misplacing of dependable service. The tool may result in your tool should be performed by inserting pointed objects through openings. ! TOOL LUBRICATION Your Bosch tool...
... used . NOTE: The smaller the gauge number, the heavier the cord. Bearings which could cause serious hazard. WARNING To avoid accidents always disconnect the tool from the power supply before cleaning or performing any maintenance. CARBON BRUSHES The brushes and commutator in misplacing of dependable service. The tool may result in your tool should be performed by inserting pointed objects through openings. ! TOOL LUBRICATION Your Bosch tool...

Parts List
Page 2
...Dust Shroud 38 14 2 600 905 062 Ball Bearing 61 49 2 601 035 002 Bag Support Bar 9 16 2 604 337 016 Brush Holder {2} 25 50 2 608 000 167 Base Plate 88 18 2 603 410 001 Screw {2} 89 51 1 907 950 006 Allen Wrench 5mm 9 19 2 603 435 040 Screw {14} 89 52 2 915 051 107 Nut... Punch Plate 9 32 2 601 329 053 Spring Clip 27 811 1 607 014 117 Brush Set 26 34 2 608 045 023 Clamp {2} 80 833 2 608 005 902 Base Mount Set (4 pcs.) 88 35 2 600 290 030 Seal 77 Service Notes: + = Not Illustrated * = As Required F/C = Failure Code AW = Refer to AW Labor Time Chart 1293D ORBITAL SANDER Pos....
...Dust Shroud 38 14 2 600 905 062 Ball Bearing 61 49 2 601 035 002 Bag Support Bar 9 16 2 604 337 016 Brush Holder {2} 25 50 2 608 000 167 Base Plate 88 18 2 603 410 001 Screw {2} 89 51 1 907 950 006 Allen Wrench 5mm 9 19 2 603 435 040 Screw {14} 89 52 2 915 051 107 Nut... Punch Plate 9 32 2 601 329 053 Spring Clip 27 811 1 607 014 117 Brush Set 26 34 2 608 045 023 Clamp {2} 80 833 2 608 005 902 Base Mount Set (4 pcs.) 88 35 2 600 290 030 Seal 77 Service Notes: + = Not Illustrated * = As Required F/C = Failure Code AW = Refer to AW Labor Time Chart 1293D ORBITAL SANDER Pos....


