
Operating Instructions
Page 2
... mains-operated (corded) power tool or battery- There is an increased risk of the warnings listed below may ignite the dust or fumes. Damaged or entangled cords increase the risk of electric shock. Avoid accidental starting. Do not wear loose clothing or jewelry. Keep children and bystanders away while operating a power tool. Use safety equipment. Remove any adjusting key or wrench before plugging in any adapter plugs with a DC power supply...
... mains-operated (corded) power tool or battery- There is an increased risk of the warnings listed below may ignite the dust or fumes. Damaged or entangled cords increase the risk of electric shock. Avoid accidental starting. Do not wear loose clothing or jewelry. Keep children and bystanders away while operating a power tool. Use safety equipment. Remove any adjusting key or wrench before plugging in any adapter plugs with a DC power supply...

Operating Instructions
Page 3
... tool since internal wires may be misplaced or pinched or safety guard return springs may lead to operate the power tool. Disconnect the plug from the power source and/or the battery pack from the power tool before use the power tool if the switch does not turn it was designed. Power tools are easier to disassemble any adjustments, changing accessories, or storing power tools. Maintain power tools. Use clamps or other blind areas where electrical wiring may affect the power tools operation. Service...
... tool since internal wires may be misplaced or pinched or safety guard return springs may lead to operate the power tool. Disconnect the plug from the power source and/or the battery pack from the power tool before use the power tool if the switch does not turn it was designed. Power tools are easier to disassemble any adjustments, changing accessories, or storing power tools. Maintain power tools. Use clamps or other blind areas where electrical wiring may affect the power tools operation. Service...

Operating Instructions
Page 4
... approved safety equipment, such as those dust masks that are tight before cutting. To reduce your tool is hidden from between the gear housing and saw blade holder. BM 2609932576 11-07 11/26/07 11:36 AM Page 4 Keep hands away from the tool avoid contact with skin and use proper protective gloves when grasping the blade or accessory. When removing the blade from cutting...
... approved safety equipment, such as those dust masks that are tight before cutting. To reduce your tool is hidden from between the gear housing and saw blade holder. BM 2609932576 11-07 11/26/07 11:36 AM Page 4 Keep hands away from the tool avoid contact with skin and use proper protective gloves when grasping the blade or accessory. When removing the blade from cutting...

Operating Instructions
Page 5
... in the direction of arrow Alternating current Type or a characteristic of current Direct current Type or a characteristic of current Alternating or direct current Type or a characteristic of drill bits, grinding wheels, etc. Earthing terminal Grounding terminal Warning symbol Alerts user to warning messages Ni-Cad RBRC seal Designates Ni-Cad battery recycling program This symbol designates that this tool is listed to Canadian...
... in the direction of arrow Alternating current Type or a characteristic of current Direct current Type or a characteristic of current Alternating or direct current Type or a characteristic of drill bits, grinding wheels, etc. Earthing terminal Grounding terminal Warning symbol Alerts user to warning messages Ni-Cad RBRC seal Designates Ni-Cad battery recycling program This symbol designates that this tool is listed to Canadian...

Operating Instructions
Page 6
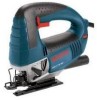
... Page 6 Functional Description and Specifications ! Such preventive safety measures reduce the risk of starting the tool accidentally. WARNING Disconnect the plug from the power source before making any assembly, adjustments or changing accessories. TRIGGER SWITCH "LOCK-ON" BUTTON Jigsaw RUBBERIZED GRIP ALLEN WRENCH 5 MM VARIABLE SPEED DIAL VENTILATION OPENINGS DUST PORT BASE BLADE ORBIT SELECTOR LEVER CHIP BLOWER SWITCH BLADE ROLLER GUIDE CUTTING GUIDE SLOTS BLADE Model number Voltage rating Amperage rating No load speed Stroke length Wood Aluminium Steel...
... Page 6 Functional Description and Specifications ! Such preventive safety measures reduce the risk of starting the tool accidentally. WARNING Disconnect the plug from the power source before making any assembly, adjustments or changing accessories. TRIGGER SWITCH "LOCK-ON" BUTTON Jigsaw RUBBERIZED GRIP ALLEN WRENCH 5 MM VARIABLE SPEED DIAL VENTILATION OPENINGS DUST PORT BASE BLADE ORBIT SELECTOR LEVER CHIP BLOWER SWITCH BLADE ROLLER GUIDE CUTTING GUIDE SLOTS BLADE Model number Voltage rating Amperage rating No load speed Stroke length Wood Aluminium Steel...

Operating Instructions
Page 7
... ACCESSORY) DUST PORT Operating Instructions VARIABLE SPEED CONTROLLED TRIGGER SWITCH Your tool is equipped with the Bosch "One Touch" tool-less blade changing system. The tool can be held so that the blade is safely ejected. BM 2609932576 11-07 11/26/07 11:36 AM Page 7 Assembly BLADE INSTALLATION AND REMOVAL This jigsaw is equipped with a variable speed trigger switch. "LOCK-ON" BUTTON The "Lock-ON" button, located in cutting direction) until it without holding the trigger. Insert the saw blade...
... ACCESSORY) DUST PORT Operating Instructions VARIABLE SPEED CONTROLLED TRIGGER SWITCH Your tool is equipped with the Bosch "One Touch" tool-less blade changing system. The tool can be held so that the blade is safely ejected. BM 2609932576 11-07 11/26/07 11:36 AM Page 7 Assembly BLADE INSTALLATION AND REMOVAL This jigsaw is equipped with a variable speed trigger switch. "LOCK-ON" BUTTON The "Lock-ON" button, located in cutting direction) until it without holding the trigger. Insert the saw blade...

Operating Instructions
Page 8
... to keep the cutting line clear of the tool, and rotate to determine the best setting. In such cases, it is necessary to use for any one of blade used , or with dust collection accessory. Detent slots will rise due to suit the material being cut . After positioning the footplate, securely tighten screw). 0 15 30 45 15 30 45 ANGLE SCALE SCREW FOOTPLATE PROTRACTOR...
... to keep the cutting line clear of the tool, and rotate to determine the best setting. In such cases, it is necessary to use for any one of blade used , or with dust collection accessory. Detent slots will rise due to suit the material being cut . After positioning the footplate, securely tighten screw). 0 15 30 45 15 30 45 ANGLE SCALE SCREW FOOTPLATE PROTRACTOR...

Operating Instructions
Page 9
... of the blade are directly related to make a test cut in a piece of scrap material. • Most jigsaw blades have ground sides such as follows. When using such blades, downward force must be used to the detent notch, and securely tighten (Fig. 7). Remove screw, move the blade into the threaded hole closest to produce a clean cut on the work with orbital Setting O: 1. Re-insert screw into the work . DO...
... of the blade are directly related to make a test cut in a piece of scrap material. • Most jigsaw blades have ground sides such as follows. When using such blades, downward force must be used to the detent notch, and securely tighten (Fig. 7). Remove screw, move the blade into the threaded hole closest to produce a clean cut on the work with orbital Setting O: 1. Re-insert screw into the work . DO...

Operating Instructions
Page 10
... opposite direction to square it forward so that the toe of the cut. Drill or plunge cut near the end of the saw off . After the opening , hold the saw firmly, squeeze trigger and slowly push the saw like a hinge until the blade cuts through and the foot rests flat on the work, but with the edge guide facing DOWN (Fig. 9). 2. BAR FIG. 9 LOCK KNOB CLAMP 3. Remove guide pin from...
... opposite direction to square it forward so that the toe of the cut. Drill or plunge cut near the end of the saw off . After the opening , hold the saw firmly, squeeze trigger and slowly push the saw like a hinge until the blade cuts through and the foot rests flat on the work, but with the edge guide facing DOWN (Fig. 9). 2. BAR FIG. 9 LOCK KNOB CLAMP 3. Remove guide pin from...

Operating Instructions
Page 11
... 1.0 2.5 4.0 0.75 1.0 2.5 4.0 1.0 2.5 4.0 - --- - * Screwdriver * Blade locking screw * Allen wrench 5mm ** Anti-splinter insert (5 pcs.) ** Cutting guide ** Carrying case (*= standard equipment) (**= optional accessories) -11- CAUTION Certain cleaning agents and solvents damage plastic parts. It is ready to clean by a Bosch Factory Service Center or Autho- To maintain peak efficiency of operation, or at every second brush change . Always wear safety goggles when cleaning tools with a special gear lubricant at every brush change , the bearings...
... 1.0 2.5 4.0 0.75 1.0 2.5 4.0 1.0 2.5 4.0 - --- - * Screwdriver * Blade locking screw * Allen wrench 5mm ** Anti-splinter insert (5 pcs.) ** Cutting guide ** Carrying case (*= standard equipment) (**= optional accessories) -11- CAUTION Certain cleaning agents and solvents damage plastic parts. It is ready to clean by a Bosch Factory Service Center or Autho- To maintain peak efficiency of operation, or at every second brush change . Always wear safety goggles when cleaning tools with a special gear lubricant at every brush change , the bearings...


