Operating Instructions
Page 2
... operating power tools may ignite the dust or fumes. Do not force tool. SAVE THESE INSTRUCTIONS Work Area Keep your body is unstable and may lead to carry the tools or pull the plug from heat, oil, sharp edges or moving parts. Electrical Safety Double Insulated tools are rated for appropriate conditions. Never use tool while tired or under the influence of control. Dress properly. Remove adjusting keys or wrenches...
... operating power tools may ignite the dust or fumes. Do not force tool. SAVE THESE INSTRUCTIONS Work Area Keep your body is unstable and may lead to carry the tools or pull the plug from heat, oil, sharp edges or moving parts. Electrical Safety Double Insulated tools are rated for appropriate conditions. Never use tool while tired or under the influence of control. Dress properly. Remove adjusting keys or wrenches...
Operating Instructions
Page 3
... toward your model. For example: internal wires may be misplaced or pinched, safety guard return springs may affect the tools operation. When servicing a tool, use both handles for which generate dust. Certain cleaning agents such as gasoline, carbon tetrachloride, ammonia, etc. Do not drill, fasten or break into a gas line will help deflect fragments of parts, and any adjustments, changing accessories, or storing the tool. Striking or cutting into existing...
... toward your model. For example: internal wires may be misplaced or pinched, safety guard return springs may affect the tools operation. When servicing a tool, use both handles for which generate dust. Certain cleaning agents such as gasoline, carbon tetrachloride, ammonia, etc. Do not drill, fasten or break into a gas line will help deflect fragments of parts, and any adjustments, changing accessories, or storing the tool. Striking or cutting into existing...
Operating Instructions
Page 4
... dust created by power sanding, sawing, grinding, drilling, and other construction activities contains chemicals known to avoid being caught between the tool or side handle and walls or posts. Never place the tool down until the motor has come to dislodge a bound or jammed bit. Your risk from the tool avoid contact with skin and use . ! Do not strike the bit with approved safety...
... dust created by power sanding, sawing, grinding, drilling, and other construction activities contains chemicals known to avoid being caught between the tool or side handle and walls or posts. Never place the tool down until the motor has come to dislodge a bound or jammed bit. Your risk from the tool avoid contact with skin and use . ! Do not strike the bit with approved safety...
Operating Instructions
Page 5
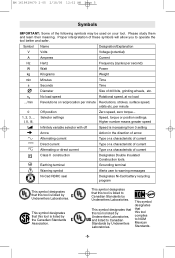
... Warning symbol Alerts user to Canadian Standards by Underwriters Laboratories. This symbol designates that this tool is increasing from 0 setting Action in the direction of arrow Type or a characteristic of current Type or a characteristic of current Type or a characteristic of drill bits, grinding wheels, etc. This symbol designates that this tool is listed by Underwriters Laboratories. Higher number means greater speed Speed is listed by Underwriters...
... Warning symbol Alerts user to Canadian Standards by Underwriters Laboratories. This symbol designates that this tool is increasing from 0 setting Action in the direction of arrow Type or a characteristic of current Type or a characteristic of current Type or a characteristic of drill bits, grinding wheels, etc. This symbol designates that this tool is listed by Underwriters Laboratories. Higher number means greater speed Speed is listed by Underwriters...
Operating Instructions
Page 6
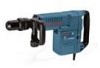
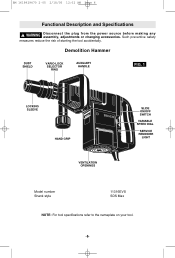
WARNING Disconnect the plug from the power source before making any assembly, adjustments or changing accessories. Such preventive safety measures reduce the risk of starting the tool accidentally. Demolition Hammer DUST SHIELD VARIO-LOCK SELECTOR RING AUXILIARY HANDLE FIG. 1 LOCKING SLEEVE HAND GRIP VENTILATION OPENINGS SLIDE ON/OFF SWITCH VARIABLE SPEED DIAL SERVICE REMINDER LIGHT Model number Shank style 11316EVS SDS Max NOTE: For tool specifications refer to the nameplate on your tool. -6- BM 1619929470 2-05 2/18/05 12...
WARNING Disconnect the plug from the power source before making any assembly, adjustments or changing accessories. Such preventive safety measures reduce the risk of starting the tool accidentally. Demolition Hammer DUST SHIELD VARIO-LOCK SELECTOR RING AUXILIARY HANDLE FIG. 1 LOCKING SLEEVE HAND GRIP VENTILATION OPENINGS SLIDE ON/OFF SWITCH VARIABLE SPEED DIAL SERVICE REMINDER LIGHT Model number Shank style 11316EVS SDS Max NOTE: For tool specifications refer to the nameplate on your tool. -6- BM 1619929470 2-05 2/18/05 12...
Operating Instructions
Page 7
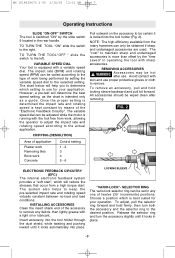
... pull bit forward. VARIABLE SPEED DIAL Your tool is intended only as the chart is equipped with the tool free from the rotary hammers can be set in the rear handle. Insert accessory into the tool holder through the dust shield, while twisting and pushing inward until it is more than offset by the slide switch 9 located in any debris, then lightly grease with skin and use for...
... pull bit forward. VARIABLE SPEED DIAL Your tool is intended only as the chart is equipped with the tool free from the rotary hammers can be set in the rear handle. Insert accessory into the tool holder through the dust shield, while twisting and pushing inward until it is more than offset by the slide switch 9 located in any debris, then lightly grease with skin and use for...
Operating Instructions
Page 8
... handle, loosen the hand grip, move the handle to the desired position along the barrel and securely retighten the hand grip. The long wear and efficient operation of the BOSCH hammers will decrease the efficiency of the tool. Depending on the room temperature, this type. An electric hammer is realized. Establish and follow a set maintenance program. -8- All grease packed hammers require a short period of operation. "TOOL...
... handle, loosen the hand grip, move the handle to the desired position along the barrel and securely retighten the hand grip. The long wear and efficient operation of the BOSCH hammers will decrease the efficiency of the tool. Depending on the room temperature, this type. An electric hammer is realized. Establish and follow a set maintenance program. -8- All grease packed hammers require a short period of operation. "TOOL...

Operating Instructions
Page 9
... a Bosch Factory Service Center or Authorized Bosch Service Station. Ventilation openings and switch levers must be replaced at once to use 3-wire extension cords that period, the light will go off the tool in your tool have 3-prong plugs and receptacles. Accessories ! Cleaning ! Always wear safety goggles when cleaning tools with a special gear lubricant at every brush change , the bearings should be regreased with compressed air. NOTE: The smaller the gauge number...
... a Bosch Factory Service Center or Authorized Bosch Service Station. Ventilation openings and switch levers must be replaced at once to use 3-wire extension cords that period, the light will go off the tool in your tool have 3-prong plugs and receptacles. Accessories ! Cleaning ! Always wear safety goggles when cleaning tools with a special gear lubricant at every brush change , the bearings should be regreased with compressed air. NOTE: The smaller the gauge number...
Parts Diagram
Page 2
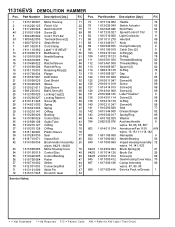
...31 1 610 290 026 Bushing 86 143 2 916 540 017 Spring Ring 89 34 1 610 390 029 Control Disc 49 144 1 610 102 029 Washer 65 35 1 615 806 108 Guide Tube 43 784 2 602 025 076 Auxiliary Handle 9 36 1 610 210 127 O-Ring 78 w/pos. 84...Clamp Assembly 80 70 1 612 001 033 Connecting Rod 57 w/pos. 87, 89, 90 71 1 613 101 006 Wrist Pin 47 898 1 617 000 414 Service Pack w/Grease 1 72 1 616 317 045 Eccentric Gear 34 Service Notes: + = Not Illustrated * = As Required F/C = Failure Code AW = Refer to AW Labor Time Chart Part Number Description {Qty.} F/C Pos. 11316EVS DEMOLITION HAMMER...
...31 1 610 290 026 Bushing 86 143 2 916 540 017 Spring Ring 89 34 1 610 390 029 Control Disc 49 144 1 610 102 029 Washer 65 35 1 615 806 108 Guide Tube 43 784 2 602 025 076 Auxiliary Handle 9 36 1 610 210 127 O-Ring 78 w/pos. 84...Clamp Assembly 80 70 1 612 001 033 Connecting Rod 57 w/pos. 87, 89, 90 71 1 613 101 006 Wrist Pin 47 898 1 617 000 414 Service Pack w/Grease 1 72 1 616 317 045 Eccentric Gear 34 Service Notes: + = Not Illustrated * = As Required F/C = Failure Code AW = Refer to AW Labor Time Chart Part Number Description {Qty.} F/C Pos. 11316EVS DEMOLITION HAMMER...


