Operating Instructions
Page 2
... with your tool. When operating a power tool outside, use "AC only" rated tools with grounded surfaces such as in the presence of the tool in moving parts. Refer to a rotating part of this manual. Do not use an outdoor extension cord marked "W-A" or "W." Water entering a power tool will further enhance your work area clean and well lit. Do not use common sense when operating a power tool. Remove adjusting keys or wrenches before plugging...
... with your tool. When operating a power tool outside, use "AC only" rated tools with grounded surfaces such as in the presence of the tool in moving parts. Refer to a rotating part of this manual. Do not use an outdoor extension cord marked "W-A" or "W." Water entering a power tool will further enhance your work area clean and well lit. Do not use common sense when operating a power tool. Remove adjusting keys or wrenches before plugging...
Operating Instructions
Page 3
... power source before making any other blind areas where electrical wiring may damage plastic parts. Use thick cushioned gloves and limit the exposure time by the manufacturer for your application. Do not force tool. Keep cutting tools sharp and clean. Combination Hammer Safety Rules Hold tools by qualified repair personnel. Contact with the switch is designed.Do not use tool if switch does not turn it own cord...
... power source before making any other blind areas where electrical wiring may damage plastic parts. Use thick cushioned gloves and limit the exposure time by the manufacturer for your application. Do not force tool. Keep cutting tools sharp and clean. Combination Hammer Safety Rules Hold tools by qualified repair personnel. Contact with the switch is designed.Do not use tool if switch does not turn it own cord...
Operating Instructions
Page 4
... bit. Do not strike the bit with the spinning bit it at maximum operating speed and impact force could dislodge and strike you causing serious personal injury. Unexpected starting at your arm or wrist. When removing the bit from the bit could startle the operator and lead to maximum speed and impact force. When the power cord is interrupted, the electronic controller will automatically reset the tool...
... bit. Do not strike the bit with the spinning bit it at maximum operating speed and impact force could dislodge and strike you causing serious personal injury. Unexpected starting at your arm or wrist. When removing the bit from the bit could startle the operator and lead to maximum speed and impact force. When the power cord is interrupted, the electronic controller will automatically reset the tool...
Operating Instructions
Page 5
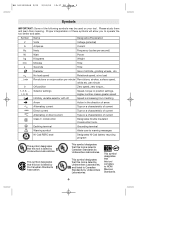
... this tool is increasing from 0 setting Arrow Action in the direction of arrow Alternating current Type or a characteristic of current Direct current Type or a characteristic of current Alternating or direct current Type or a characteristic of drill bits, grinding wheels, etc. Higher number means greater speed 0 Infinitely variable selector with off Speed is listed by the Canadian Standards Association. This symbol designates that this tool is listed by...
... this tool is increasing from 0 setting Arrow Action in the direction of arrow Alternating current Type or a characteristic of current Direct current Type or a characteristic of current Alternating or direct current Type or a characteristic of drill bits, grinding wheels, etc. Higher number means greater speed 0 Infinitely variable selector with off Speed is listed by the Canadian Standards Association. This symbol designates that this tool is listed by...
Operating Instructions
Page 6
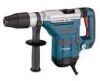
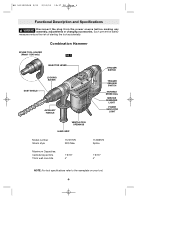
... the plug from the power source before making any assembly, adjustments or changing accessories. Combination Hammer SPLINE TOOL HOLDER (Model 11248 only) FIG. 1 SELECTOR LEVER LOCKING SLEEVE DUST SHIELD AUXILIARY HANDLE TRIGGER SWITCH TRIGGER RELEASE SWITCH VARIABLE SPEED DIAL SERVICE REMINDER LIGHT POWER INDICATOR LIGHT VENTILATION OPENINGS HAND GRIP Model number Shank style 11241EVS SDS Max Maximum Capacities: Carbide tipped bits Thick wall core bits 1 9/16" 4" 11248EVS Spline 1 9/16" 4" NOTE: For tool specifications refer to the nameplate on your tool. -6- BM 1619929548 2/03...
... the plug from the power source before making any assembly, adjustments or changing accessories. Combination Hammer SPLINE TOOL HOLDER (Model 11248 only) FIG. 1 SELECTOR LEVER LOCKING SLEEVE DUST SHIELD AUXILIARY HANDLE TRIGGER SWITCH TRIGGER RELEASE SWITCH VARIABLE SPEED DIAL SERVICE REMINDER LIGHT POWER INDICATOR LIGHT VENTILATION OPENINGS HAND GRIP Model number Shank style 11241EVS SDS Max Maximum Capacities: Carbide tipped bits Thick wall core bits 1 9/16" 4" 11248EVS Spline 1 9/16" 4" NOTE: For tool specifications refer to the nameplate on your tool. -6- BM 1619929548 2/03...
Operating Instructions
Page 7
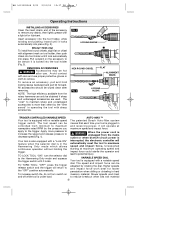
... speed and impact force. WARNING Accessories may be wiped clean after use proper protective gloves or cloth to maintain sharp and undamaged accessories is more pressure to increase the speed and release pressure to remove any debris, then lightly grease with a variable speed The patented Bosch Auto-Max system trigger switch. TO LOCK TOOL "ON": turn switch on chisel with a variable speed dial. TO TURN TOOL: "OFF" press the trigger release switch and the trigger will automatically reset...
... speed and impact force. WARNING Accessories may be wiped clean after use proper protective gloves or cloth to maintain sharp and undamaged accessories is more pressure to increase the speed and release pressure to remove any debris, then lightly grease with a variable speed The patented Bosch Auto-Max system trigger switch. TO LOCK TOOL "ON": turn switch on chisel with a variable speed dial. TO TURN TOOL: "OFF" press the trigger release switch and the trigger will automatically reset...
Operating Instructions
Page 8
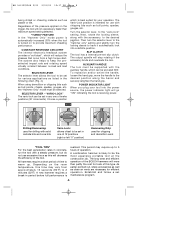
... LEVER - The Vario-Lock position is turned on the trigger, the tool will not operate any one of 12 positions (right or left "0" position) Hammering Only: used for tools of this type. Turn the selector lever, to keep the preselected impact rate and rotating speed virtually constant between no-load and load conditions. Regardless of the pressure applied on to the desired position along with chipping bits such...
... LEVER - The Vario-Lock position is turned on the trigger, the tool will not operate any one of 12 positions (right or left "0" position) Hammering Only: used for tools of this type. Turn the selector lever, to keep the preselected impact rate and rotating speed virtually constant between no-load and load conditions. Regardless of the pressure applied on to the desired position along with chipping bits such...
Operating Instructions
Page 9
... LIGHT When the service reminder light lights up or blinks, this will indicate that the cut-out carbon brushes will switch off and the tool will stop running. TOOL LUBRICATION Your Bosch tool has been properly lubricated and is necessary, a cord with a special gear lubricant at Bosch Factory Service Center or Authorized Bosch Service Station. Always wear safety goggles when cleaning tools with compressed dry air. RECOMMENDED SIZES OF EXTENSION CORDS 120 VOLT ALTERNATING CURRENT TOOLS Tool...
... LIGHT When the service reminder light lights up or blinks, this will indicate that the cut-out carbon brushes will switch off and the tool will stop running. TOOL LUBRICATION Your Bosch tool has been properly lubricated and is necessary, a cord with a special gear lubricant at Bosch Factory Service Center or Authorized Bosch Service Station. Always wear safety goggles when cleaning tools with compressed dry air. RECOMMENDED SIZES OF EXTENSION CORDS 120 VOLT ALTERNATING CURRENT TOOLS Tool...

Use and Care Manual
Page 3
... IMPORTANT SAFETY INSTRUCTIONS 2 Dishwasher Components 3 Dishwasher Features and Options 4 Dishware Materials 5 Preparing and Loading the Dishware 5-9 Dishware Preparation 5 Loading the Dishwasher 5-10 Adding Detergent and Rinse Agent 11-12 Operating the Dishwasher 13-14 Dishware Drying 15 Unloading the Dishwasher 15 Care and Maintenance 16-18 Self Help 19 Wash Cycle Information/Sanitized 20 Statement of Warranties...
... IMPORTANT SAFETY INSTRUCTIONS 2 Dishwasher Components 3 Dishwasher Features and Options 4 Dishware Materials 5 Preparing and Loading the Dishware 5-9 Dishware Preparation 5 Loading the Dishwasher 5-10 Adding Detergent and Rinse Agent 11-12 Operating the Dishwasher 13-14 Dishware Drying 15 Unloading the Dishwasher 15 Care and Maintenance 16-18 Self Help 19 Wash Cycle Information/Sanitized 20 Statement of Warranties...

Use and Care Manual
Page 4
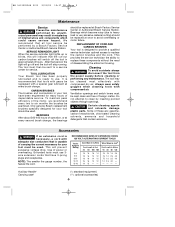
All repairs must be performed by the warranty. • Use this time. • Remove the door to the washing compartment when removing an old dishwasher from each for the dishwasher covered in this manual is provided with their HANDLES UP to reduce the risk of cut-type injuries. • Do not wash plastic items unless they are marked "dishwasher safe...
All repairs must be performed by the warranty. • Use this time. • Remove the door to the washing compartment when removing an old dishwasher from each for the dishwasher covered in this manual is provided with their HANDLES UP to reduce the risk of cut-type injuries. • Do not wash plastic items unless they are marked "dishwasher safe...

Use and Care Manual
Page 9
...the rack outward and up until the rollers are completely free of the upper rack. Re-insert the rack with sharp sides down, see Figure 9. To use the Top Rack Only™ cycle: 1. Load the top rack. 2. Press the Top Rack Only button. Grasp the cup shelves as shown in Figure 7....only) The knife rack is assembled onto an edge of the roller guides. NOTE: The Top Rack Only™ cycle does not reduce wash time. Preparing and Loading the Dishware (continued) Top Rack Height Adjustment (models SHV56C and SHX56C only) Remove the empty upper rack by washing loads small enough to fill only ...
...the rack outward and up until the rollers are completely free of the upper rack. Re-insert the rack with sharp sides down, see Figure 9. To use the Top Rack Only™ cycle: 1. Load the top rack. 2. Press the Top Rack Only button. Grasp the cup shelves as shown in Figure 7....only) The knife rack is assembled onto an edge of the roller guides. NOTE: The Top Rack Only™ cycle does not reduce wash time. Preparing and Loading the Dishware (continued) Top Rack Height Adjustment (models SHV56C and SHX56C only) Remove the empty upper rack by washing loads small enough to fill only ...

Use and Care Manual
Page 10
... Figure 13. Set the top rack aside. Figure 15 8 Figure 16 Insert the Extra Tall Item Sprinkler into the top rack spray outlet and turn the sprinkler clockwise to lock it stops rolling. Push the roller guides back into the dishwasher. Rack Attachment (models SHE66C, SHX57C ...Loading the Dishware (continued) Bottom Rack Accessories Flip Tines Flip Tines fold down the cup shelves and place items to be placed into the bottom rack even with the top rack in the raised position, Remove the empty top rack by placing tall items such as plastic cutting boards and tall baking sheets...
... Figure 13. Set the top rack aside. Figure 15 8 Figure 16 Insert the Extra Tall Item Sprinkler into the top rack spray outlet and turn the sprinkler clockwise to lock it stops rolling. Push the roller guides back into the dishwasher. Rack Attachment (models SHE66C, SHX57C ...Loading the Dishware (continued) Bottom Rack Accessories Flip Tines Flip Tines fold down the cup shelves and place items to be placed into the bottom rack even with the top rack in the raised position, Remove the empty top rack by placing tall items such as plastic cutting boards and tall baking sheets...

Use and Care Manual
Page 15
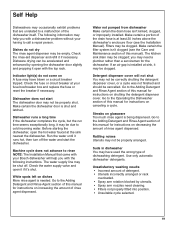
...manual. When using the Top Rack Only feature, dishes should only be loaded in the dishwasher automatically adjust the cycle length, temperature and water changes based on the soil load. Shut the dishwasher door. Open the dishwasher door far enough to expose the control buttons. To avoid damage to remove...seriously scalded if you start automatically and continue operating until it is distributed over the dishes to allow hard to remove soils to the Dishware Materials section of this manual for further information. Hand washing may require soaking or hand scouring. When Pre ...
...manual. When using the Top Rack Only feature, dishes should only be loaded in the dishwasher automatically adjust the cycle length, temperature and water changes based on the soil load. Shut the dishwasher door. Open the dishwasher door far enough to expose the control buttons. To avoid damage to remove...seriously scalded if you start automatically and continue operating until it is distributed over the dishes to allow hard to remove soils to the Dishware Materials section of this manual for further information. Hand washing may require soaking or hand scouring. When Pre ...
Use and Care Manual
Page 16
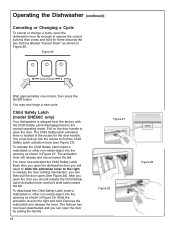
... or change a cycle, open the dishwasher door far enough to expose the control buttons then press and hold . Each time you open the dishwasher door you can open the door by pulling the handle. 14 Figure 27 Figure 29 Figure 28 The activation lever will need to slide the activation lever to the right to release the door locking...
... or change a cycle, open the dishwasher door far enough to expose the control buttons then press and hold . Each time you open the dishwasher door you can open the door by pulling the handle. 14 Figure 27 Figure 29 Figure 28 The activation lever will need to slide the activation lever to the right to release the door locking...
Use and Care Manual
Page 17
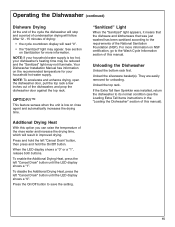
...your household hot water supply. Operating the Dishwasher (continued) Dishware Drying At the end of the cycle the dishwasher will stop and a period of the dishwasher, and prop the dishwasher door against the top rack. They are easily removed for more information on rinse... its normal condition (see the Loading Extra Tall Items instructions in improved drying. Press the On/Off button to the requirements of this manual). 15 "Sanitized" Light When the "Sanitized" light appears, it means that the dishware and kitchenware that was installed, return the dishwasher to the ...
...your household hot water supply. Operating the Dishwasher (continued) Dishware Drying At the end of the cycle the dishwasher will stop and a period of the dishwasher, and prop the dishwasher door against the top rack. They are easily removed for more information on rinse... its normal condition (see the Loading Extra Tall Items instructions in improved drying. Press the On/Off button to the requirements of this manual). 15 "Sanitized" Light When the "Sanitized" light appears, it means that the dishware and kitchenware that was installed, return the dishwasher to the ...

Use and Care Manual
Page 19
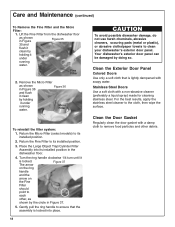
Return the locking nut to dislodge and remove the debris. Return the top rack to its installed position. 3. The filter system is located on a surface such as shown in Figure 34. Remove the bottom rack. 2. If the spray nozzles need cleaning, flush them under running water. Return the bottom spray arm to its installed position. 2. Return the bottom...
Return the locking nut to dislodge and remove the debris. Return the top rack to its installed position. 3. The filter system is located on a surface such as shown in Figure 34. Remove the bottom rack. 2. If the spray nozzles need cleaning, flush them under running water. Return the bottom spray arm to its installed position. 2. Return the bottom...
Use and Care Manual
Page 20
... Colored Doors Use only a soft cloth that the assembly is locked into its installed position in Figure 36 Figure 36 and flush it clean by holding it is lightly dampened with a non-abrasive cleaner (preferably a liquid spray) made for cleaning stainless steel. Return the Micro Filter (select models) to ensure that is locked. Turn the ring handle clockwise 1/4 turn until...
... Colored Doors Use only a soft cloth that the assembly is locked into its installed position in Figure 36 Figure 36 and flush it clean by holding it is lightly dampened with a non-abrasive cleaner (preferably a liquid spray) made for cleaning stainless steel. Return the Micro Filter (select models) to ensure that is locked. Turn the ring handle clockwise 1/4 turn until...
Use and Care Manual
Page 21
... start the dishwasher. Run the water until it open with a dishwasher problem without your fuse box/breaker box and replace the fuse or reset the breaker if necessary. Check the water supply valve and open the hot water faucet at least 20 inches above the dishwasher's enclosure floor (see the Care and Maintenance section of this manual for instructions...
... start the dishwasher. Run the water until it open with a dishwasher problem without your fuse box/breaker box and replace the fuse or reset the breaker if necessary. Check the water supply valve and open the hot water faucet at least 20 inches above the dishwasher's enclosure floor (see the Care and Maintenance section of this manual for instructions...

Use and Care Manual
Page 23
... YOUR DISHWASHER'S MODEL, SERIAL NUMBER, PURCHASE DATE, AND THE SELLER'S NAME AND ADDRESS. *Date of installation shall refer to correct plumbing or the electric wiring in the United Sates or Canada. Statement of the applicable warranty period. EXCLUSIONS: This warranty does not cover service calls or repairs to correct the installation of the dishwasher, to the first using purchaser by Bosch or its...
... YOUR DISHWASHER'S MODEL, SERIAL NUMBER, PURCHASE DATE, AND THE SELLER'S NAME AND ADDRESS. *Date of installation shall refer to correct plumbing or the electric wiring in the United Sates or Canada. Statement of the applicable warranty period. EXCLUSIONS: This warranty does not cover service calls or repairs to correct the installation of the dishwasher, to the first using purchaser by Bosch or its...
Parts List
Page 2
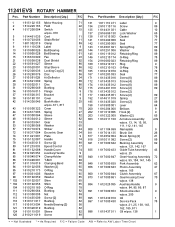
...Service Pack 78 w/pos. 21, 25, 138, 143, 162, 165, 811 898 1 615 437 511 Oil w/pos. 138 1 + = Not Illustrated * = As Required F/C = Failure Code AW = Refer to AW Labor Time Chart Part Number Description {Qty.} F/C 1 1 615 102 155 Motor Housing 71 2 1 614 220 163 Field 22 4 1 617 200 094 Switch 15 w/pos. 818 5 1 614 461 035 Cord...Eccentric Gear 34 74 1 611 921 001 Plate 9 75 1 615 132 087 Handle 74 79 1 613 435 015 Screw {2} 89 80 1 617 233 033 Speed Control 17 81 1 615 132 088 Handle Cover 74 84 1 612 025 054 Auxiliary Handle 9 85 1 618 040 074 Clamp Holder 80 ...
...Service Pack 78 w/pos. 21, 25, 138, 143, 162, 165, 811 898 1 615 437 511 Oil w/pos. 138 1 + = Not Illustrated * = As Required F/C = Failure Code AW = Refer to AW Labor Time Chart Part Number Description {Qty.} F/C 1 1 615 102 155 Motor Housing 71 2 1 614 220 163 Field 22 4 1 617 200 094 Switch 15 w/pos. 818 5 1 614 461 035 Cord...Eccentric Gear 34 74 1 611 921 001 Plate 9 75 1 615 132 087 Handle 74 79 1 613 435 015 Screw {2} 89 80 1 617 233 033 Speed Control 17 81 1 615 132 088 Handle Cover 74 84 1 612 025 054 Auxiliary Handle 9 85 1 618 040 074 Clamp Holder 80 ...

