Owners Manual
Page 1
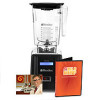
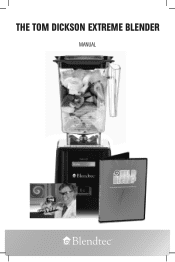
THE TOM DICKSON EXTREME BLENDER MANUAL
THE TOM DICKSON EXTREME BLENDER MANUAL
Owners Manual
Page 2
TABLE OF CONTENTS SECTION SECTION 1: IMPORTANT SAFEGUARDS SECTION 2: UNPACKING SECTION 3: BLENDER OVERVIEW SECTION 4: INSTALLATION SECTION 5: CARE AND CLEANING SECTION 6: OPERATIONAL OVERVIEW SECTION 7: TROUBLESHOOTING SECTION 8: WARRANTY PAGE # 1 3 4 5 9 9 14 15 II
TABLE OF CONTENTS SECTION SECTION 1: IMPORTANT SAFEGUARDS SECTION 2: UNPACKING SECTION 3: BLENDER OVERVIEW SECTION 4: INSTALLATION SECTION 5: CARE AND CLEANING SECTION 6: OPERATIONAL OVERVIEW SECTION 7: TROUBLESHOOTING SECTION 8: WARRANTY PAGE # 1 3 4 5 9 9 14 15 II
Owners Manual
Page 3
... Listing. Keep hands and utensils out of jar while blending to reduce the risk of electrical shock do not put hands into the blender jar or add substances by hand when the blender jar is on or off the motor base. • NEVER place jar into drive socket if blender motor is operating. • DO NOT rock the blender jar during operation. SECTION 1 IMPORTANT SAFEGUARDS READ ALL INSTRUCTIONS CAREFULLY BEFORE USING YOUR The Tom Dickson Extreme Blender...
... Listing. Keep hands and utensils out of jar while blending to reduce the risk of electrical shock do not put hands into the blender jar or add substances by hand when the blender jar is on or off the motor base. • NEVER place jar into drive socket if blender motor is operating. • DO NOT rock the blender jar during operation. SECTION 1 IMPORTANT SAFEGUARDS READ ALL INSTRUCTIONS CAREFULLY BEFORE USING YOUR The Tom Dickson Extreme Blender...
Owners Manual
Page 4
....) • DO NOT permit the cord to service the blender will void the warranty. 1.9 CONTAINER MUST BE PROPERLY IN PLACE WHILE APPLIANCE IS OPERATING 1.10 BLADES ARE SHARP! 1.7 NEVER OPERATE THE BLENDER WITHOUT THE LID IN PLACE 1.8 NEVER OPERATE THE BLENDER USING ATTACHMENTS NOT SOLD BY BLENDTEC The use , before changing blender locations, or cleaning. 1.13 NEVER ATTEMPT TO REPAIR THE POWER UNIT Never remove the blender motor cover. BE CAREFUL NOT TO COME IN CONTACT...
....) • DO NOT permit the cord to service the blender will void the warranty. 1.9 CONTAINER MUST BE PROPERLY IN PLACE WHILE APPLIANCE IS OPERATING 1.10 BLADES ARE SHARP! 1.7 NEVER OPERATE THE BLENDER WITHOUT THE LID IN PLACE 1.8 NEVER OPERATE THE BLENDER USING ATTACHMENTS NOT SOLD BY BLENDTEC The use , before changing blender locations, or cleaning. 1.13 NEVER ATTEMPT TO REPAIR THE POWER UNIT Never remove the blender motor cover. BE CAREFUL NOT TO COME IN CONTACT...
Owners Manual
Page 5
... power cord. 3. Inspect all items to ensure no damage occurred in shipment. 5. If any packing material that may have received the following items: • The Tom Dickson Extreme Blender™ motor base • Black motor stand • Standard blender jar with lid • WILD SIDE™ blender jar with lid • Recipe book 1. Motor Serial #: Found on bottom of motor base) Date of purchase in the space below. You will need these when contacting Blendtec...
... power cord. 3. Inspect all items to ensure no damage occurred in shipment. 5. If any packing material that may have received the following items: • The Tom Dickson Extreme Blender™ motor base • Black motor stand • Standard blender jar with lid • WILD SIDE™ blender jar with lid • Recipe book 1. Motor Serial #: Found on bottom of motor base) Date of purchase in the space below. You will need these when contacting Blendtec...
Owners Manual
Page 6
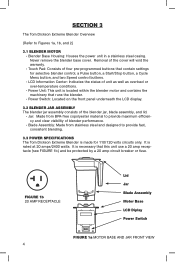
... circuit breaker or fuse. Never remove the blender base cover. SECTION 3 The Tom Dickson Extreme Blender Overview (Refer to provide fast, consistent blending. 3.3 POWER SPECIFICATIONS The Tom Dickson Extreme Blender is made for selective blender control, a Pulse button, a Start/Stop button, a Cycle Menu button, and two Speed control buttons. • LCD Information Center: Indicates the status of blender performance. • Blade Assembly: Made from stainless steel and designed to Figures 1a, 1b, and 2) 3.1 BLENDER MOTOR • Blender Base Housing: Houses the...
... circuit breaker or fuse. Never remove the blender base cover. SECTION 3 The Tom Dickson Extreme Blender Overview (Refer to provide fast, consistent blending. 3.3 POWER SPECIFICATIONS The Tom Dickson Extreme Blender is made for selective blender control, a Pulse button, a Start/Stop button, a Cycle Menu button, and two Speed control buttons. • LCD Information Center: Indicates the status of blender performance. • Blade Assembly: Made from stainless steel and designed to Figures 1a, 1b, and 2) 3.1 BLENDER MOTOR • Blender Base Housing: Houses the...
Owners Manual
Page 7
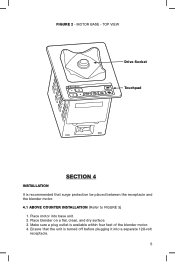
MOTOR BASE - Place motor into a separate 120-volt receptacle. 5 Ensure that surge protection be placed between the receptacle and the blender motor. 4.1 ABOVE COUNTER INSTALLATION (Refer to FIGURE 3) 1. FIGURE 2 - Place blender on a flat, clean, and dry surface. 3. Make sure a plug outlet is turned off before plugging it into base unit. 2. TOP VIEW Drive Socket Touchpad SECTION 4 INSTALLATION It is recommended that the unit is available within four feet of the blender motor. 4.
MOTOR BASE - Place motor into a separate 120-volt receptacle. 5 Ensure that surge protection be placed between the receptacle and the blender motor. 4.1 ABOVE COUNTER INSTALLATION (Refer to FIGURE 3) 1. FIGURE 2 - Place blender on a flat, clean, and dry surface. 3. Make sure a plug outlet is turned off before plugging it into base unit. 2. TOP VIEW Drive Socket Touchpad SECTION 4 INSTALLATION It is recommended that the unit is available within four feet of the blender motor. 4.
Owners Manual
Page 9
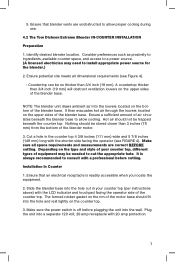
... operator side of the motor base should not be no thicker than 3/4 inch (19 mm). Installation In Counter 1. A countertop thicker than 3 inches (76 mm) from the bottom of equipment may need to allow proper cooling during use. 4.2 The Tom Dickson Extreme Blender IN-COUNTER INSTALLATION Preparation 1. Cut a hole in your counter top, different types of the blender motor. 3. Depending on the type and style of the blender base...
... operator side of the motor base should not be no thicker than 3/4 inch (19 mm). Installation In Counter 1. A countertop thicker than 3 inches (76 mm) from the bottom of equipment may need to allow proper cooling during use. 4.2 The Tom Dickson Extreme Blender IN-COUNTER INSTALLATION Preparation 1. Cut a hole in your counter top, different types of the blender motor. 3. Depending on the type and style of the blender base...
Owners Manual
Page 10
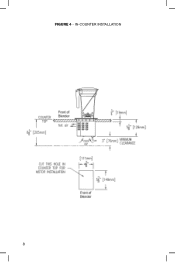
IN-COUNTER INSTALLATION 8 FIGURE 4 -
IN-COUNTER INSTALLATION 8 FIGURE 4 -
Owners Manual
Page 11
... seconds to the jar. Turn jar RIGHT SIDE UP on top of the lid, press the PULSE button for your convenience, as well as this will reduce the life of liquid chlorine bleach. 3. Rinse with your hand placed on dish rack until all soap is rinsed from jar and lid. 4. Clean the blender base by warranty. • NEVER submerge the blender motor in blender jar for more...
... seconds to the jar. Turn jar RIGHT SIDE UP on top of the lid, press the PULSE button for your convenience, as well as this will reduce the life of liquid chlorine bleach. 3. Rinse with your hand placed on dish rack until all soap is rinsed from jar and lid. 4. Clean the blender base by warranty. • NEVER submerge the blender motor in blender jar for more...
Owners Manual
Page 12
... AND CUSTOM CONTROL PRESETS BUTTONS - 1, 2, 3, 4: The four numbered buttons on the left side of the available 10 speed settings. To stop the current blender function. 6.1 BEFORE YOU BEGIN OPERATION 1. Place the blender jar on the front of these presets, simply press the designated button. Turn on the main power switch located on the base, making sure the jar is pushed the motor will begin . The pulse function can...
... AND CUSTOM CONTROL PRESETS BUTTONS - 1, 2, 3, 4: The four numbered buttons on the left side of the available 10 speed settings. To stop the current blender function. 6.1 BEFORE YOU BEGIN OPERATION 1. Place the blender jar on the front of these presets, simply press the designated button. Turn on the main power switch located on the base, making sure the jar is pushed the motor will begin . The pulse function can...
Owners Manual
Page 13
... through the blend cycles listed in the FOOD PROCESSING category (Chop, Whip, and Puree) function similar to program your blender, contact Blendtec customer service at 800-253-6383 for assistance. 6.4 RESTORING FACTORY DEFAULTS The Tom Dickson Extreme Blender has the following blend cycles set as you want to save any of the pre-programmed blend cycles. PROGRAMMING A PRESET BUTTON (Button 1-4): For blend cycles you use , press the START/ STOP button. If...
... through the blend cycles listed in the FOOD PROCESSING category (Chop, Whip, and Puree) function similar to program your blender, contact Blendtec customer service at 800-253-6383 for assistance. 6.4 RESTORING FACTORY DEFAULTS The Tom Dickson Extreme Blender has the following blend cycles set as you want to save any of the pre-programmed blend cycles. PROGRAMMING A PRESET BUTTON (Button 1-4): For blend cycles you use , press the START/ STOP button. If...
Owners Manual
Page 14
... needs to match the blending needs of the type of product being made (see pulse instructions for use. It is complete, the display will take longer to blend and need to these settings, press and hold preset button 4 and the START/STOP button. Now play the same 12 BLEND CYCLES* CATEGORIES Beverages Drinks/Ice Cream Whole Foods Food Processing Multi-Use Smoothie Ice Cappuccino Light Juice *Chop Low Energy XL Smoothie Ice...
... needs to match the blending needs of the type of product being made (see pulse instructions for use. It is complete, the display will take longer to blend and need to these settings, press and hold preset button 4 and the START/STOP button. Now play the same 12 BLEND CYCLES* CATEGORIES Beverages Drinks/Ice Cream Whole Foods Food Processing Multi-Use Smoothie Ice Cappuccino Light Juice *Chop Low Energy XL Smoothie Ice...
Owners Manual
Page 15
... ice and the amount of liquid in the various foods used in a recipe will be different depending on the type of foods the blend cycle is why you may need to adjust certain recipes to handle, it produce consistent results across a wider range of food items than any other home blender. You will create different blending characteristics. The Tom Dickson Extreme Blender was designed with many different food items...
... ice and the amount of liquid in the various foods used in a recipe will be different depending on the type of foods the blend cycle is why you may need to adjust certain recipes to handle, it produce consistent results across a wider range of food items than any other home blender. You will create different blending characteristics. The Tom Dickson Extreme Blender was designed with many different food items...
Owners Manual
Page 16
... speed motor, patented WILDSIDE jar, single prong wingtip blade, direct drive coupling, and computer controlled blend cycles. An absence of a lit LCD indicates a lack of the blade. The blender has been disabled until the unit cools to the motor sound without a jar attached. Listen to operating temperatures. Allow it is overheating. Check the blender jar for blockage of power to the unit. the difference in the unit and turn...
... speed motor, patented WILDSIDE jar, single prong wingtip blade, direct drive coupling, and computer controlled blend cycles. An absence of a lit LCD indicates a lack of the blade. The blender has been disabled until the unit cools to the motor sound without a jar attached. Listen to operating temperatures. Allow it is overheating. Check the blender jar for blockage of power to the unit. the difference in the unit and turn...
Owners Manual
Page 17
... jar assembly, including all moving jar parts, is unsurpassed. Warranties begin from the Tom Dickson Extreme Blender. And we expect you have been or used . Warranties begin from date of wonderful and reliable service from the date of Blendtec blenders is covered against leaking or breakage for a few seconds using the PULSE button. • Jar: Check to determine whether the sound changes as different jars are not included under this warranty. Run the motor...
... jar assembly, including all moving jar parts, is unsurpassed. Warranties begin from the Tom Dickson Extreme Blender. And we expect you have been or used . Warranties begin from date of wonderful and reliable service from the date of Blendtec blenders is covered against leaking or breakage for a few seconds using the PULSE button. • Jar: Check to determine whether the sound changes as different jars are not included under this warranty. Run the motor...

Owners Manual
Page 18
... number: (located on the jars. Limited Ten Year Warranty Blendtec warrants the blender motor to be free of defect in duration to a period of ten years on the motor and three years on the bottom of the blender motor base) Cycle Count (from the LCD indicator): Your purchase date: Place of purchase: An explanation of the problem: OUT OF WARRANTY 1. This warranty does not cover...
... number: (located on the jars. Limited Ten Year Warranty Blendtec warrants the blender motor to be free of defect in duration to a period of ten years on the motor and three years on the bottom of the blender motor base) Cycle Count (from the LCD indicator): Your purchase date: Place of purchase: An explanation of the problem: OUT OF WARRANTY 1. This warranty does not cover...
Owners Manual
Page 19
up the blender motor and ship it to Blendtec. You will be billed for services rendered. 3. INSTRUCTIONS THAT APPEAR IN THIS USER GUIDE ARE NOT MEANT TO COVER EVERY POSSIBLE CONDITION OR SITUATION THAT MAY OCCUR. M-F from the LCD indicator): Your purchase date: Place of purchase: An explanation of the problem: FOR QUESTIONS REGARDING THIS WARRANTY CONTACT CUSTOMER SERVICE AT (800) 253-6383...
up the blender motor and ship it to Blendtec. You will be billed for services rendered. 3. INSTRUCTIONS THAT APPEAR IN THIS USER GUIDE ARE NOT MEANT TO COVER EVERY POSSIBLE CONDITION OR SITUATION THAT MAY OCCUR. M-F from the LCD indicator): Your purchase date: Place of purchase: An explanation of the problem: FOR QUESTIONS REGARDING THIS WARRANTY CONTACT CUSTOMER SERVICE AT (800) 253-6383...

Owners Manual
Page 20
blendtec.com OWN-RD-041 Manual, The Tom Dickson Extreme Blender v1 May 10 1206 South 1680 West Orem, UT 84058 801-222-0888 www.
blendtec.com OWN-RD-041 Manual, The Tom Dickson Extreme Blender v1 May 10 1206 South 1680 West Orem, UT 84058 801-222-0888 www.

