Owners Manual
Page 2
... 7 2.1 UNPACKING YOUR BLENDER 2.2 RECORDING YOUR SERIAL NUMBER AND DATE OF PURCHASE SECTION 3 - CARE AND CLEANING 14 6.1 AFTER USE CLEANING 6.2 LONG-TERM SANITATION 6.3 CLEANING TIPS AND CAUTIONS SECTION 7 - Table of Contents SECTION 1 - INSTALLATION 8 SECTION 5 - BLENDER OVERVIEW 7 3.1 BLENDER MOTOR 3.2 BLENDER JAR ASSEMBLY SECTION 4 - WARRANTY 16 TROUBLESHOOTING 14 7.1 BLENDED TEXTURE UNSATISFACTORY 7.2 BLENDER MOTOR WILL NOT TURN ON 7.3 NOISE LEVEL CHANGES SECTION 8 - OPERATIONAL OVERVIEW 8 5.1 MAIN POINTS OF OPERATION 5.2 AUTOMATIC CYCLE OPERATION 5.3 BLEND CYCLES SECTION...
... 7 2.1 UNPACKING YOUR BLENDER 2.2 RECORDING YOUR SERIAL NUMBER AND DATE OF PURCHASE SECTION 3 - CARE AND CLEANING 14 6.1 AFTER USE CLEANING 6.2 LONG-TERM SANITATION 6.3 CLEANING TIPS AND CAUTIONS SECTION 7 - Table of Contents SECTION 1 - INSTALLATION 8 SECTION 5 - BLENDER OVERVIEW 7 3.1 BLENDER MOTOR 3.2 BLENDER JAR ASSEMBLY SECTION 4 - WARRANTY 16 TROUBLESHOOTING 14 7.1 BLENDED TEXTURE UNSATISFACTORY 7.2 BLENDER MOTOR WILL NOT TURN ON 7.3 NOISE LEVEL CHANGES SECTION 8 - OPERATIONAL OVERVIEW 8 5.1 MAIN POINTS OF OPERATION 5.2 AUTOMATIC CYCLE OPERATION 5.3 BLEND CYCLES SECTION...
Owners Manual
Page 3
IMPORTANT SAFEGUARDS IMPORTANT INFORMATION Following these instructions will help prevent injuries and damage to a Blendtec service agent immediately for examination, repair, electrical or mechanical adjustment, or possible replacement. 1.3 NEVER OPERATE BLENDER IN LIQUID To protect against the risk of electrical shock do not put hands into or remove from the drive socket and blender jar blades during operation. 1.2 NEVER OPERATE THE BLENDER IF IT APPEARS DAMAGED If the...
IMPORTANT SAFEGUARDS IMPORTANT INFORMATION Following these instructions will help prevent injuries and damage to a Blendtec service agent immediately for examination, repair, electrical or mechanical adjustment, or possible replacement. 1.3 NEVER OPERATE BLENDER IN LIQUID To protect against the risk of electrical shock do not put hands into or remove from the drive socket and blender jar blades during operation. 1.2 NEVER OPERATE THE BLENDER IF IT APPEARS DAMAGED If the...
Owners Manual
Page 4
... POWER CORD PRECAUTIONS • NEVER operate with lid • Fresh Blends recipe book • Owner's manual 2.2 RECORDING YOUR SERIAL NUMBER AND DATE OF PURCHASE Record your Blendtec service agent immediately. Removing the cover or attempting to service the blender will heat the contents. ANY USE OF THE BLENDER FOR COMMERCIAL PURPOSES VOIDS ALL WARRANTIES SAVE THESE INSTRUCTIONS FOR FUTURE REFERENCE SECTION 2 - Inspect all service adjustments. The vented lid will need these when contacting Blendtec for service...
... POWER CORD PRECAUTIONS • NEVER operate with lid • Fresh Blends recipe book • Owner's manual 2.2 RECORDING YOUR SERIAL NUMBER AND DATE OF PURCHASE Record your Blendtec service agent immediately. Removing the cover or attempting to service the blender will heat the contents. ANY USE OF THE BLENDER FOR COMMERCIAL PURPOSES VOIDS ALL WARRANTIES SAVE THESE INSTRUCTIONS FOR FUTURE REFERENCE SECTION 2 - Inspect all service adjustments. The vented lid will need these when contacting Blendtec for service...
Owners Manual
Page 5
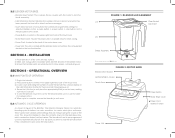
... the jar couples with the blender motor and contains the computerized electronics that will change during use the slider for manual control. 6. Place blender on the upper right hand side of the touch area. • Motor Base Cover: Houses the power unit in back Power Unit 9 OPERATIONAL OVERVIEW 5.1 MAIN POINTS OF OPERATION 1. To start the blender, touch the icon for selective blender control, a pulse button, a power button, a stop button. 8 FIGURE 1: BLENDER JAR ASSEMBLY Lid Clear Vented Cap Insert Jar Blade Assembly The jar shown...
... the jar couples with the blender motor and contains the computerized electronics that will change during use the slider for manual control. 6. Place blender on the upper right hand side of the touch area. • Motor Base Cover: Houses the power unit in back Power Unit 9 OPERATIONAL OVERVIEW 5.1 MAIN POINTS OF OPERATION 1. To start the blender, touch the icon for selective blender control, a pulse button, a power button, a stop button. 8 FIGURE 1: BLENDER JAR ASSEMBLY Lid Clear Vented Cap Insert Jar Blade Assembly The jar shown...
Owners Manual
Page 6
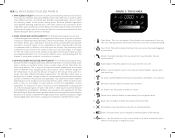
... Total Blender Designer Series derives its unique combination of blending tasks. Smoothie: Use this button at the difference in understanding what is designed for a wide range of high-speed motor, patented square jar, single prong wingtip blade, direct drive coupling, and computer-controlled blend cycles. 10 FIGURE 3: TOUCH AREA 12 34 5 6 7 8 9 10 12 11 13 1. You will create different blending characteristics. Pulse: Use this button to match the blending needs of commercial results...
... Total Blender Designer Series derives its unique combination of blending tasks. Smoothie: Use this button at the difference in understanding what is designed for a wide range of high-speed motor, patented square jar, single prong wingtip blade, direct drive coupling, and computer-controlled blend cycles. 10 FIGURE 3: TOUCH AREA 12 34 5 6 7 8 9 10 12 11 13 1. You will create different blending characteristics. Pulse: Use this button to match the blending needs of commercial results...
Owners Manual
Page 7
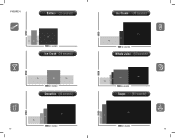
FIGURE 4 Batters (23 seconds) SPEED 3s 4s 2s 14s TIME (in seconds) Ice Crush (35 seconds) SPEED 15s 10s 10s TIME (in seconds) Smoothie (40 seconds) SPEED 24s 3s 10s 3s TIME (in seconds) 12 SPEED SPEED SPEED Ice Cream (45 seconds) 27s 3s 15s TIME (in seconds) Whole Juice (50 seconds) 20s 2s 16s 10s 2s TIME (in seconds) Soups (90 seconds) 85s 3s 2s TIME (in seconds) 13
FIGURE 4 Batters (23 seconds) SPEED 3s 4s 2s 14s TIME (in seconds) Ice Crush (35 seconds) SPEED 15s 10s 10s TIME (in seconds) Smoothie (40 seconds) SPEED 24s 3s 10s 3s TIME (in seconds) 12 SPEED SPEED SPEED Ice Cream (45 seconds) 27s 3s 15s TIME (in seconds) Whole Juice (50 seconds) 20s 2s 16s 10s 2s TIME (in seconds) Soups (90 seconds) 85s 3s 2s TIME (in seconds) 13

Owners Manual
Page 8
... the stop button to determine whether the sound changes as different jars are never colder than one teaspoon (5 ml)of liquid chlorine bleach. 3. We do the following : • Determine if the Power Button is still visible. This problem can be used in the recipe are used. Absence of a lit Power Button indicates a lack of the touch area. • Unplug the power cord from jar and lid...
... the stop button to determine whether the sound changes as different jars are never colder than one teaspoon (5 ml)of liquid chlorine bleach. 3. We do the following : • Determine if the Power Button is still visible. This problem can be used in the recipe are used. Absence of a lit Power Button indicates a lack of the touch area. • Unplug the power cord from jar and lid...
Owners Manual
Page 9
... issues can be repaired or the product replaced at no cost. This warranty does not cover damage caused by unauthorized service agencies, units that have modifications, or have it repaired, please call customer service with a description of the problem 17 Repairs made by proof of defect in for the warranty period. Cosmetic damage and abuse are limited in duration to do your Blendtec Total Blender Designer Series...
... issues can be repaired or the product replaced at no cost. This warranty does not cover damage caused by unauthorized service agencies, units that have modifications, or have it repaired, please call customer service with a description of the problem 17 Repairs made by proof of defect in for the warranty period. Cosmetic damage and abuse are limited in duration to do your Blendtec Total Blender Designer Series...
Owners Manual
Page 10
Products intended for will void the warranty. 18 Using a machine outside the United States and Canada are only covered by U.S. Products used or sold outside the country it was designed for sale in the United States and Canada are subject to the applicable international warranty and service procedures. and Canadian warranty, repair policies, and procedures.
Products intended for will void the warranty. 18 Using a machine outside the United States and Canada are only covered by U.S. Products used or sold outside the country it was designed for sale in the United States and Canada are subject to the applicable international warranty and service procedures. and Canadian warranty, repair policies, and procedures.

Owners Manual
Page 11
1206 South 1680 West Orem, Utah 84058 U�S�A� 1-801-222-0888 blendtec�com ©2011 K-TEC, INC�, All Rights Reserved� Blendtec is a registered trademark of K-TEC, INC� OWN-RE-074 Manual, Owner's, Total Blender Designer Series Rev 01
1206 South 1680 West Orem, Utah 84058 U�S�A� 1-801-222-0888 blendtec�com ©2011 K-TEC, INC�, All Rights Reserved� Blendtec is a registered trademark of K-TEC, INC� OWN-RE-074 Manual, Owner's, Total Blender Designer Series Rev 01


