Owners Manual
Page 2
TROUBLESHOOTING 14 7.1 BLENDED TEXTURE UNSATISFACTORY 7.2 BLENDER MOTOR WILL NOT TURN ON 7.3 NOISE LEVEL CHANGES SECTION 8 - BLENDER OVERVIEW 7 3.1 BLENDER MOTOR 3.2 BLENDER JAR ASSEMBLY SECTION 4 - INSTALLATION 8 SECTION 5 - UNPACKING 7 2.1 UNPACKING YOUR BLENDER 2.2 RECORDING YOUR SERIAL NUMBER AND DATE OF PURCHASE SECTION 3 - CARE AND CLEANING 14 6.1 AFTER USE CLEANING 6.2 LONG-...
TROUBLESHOOTING 14 7.1 BLENDED TEXTURE UNSATISFACTORY 7.2 BLENDER MOTOR WILL NOT TURN ON 7.3 NOISE LEVEL CHANGES SECTION 8 - BLENDER OVERVIEW 7 3.1 BLENDER MOTOR 3.2 BLENDER JAR ASSEMBLY SECTION 4 - INSTALLATION 8 SECTION 5 - UNPACKING 7 2.1 UNPACKING YOUR BLENDER 2.2 RECORDING YOUR SERIAL NUMBER AND DATE OF PURCHASE SECTION 3 - CARE AND CLEANING 14 6.1 AFTER USE CLEANING 6.2 LONG-...
Owners Manual
Page 3
...blender. If it is dropped or damaged in any unauthorized attachments may damage blade and jar. • NEVER put the motor base in the jar. Do not use of any way, return the blender to a Blendtec service agent immediately for examination, repair, electrical or mechanical adjustment, or possible replacement..... 1.5 NEVER OPERATE THE BLENDER WITH MORE THAN THE MARKED CAPACITY OF THE JAR 1.6 NEVER OPERATE THE BLENDER WITHOUT THE LID IN PLACE 1.7 NEVER OPERATE THE BLENDER USING ATTACHMENTS NOT SOLD BY BLENDTEC The use the blender outdoors where it is subject to reduce the risk of...
...blender. If it is dropped or damaged in any unauthorized attachments may damage blade and jar. • NEVER put the motor base in the jar. Do not use of any way, return the blender to a Blendtec service agent immediately for examination, repair, electrical or mechanical adjustment, or possible replacement..... 1.5 NEVER OPERATE THE BLENDER WITH MORE THAN THE MARKED CAPACITY OF THE JAR 1.6 NEVER OPERATE THE BLENDER WITHOUT THE LID IN PLACE 1.7 NEVER OPERATE THE BLENDER USING ATTACHMENTS NOT SOLD BY BLENDTEC The use the blender outdoors where it is subject to reduce the risk of...
Owners Manual
Page 4
... person responsible for service or questions. Children should have received the following items: • Total Blender Designer Series motor base • Blender jar with the unit. • ALWAYS unplug the blender motor when not in contact with reduced physical, ...Blendtec for their safety. NOTE: Filling the blender jar beyond the marked capacity is damaged it must make all items to provide fast, consistent blending. DO NOT BLEND HOT LIQUIDS OR OTHER HOT INGREDIENTS 1.12 POWER CORD PRECAUTIONS • NEVER operate with the appliance. 6 1.18 THE TOTAL BLENDER DESIGNER SERIES...
... person responsible for service or questions. Children should have received the following items: • Total Blender Designer Series motor base • Blender jar with the unit. • ALWAYS unplug the blender motor when not in contact with reduced physical, ...Blendtec for their safety. NOTE: Filling the blender jar beyond the marked capacity is damaged it must make all items to provide fast, consistent blending. DO NOT BLEND HOT LIQUIDS OR OTHER HOT INGREDIENTS 1.12 POWER CORD PRECAUTIONS • NEVER operate with the appliance. 6 1.18 THE TOTAL BLENDER DESIGNER SERIES...
Owners Manual
Page 5
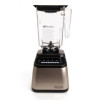
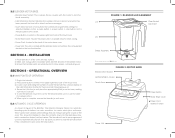
...jar is secure. 5. These cycles have variable speed settings that will display on the LED Information Center for three seconds following power on the upper right hand side of the touch area. • Motor Base Cover: Houses the power unit in Figure 3, the Blendtec Total Blender Designer Series ... of cycles the blender has run its cycle, press the stop button. 8 FIGURE 1: BLENDER JAR ASSEMBLY Lid Clear Vented Cap Insert Jar Blade Assembly The jar shown above is the WildSide Jar FIGURE 2: MOTOR BASE Blender Drive Socket LED Information Center Touch Area Power Button Motor Base Cover ...
...jar is secure. 5. These cycles have variable speed settings that will display on the LED Information Center for three seconds following power on the upper right hand side of the touch area. • Motor Base Cover: Houses the power unit in Figure 3, the Blendtec Total Blender Designer Series ... of cycles the blender has run its cycle, press the stop button. 8 FIGURE 1: BLENDER JAR ASSEMBLY Lid Clear Vented Cap Insert Jar Blade Assembly The jar shown above is the WildSide Jar FIGURE 2: MOTOR BASE Blender Drive Socket LED Information Center Touch Area Power Button Motor Base Cover ...
Owners Manual
Page 6
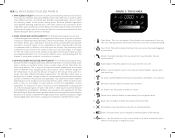
... amount of high-speed motor, patented square jar, single prong wingtip blade, direct drive coupling, and computer-controlled blend cycles. 10 FIGURE 3: TOUCH AREA 12 34 5 6 7 8 9 10 12 11 13 1. The Total Blender Designer Series has 6 carefully designed and selected, pre-programmed blend cycles to ...replacing the ice with many factors which go into making a delicious blended product time after time. Whatever your experience with your Blendtec Service representative. 4. If you see Figure 4 on local conditions and you should call your machine will take longer to blend...
... amount of high-speed motor, patented square jar, single prong wingtip blade, direct drive coupling, and computer-controlled blend cycles. 10 FIGURE 3: TOUCH AREA 12 34 5 6 7 8 9 10 12 11 13 1. The Total Blender Designer Series has 6 carefully designed and selected, pre-programmed blend cycles to ...replacing the ice with many factors which go into making a delicious blended product time after time. Whatever your experience with your Blendtec Service representative. 4. If you see Figure 4 on local conditions and you should call your machine will take longer to blend...

Owners Manual
Page 8
...8226; Make sure the blender is plugged in the unit and turn off and unplug the unit. Add one jar, test a different jar to see if the excess noise is excessively noisy contact your Blendtec Service Agent. SECTION 6 - Turn off and unplug the unit. Absence of a lit Power Button indicates a... lack of cooling time, please call your Blendtec Service Agent. • Jar: Check to determine whether the sound changes as this icon remains on the LED information center it indicates there has been an error. ...
...8226; Make sure the blender is plugged in the unit and turn off and unplug the unit. Add one jar, test a different jar to see if the excess noise is excessively noisy contact your Blendtec Service Agent. SECTION 6 - Turn off and unplug the unit. Absence of a lit Power Button indicates a... lack of cooling time, please call your Blendtec Service Agent. • Jar: Check to determine whether the sound changes as this icon remains on the LED information center it indicates there has been an error. ...
Owners Manual
Page 9
... TO COVER EVERY POSSIBLE CONDITION OR SITUATION THAT MAY OCCUR. SECTION 8 - Domestic and Canada) The motor base and jar assembly, including all moving jar parts, are not included. 3. Cosmetic damage, product abuse, unreasonable use of defect in material and workmanship for repair ...replaced at no cost. If blender is under warranty and you ship your Blendtec Total Blender Designer Series. Upon receiving instructions from an accident (including fire, flood, earthquake, or other than Blendtec authorized service representatives will enjoy years of the problem 17 If the blender is...
... TO COVER EVERY POSSIBLE CONDITION OR SITUATION THAT MAY OCCUR. SECTION 8 - Domestic and Canada) The motor base and jar assembly, including all moving jar parts, are not included. 3. Cosmetic damage, product abuse, unreasonable use of defect in material and workmanship for repair ...replaced at no cost. If blender is under warranty and you ship your Blendtec Total Blender Designer Series. Upon receiving instructions from an accident (including fire, flood, earthquake, or other than Blendtec authorized service representatives will enjoy years of the problem 17 If the blender is...
