Type 1 Manual - WM125
Page 2
...without the safety alert symbol indicates a potentially hazardous situation which , if not avoided, will need a hammer, flat bladed screwdriver and the provided nut driver part (U). 90555796 WM125.qxd:??????-00 BDL500 laser 9/25/09 12:44 PM Page 2 Workmate® Work Center Warnings: 1. Do not load with more than 350 pounds. (...death or serious injury. WARNING: Indicates a potentially hazardous situation which could result in vise jaws; Assembly Instructions ® NOTE: For assembly of the WM125 Workmate you recognize this manual. Assembly time is a foot REST only. 4.
...without the safety alert symbol indicates a potentially hazardous situation which , if not avoided, will need a hammer, flat bladed screwdriver and the provided nut driver part (U). 90555796 WM125.qxd:??????-00 BDL500 laser 9/25/09 12:44 PM Page 2 Workmate® Work Center Warnings: 1. Do not load with more than 350 pounds. (...death or serious injury. WARNING: Indicates a potentially hazardous situation which could result in vise jaws; Assembly Instructions ® NOTE: For assembly of the WM125 Workmate you recognize this manual. Assembly time is a foot REST only. 4.

Type 1 Manual - WM125
Page 3
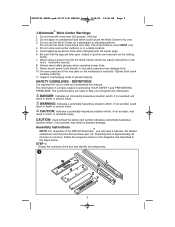
90555796 WM125.qxd:??????-00 BDL500 laser 9/25/09 12:44 PM Page 3 STEP 2: • Empty the contents of the parts pack and identify all components. 2 STEP 3: • Guide carriage bolt (D) through slot in vise bracket of assembly (L), spacer (F) outer leg (T) and secure with Pan Head bolt, M6 x 30mm (C) and M6 nut (A). Use flat bladed screwdriver and nut driver (U) to secure. 3 Repeat this step using assembly (R). 3 E E T FF T R D D STEP 4: 4 • Place the rear bracket (Z) over the legs, align holes and secure with locking knob (E).
90555796 WM125.qxd:??????-00 BDL500 laser 9/25/09 12:44 PM Page 3 STEP 2: • Empty the contents of the parts pack and identify all components. 2 STEP 3: • Guide carriage bolt (D) through slot in vise bracket of assembly (L), spacer (F) outer leg (T) and secure with Pan Head bolt, M6 x 30mm (C) and M6 nut (A). Use flat bladed screwdriver and nut driver (U) to secure. 3 Repeat this step using assembly (R). 3 E E T FF T R D D STEP 4: 4 • Place the rear bracket (Z) over the legs, align holes and secure with locking knob (E).
Type 1 Manual - WM125
Page 7
... this tool could be replaced or repaired at our option. FREE WARNING LABEL REPLACEMENT: If your local service location, refer to a Black & Decker owned or authorized Service Center for repair or replacement at no charge in either of two ways. Towson, MD 21286 U.S.A. 7 See... parts, contact the Black & Decker location nearest you may be required.Black & Decker owned and authorized Service Centers are beyond the time set for exchanges. SERVICE INFORMATION All Black & Decker Service Centers are staffed with trained personnel to a maximum of the vise jaws. 90555796 WM125.qxd...
... this tool could be replaced or repaired at our option. FREE WARNING LABEL REPLACEMENT: If your local service location, refer to a Black & Decker owned or authorized Service Center for repair or replacement at no charge in either of two ways. Towson, MD 21286 U.S.A. 7 See... parts, contact the Black & Decker location nearest you may be required.Black & Decker owned and authorized Service Centers are beyond the time set for exchanges. SERVICE INFORMATION All Black & Decker Service Centers are staffed with trained personnel to a maximum of the vise jaws. 90555796 WM125.qxd...
