Type 1 Manual - WM125
Page 1
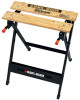
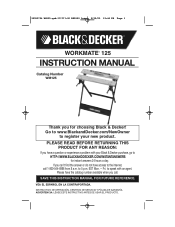
...® 125 INSTRUCTION MANUAL Catalog Number WM125 Thank you for instant answers 24 hours a day. PLEASE READ BEFORE RETURNING THIS PRODUCT FOR ANY REASON: If you call 1-800-544-6986 from 8 a.m. SAVE THIS INSTRUCTION MANUAL FOR FUTURE REFERENCE. VEA EL ESPAÑOL EN LA CONTRAPORTADA. to HTTP://WWW.BLACKANDDECKER.COM/INSTANTANSWERS for choosing Black & Decker! Go to...
...® 125 INSTRUCTION MANUAL Catalog Number WM125 Thank you for instant answers 24 hours a day. PLEASE READ BEFORE RETURNING THIS PRODUCT FOR ANY REASON: If you call 1-800-544-6986 from 8 a.m. SAVE THIS INSTRUCTION MANUAL FOR FUTURE REFERENCE. VEA EL ESPAÑOL EN LA CONTRAPORTADA. to HTTP://WWW.BLACKANDDECKER.COM/INSTANTANSWERS for choosing Black & Decker! Go to...
Type 1 Manual - WM125
Page 2
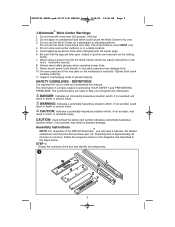
.... 1 2 Tighten both crank handles uniformly. 11. The information it contains relates to protecting YOUR SAFETY and PREVENTING PROBLEMS. The symbols below . DANGER: Indicates an imminently hazardous situation which , if not avoided, may damage tools. 10. CAUTION: Indicates a potentially hazardous situation which , if not avoided, will need a hammer, flat bladed screwdriver and the provided nut driver part (U). Be sure that the legs are used...
.... 1 2 Tighten both crank handles uniformly. 11. The information it contains relates to protecting YOUR SAFETY and PREVENTING PROBLEMS. The symbols below . DANGER: Indicates an imminently hazardous situation which , if not avoided, may damage tools. 10. CAUTION: Indicates a potentially hazardous situation which , if not avoided, will need a hammer, flat bladed screwdriver and the provided nut driver part (U). Be sure that the legs are used...

Type 1 Manual - WM125
Page 3
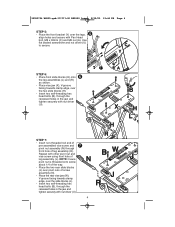
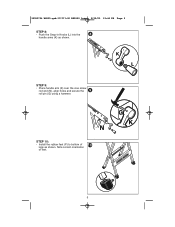
Use flat bladed screwdriver and nut driver (U) to secure. 3 90555796 WM125.qxd:??????-00 BDL500 laser 9/25/09 12:44 PM Page 3 STEP 2: • Empty the contents of the parts pack and identify all components. 2 STEP 3: • Guide carriage bolt (D) through slot in vise bracket of assembly (L), spacer (F) outer leg (T) and secure with Pan Head bolt, M6 x 30mm (C) and M6 nut (A). Repeat this step using assembly (R). 3 E E T FF T R D D STEP 4: 4 • Place the rear bracket (Z) over the legs, align holes and secure with locking knob (E).
Use flat bladed screwdriver and nut driver (U) to secure. 3 90555796 WM125.qxd:??????-00 BDL500 laser 9/25/09 12:44 PM Page 3 STEP 2: • Empty the contents of the parts pack and identify all components. 2 STEP 3: • Guide carriage bolt (D) through slot in vise bracket of assembly (L), spacer (F) outer leg (T) and secure with Pan Head bolt, M6 x 30mm (C) and M6 nut (A). Repeat this step using assembly (R). 3 E E T FF T R D D STEP 4: 4 • Place the rear bracket (Z) over the legs, align holes and secure with locking knob (E).
Type 1 Manual - WM125
Page 4
... (R) as shown. • Place vise jaw (X), V-groove facing towards clamp edge, over the slide blocks (J). • Insert two self-threading hex head bolts (B), through the recessed holes in the jaw and tighten securely with other pivot nut and vise screw using front hole of leg assembly (R). 90555796 WM125.qxd:??????-00 BDL500 laser 9/25/09 12:44 PM Page 4 STEP 5: • Place the...
... (R) as shown. • Place vise jaw (X), V-groove facing towards clamp edge, over the slide blocks (J). • Insert two self-threading hex head bolts (B), through the recessed holes in the jaw and tighten securely with other pivot nut and vise screw using front hole of leg assembly (R). 90555796 WM125.qxd:??????-00 BDL500 laser 9/25/09 12:44 PM Page 4 STEP 5: • Place the...
Type 1 Manual - WM125
Page 5
STEP 10: • Install the rubber feet (P) to bottom of feet. 5 STEP 9: • Place handle arm (K) over the vise screw rod end (N), align holes and secure the 9 roll pin (G) using a hammer. 90555796 WM125.qxd:??????-00 BDL500 laser 9/25/09 12:44 PM Page 5 STEP 8: • Push the Snap-in Knobs (L) into the 8 handle arms (K) as shown. Note correct orientation of 10 legs as shown.
STEP 10: • Install the rubber feet (P) to bottom of feet. 5 STEP 9: • Place handle arm (K) over the vise screw rod end (N), align holes and secure the 9 roll pin (G) using a hammer. 90555796 WM125.qxd:??????-00 BDL500 laser 9/25/09 12:44 PM Page 5 STEP 8: • Push the Snap-in Knobs (L) into the 8 handle arms (K) as shown. Note correct orientation of 10 legs as shown.
Type 1 Manual - WM125
Page 6
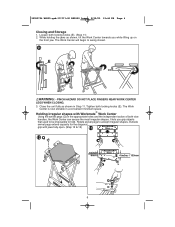
... PLACE FINGERS NEAR WORK CENTER LEGS WHEN CLOSING. 3. 90555796 WM125.qxd:??????-00 BDL500 laser 9/25/09 12:44 PM Page 6 Closing and Storage 1. Close the unit fully as shown, tilt the Work Center towards you grip objects that used to be impossible ...Using the swivel pegs (Q) in a convenient minimum space. While holding the jaws as shown in Step 11. Holding irregular shapes with jaws fully open. (Step 12 & 13) 13 12 6 Loosen both vise handles, the Work Center can secure the most irregular shapes. It lets you while lifting up on the front jaw. Tighten both locking knobs...
... PLACE FINGERS NEAR WORK CENTER LEGS WHEN CLOSING. 3. 90555796 WM125.qxd:??????-00 BDL500 laser 9/25/09 12:44 PM Page 6 Closing and Storage 1. Close the unit fully as shown, tilt the Work Center towards you grip objects that used to be impossible ...Using the swivel pegs (Q) in a convenient minimum space. While holding the jaws as shown in Step 11. Holding irregular shapes with jaws fully open. (Step 12 & 13) 13 12 6 Loosen both vise handles, the Work Center can secure the most irregular shapes. It lets you while lifting up on the front jaw. Tighten both locking knobs...
Type 1 Manual - WM125
Page 7
... 90 days after the sale). WARNING: The use of two ways. To find your local service location, refer to the yellow page directory under "Tools-Electric" in either of any accessory not recommended for warranty information. This warranty gives you specific legal rights and you need technical advice, repair, or genuine factory replacement parts, contact the Black & Decker location nearest you perform a complete range...
... 90 days after the sale). WARNING: The use of two ways. To find your local service location, refer to the yellow page directory under "Tools-Electric" in either of any accessory not recommended for warranty information. This warranty gives you specific legal rights and you need technical advice, repair, or genuine factory replacement parts, contact the Black & Decker location nearest you perform a complete range...


