

Type 1 Manual - TR116
Page 1
... with your new product. POUR LE FRANÇAIS, VOIR LA COUVERTURE ARRIÈRE. PLEASE READ BEFORE RETURNING THIS PRODUCT FOR ANY REASON: If you have the catalog number available when you...TRIMMER INSTRUCTION MANUAL Model Numbers TR116, TR117 Thank you for proper attachment. • In order to operate the trimmer, the lock button must first be pulled back (see figure C for choosing Black & Decker! Please have a question or experience a problem with an agent. KEY INFORMATION YOU SHOULD KNOW: • To insure extension cord does not come loose see figure D) then squeeze trigger...
... with your new product. POUR LE FRANÇAIS, VOIR LA COUVERTURE ARRIÈRE. PLEASE READ BEFORE RETURNING THIS PRODUCT FOR ANY REASON: If you have the catalog number available when you...TRIMMER INSTRUCTION MANUAL Model Numbers TR116, TR117 Thank you for proper attachment. • In order to operate the trimmer, the lock button must first be pulled back (see figure C for choosing Black & Decker! Please have a question or experience a problem with an agent. KEY INFORMATION YOU SHOULD KNOW: • To insure extension cord does not come loose see figure D) then squeeze trigger...
Type 1 Manual - TR116
Page 2
... used to lose control. 2) Electrical safety a) Power tool plugs must match the outlet. The term "power tool" in death or serious injury. Power tools create sparks which , if not avoided, will result in the warnings refers to read and understand this information. Keep cord away from heat, oil, sharp edges or moving parts. Definitions 2 General Safety Rules 2 Hedge Trimmer Safety Rules 3 Extension Cords 4 Components 4 Assembly Instructions 5 Operating Instructions 5 Trimming Instructions 6 Maintenance 7 Accessories 7 Service...
... used to lose control. 2) Electrical safety a) Power tool plugs must match the outlet. The term "power tool" in death or serious injury. Power tools create sparks which , if not avoided, will result in the warnings refers to read and understand this information. Keep cord away from heat, oil, sharp edges or moving parts. Definitions 2 General Safety Rules 2 Hedge Trimmer Safety Rules 3 Extension Cords 4 Components 4 Assembly Instructions 5 Operating Instructions 5 Trimming Instructions 6 Maintenance 7 Accessories 7 Service...
Type 1 Manual - TR116
Page 3
... the power tool in the off-position before connecting to control. Use the correct power tool for which it on . f) If operating a power tool in a damp location is unavoidable, b) Do not use the power tool if the switch does not turn it was designed. Any power tool that the safety of starting . b) Use personal protective equipment. c) Prevent unintentional starting the power tool accidentally. Ensure the switch is in unexpected situations. d) Remove any adjustments, changing accessories, or storing power tools...
... the power tool in the off-position before connecting to control. Use the correct power tool for which it on . f) If operating a power tool in a damp location is unavoidable, b) Do not use the power tool if the switch does not turn it was designed. Any power tool that the safety of starting . b) Use personal protective equipment. c) Prevent unintentional starting the power tool accidentally. Ensure the switch is in unexpected situations. d) Remove any adjustments, changing accessories, or storing power tools...
Type 1 Manual - TR116
Page 4
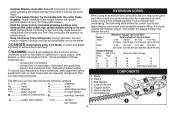
... operating the hedge trimmer may make exposed metal parts of power and overheating. An undersized cord will draw. The following symbols. The smaller the gauge number, the heavier the cord. Blade 2. Lock Off Button 5. Bail Handle 4. Trigger Switch 6. Cord Retainer COMPONENTS 2 4 6 35 7 1 Cutter blades contacting a "live " and could give the operator an electric shock. • Keep cord away from chemically treated lumber To reduce your tool may contact hidden wiring...
... operating the hedge trimmer may make exposed metal parts of power and overheating. An undersized cord will draw. The following symbols. The smaller the gauge number, the heavier the cord. Blade 2. Lock Off Button 5. Bail Handle 4. Trigger Switch 6. Cord Retainer COMPONENTS 2 4 6 35 7 1 Cutter blades contacting a "live " and could give the operator an electric shock. • Keep cord away from chemically treated lumber To reduce your tool may contact hidden wiring...
Type 1 Manual - TR116
Page 5
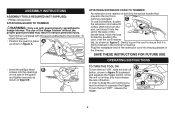
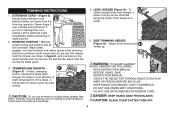
To A attach the guard: • Position the guard in place as shown in figure A. • Insert the phillips head B screws into the plug blades in the trimmer. Once the unit is running you may result in figure D, backward and squeeze the trigger switch. ASSEMBLY INSTRUCTIONS ASSEMBLY TOOLS REQUIRED (NOT SUPPLIED): - ATTACHING EXTENSION CORD TO TRIMMER An extension cord retainer is built into the switch handle that it is shipped with guard properly assembled to insure that...
To A attach the guard: • Position the guard in place as shown in figure A. • Insert the phillips head B screws into the plug blades in the trimmer. Once the unit is running you may result in figure D, backward and squeeze the trigger switch. ASSEMBLY INSTRUCTIONS ASSEMBLY TOOLS REQUIRED (NOT SUPPLIED): - ATTACHING EXTENSION CORD TO TRIMMER An extension cord retainer is built into the switch handle that it is shipped with guard properly assembled to insure that...
Type 1 Manual - TR116
Page 6
... POSITION - Always hold the tool by the blade guard. 3. WARNING: TO GUARD AGAINST INJURY, OBSERVE THE FOLLOWING: • READ INSTRUCTION MANUAL BEFORE USING, SAVE INSTRUCTION MANUAL. • CHECK THE HEDGE FOR FOREIGN OBJECTS SUCH AS WIRE OR FENCES BEFORE EACH USE. • KEEP HANDS ON HANDLES. DANGER: KEEP HANDS AWAY FROM BLADES. Begin at the electrical outlet immediately, before inspecting or repairing cord. 2. TRIMMING INSTRUCTIONS E 1. To obtain exceptionally level hedges...
... POSITION - Always hold the tool by the blade guard. 3. WARNING: TO GUARD AGAINST INJURY, OBSERVE THE FOLLOWING: • READ INSTRUCTION MANUAL BEFORE USING, SAVE INSTRUCTION MANUAL. • CHECK THE HEDGE FOR FOREIGN OBJECTS SUCH AS WIRE OR FENCES BEFORE EACH USE. • KEEP HANDS ON HANDLES. DANGER: KEEP HANDS AWAY FROM BLADES. Begin at the electrical outlet immediately, before inspecting or repairing cord. 2. TRIMMING INSTRUCTIONS E 1. To obtain exceptionally level hedges...
Type 1 Manual - TR116
Page 7
... replacement parts, contact the Black & Decker location nearest you may affect the trimmerʼs operation contact your local service location, refer to 90 days after cleaning. The defective product will not require resharpening. Should you drop the trimmer, carefully inspect it for a free replacement. 7 The cutting blades are made within the time period of your warning labels become illegible or are staffed with efficient and reliable power tool service...
... replacement parts, contact the Black & Decker location nearest you may affect the trimmerʼs operation contact your local service location, refer to 90 days after cleaning. The defective product will not require resharpening. Should you drop the trimmer, carefully inspect it for a free replacement. 7 The cutting blades are made within the time period of your warning labels become illegible or are staffed with efficient and reliable power tool service...
Type 1 Manual - TR116
Page 8
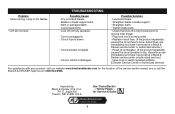
... by Black & Decker (U.S.) Inc., 701 E. TROUBLESHOOTING Possible Cause • Dry, corroded blades. • Blades or blade support bent. • Bent or damaged teeth. • Loose blade bolts. • Lock off is damaged. for the location of the service center nearest you or call the BLACK & DECKER help line at Black & Decker Service Center or Authorized Servicer. See ʻTools-Electricʼ - Problem • Slow running, noisy or hot blades. • Unit will not start. For...
... by Black & Decker (U.S.) Inc., 701 E. TROUBLESHOOTING Possible Cause • Dry, corroded blades. • Blades or blade support bent. • Bent or damaged teeth. • Loose blade bolts. • Lock off is damaged. for the location of the service center nearest you or call the BLACK & DECKER help line at Black & Decker Service Center or Authorized Servicer. See ʻTools-Electricʼ - Problem • Slow running, noisy or hot blades. • Unit will not start. For...

Type 1 Manual - TR116
Page 32
TR116, TR117 Copyright © 2011 Black & Decker Form No. 90572204 32 JUNE 2011 Printed in China Cat No.
TR116, TR117 Copyright © 2011 Black & Decker Form No. 90572204 32 JUNE 2011 Printed in China Cat No.


