

Type 1 Manual - TL10
Page 1
... Black & Decker purchase, go to speak with your new product. PLEASE READ BEFORE RETURNING THIS PRODUCT FOR ANY REASON: If you cantʼ find the answer or do not have a question or experience a problem ...with an agent. to the internet, call . to WWW.BLACKANDDECKER.COM/INSTANTANSWERS for choosing Black & Decker! INSTRUCTIVO DE OPERACIÓN, CENTROS DE SERVICIO Y PÓLIZA DE GARANTÍA. VEA EL ESPAÑOL EN LA CONTRAPORTADA. ADVERTENCIA: LÉASE ESTE INSTRUCTIVO ANTES DE USAR EL PRODUCTO. Garden Tiller INSTRUCTION MANUAL Catalog Number TL10 Date Code...
... Black & Decker purchase, go to speak with your new product. PLEASE READ BEFORE RETURNING THIS PRODUCT FOR ANY REASON: If you cantʼ find the answer or do not have a question or experience a problem ...with an agent. to the internet, call . to WWW.BLACKANDDECKER.COM/INSTANTANSWERS for choosing Black & Decker! INSTRUCTIVO DE OPERACIÓN, CENTROS DE SERVICIO Y PÓLIZA DE GARANTÍA. VEA EL ESPAÑOL EN LA CONTRAPORTADA. ADVERTENCIA: LÉASE ESTE INSTRUCTIVO ANTES DE USAR EL PRODUCTO. Garden Tiller INSTRUCTION MANUAL Catalog Number TL10 Date Code...
Type 1 Manual - TL10
Page 2
..., will result in minor or moderate injury. Definitions 2 Important Safety Instructions 3 Extension Cords 4 Functional Description 5 Assembly Instructions 6 Unpacking 6 Mid Handle Assembly 6 Upper Handle Assembly 6 Wheel Assembly 7 Tine Assembly 7 Drag Bar Assembly 7 Operating Instructions 8 Ballast Tank 8 Attaching Extension Cord 8 Switch Use 8 Adjusting the Drag Bar 9 Using the Tiller 9 Troubleshooting 10 Maintenance 10 Storage...10 Accessories...10 Service Information 10 Warranty...11 SAFETY GUIDELINES - DANGER: Indicates an imminently hazardous situation which , if...
..., will result in minor or moderate injury. Definitions 2 Important Safety Instructions 3 Extension Cords 4 Functional Description 5 Assembly Instructions 6 Unpacking 6 Mid Handle Assembly 6 Upper Handle Assembly 6 Wheel Assembly 7 Tine Assembly 7 Drag Bar Assembly 7 Operating Instructions 8 Ballast Tank 8 Attaching Extension Cord 8 Switch Use 8 Adjusting the Drag Bar 9 Using the Tiller 9 Troubleshooting 10 Maintenance 10 Storage...10 Accessories...10 Service Information 10 Warranty...11 SAFETY GUIDELINES - DANGER: Indicates an imminently hazardous situation which , if...
Type 1 Manual - TL10
Page 3
... be used and remove all times. 24. Exercise extreme caution when operating on or crossing gravel drives, walks, or roads. Release switch lever to turn tiller off , wait until tines stop the unit and disengage the controls quickly. 2. Never operate the tiller without proper instruction. 3. Do not change the motor settings or overspeed the motor. 19. SAVE THESE INSTRUCTIONS FOR ALL DOUBLE-INSULATED APPLIANCES 1) Replacement Parts When servicing use only identical replacement parts. 2) Polarized...
... be used and remove all times. 24. Exercise extreme caution when operating on or crossing gravel drives, walks, or roads. Release switch lever to turn tiller off , wait until tines stop the unit and disengage the controls quickly. 2. Never operate the tiller without proper instruction. 3. Do not change the motor settings or overspeed the motor. 19. SAVE THESE INSTRUCTIONS FOR ALL DOUBLE-INSULATED APPLIANCES 1) Replacement Parts When servicing use only identical replacement parts. 2) Polarized...
Type 1 Manual - TL10
Page 4
... changing accessories. Keep handles dry, clean and free from heat, oil, and sharp edges. 12) Dontʼ grasp the exposed cutting blades or cutting edges when picking up place - SAFETY WARNINGS AND INSTRUCTIONS: DOUBLE INSULATION Double insulated tools are constructed throughout with double insulation are available having built-in GFCI protection and may affect its intended function. Repair or replace damaged cords. Donʼt use...
... changing accessories. Keep handles dry, clean and free from heat, oil, and sharp edges. 12) Dontʼ grasp the exposed cutting blades or cutting edges when picking up place - SAFETY WARNINGS AND INSTRUCTIONS: DOUBLE INSULATION Double insulated tools are constructed throughout with double insulation are available having built-in GFCI protection and may affect its intended function. Repair or replace damaged cords. Donʼt use...
Type 1 Manual - TL10
Page 5
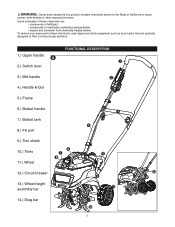
Some examples of California to filter out microscopic particles. 1.) Upper handle A 2.) Switch lever FUNCTIONAL DESCRIPTION 1 3.) Mid handle 2 4.) Handle knobs 5.) Frame 6.) Ballast handle 7.) Ballast tank 8.) Fill port 4 3 9.) Tine shield 6 10.) Tines 7 5 8 11.) Wheel 12.) Circuit breaker 13.) Wheel height assembly bar 9 11 14.) Drag bar 10 5 13 12 14 WARNING: Some dust created by this product contains chemicals known to the State of these chemicals are...
Some examples of California to filter out microscopic particles. 1.) Upper handle A 2.) Switch lever FUNCTIONAL DESCRIPTION 1 3.) Mid handle 2 4.) Handle knobs 5.) Frame 6.) Ballast handle 7.) Ballast tank 8.) Fill port 4 3 9.) Tine shield 6 10.) Tines 7 5 8 11.) Wheel 12.) Circuit breaker 13.) Wheel height assembly bar 9 11 14.) Drag bar 10 5 13 12 14 WARNING: Some dust created by this product contains chemicals known to the State of these chemicals are...
Type 1 Manual - TL10
Page 6
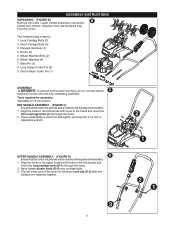
... tighten plastic knob (D-2) onto carriage bolts. 3. Long Carriage Bolts (2) 2. Wheel Machine Bolts (2) 6. Short Hairpin Cotter Pin (1) C ASSEMBLY DANGER: To prevent serious personal injury, do not connect electric extension cord to unit until fully completing assembly. Clip the lower part of the handles. 1. Short Carriage Bolts (4) 3. ASSEMBLY INSTRUCTIONS UNPACKING - (FIGURE B) Remove the frame / upper handle assembly, mid handle, B ballast tank, wheels, drag bar, tines and hardware bag from the carton. Wheel Washers (4) 7. Steel Pin (1) 8. Align...
... tighten plastic knob (D-2) onto carriage bolts. 3. Long Carriage Bolts (2) 2. Wheel Machine Bolts (2) 6. Short Hairpin Cotter Pin (1) C ASSEMBLY DANGER: To prevent serious personal injury, do not connect electric extension cord to unit until fully completing assembly. Clip the lower part of the handles. 1. Short Carriage Bolts (4) 3. ASSEMBLY INSTRUCTIONS UNPACKING - (FIGURE B) Remove the frame / upper handle assembly, mid handle, B ballast tank, wheels, drag bar, tines and hardware bag from the carton. Wheel Washers (4) 7. Steel Pin (1) 8. Align...
Type 1 Manual - TL10
Page 7
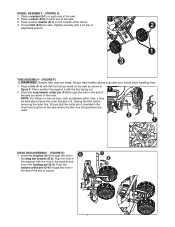
... protect your hands when handling tines. 1. Place a washer (E-1) on the outside of the bolt to secure. 7 TINE ASSEMBLY - (FIGURE F) WARNING: Garden tiller tines are used. E 3. Thread bolt (E-2) into axle. DRAG BAR ASSEMBLY - (FIGURE G) 1. Place a tine (F-1) with the hole in the end of the wheel. 3. WHEEL ASSEMBLY - (FIGURE E) 1. Unplug the tiller before removing the outer tine. Push the hairpin cotter pin (G-4) through the hole in...
... protect your hands when handling tines. 1. Place a washer (E-1) on the outside of the bolt to secure. 7 TINE ASSEMBLY - (FIGURE F) WARNING: Garden tiller tines are used. E 3. Thread bolt (E-2) into axle. DRAG BAR ASSEMBLY - (FIGURE G) 1. Place a tine (F-1) with the hole in the end of the wheel. 3. WHEEL ASSEMBLY - (FIGURE E) 1. Unplug the tiller before removing the outer tine. Push the hairpin cotter pin (G-4) through the hole in...
Type 1 Manual - TL10
Page 8
... is plugged into the switch housing and remove all the slack in a stable position while starting . Note: Starting the tiller motor also starts the tilling action. TION" lever will operate satisfactorily on and hold it against the tiller han- I ) DO NOT connect the extension cord to the tiller with your finger into a 120 volt, 60 cycle AC grounded outlet. Stand behind the tiller when using it. Pull the lever back...
... is plugged into the switch housing and remove all the slack in a stable position while starting . Note: Starting the tiller motor also starts the tilling action. TION" lever will operate satisfactorily on and hold it against the tiller han- I ) DO NOT connect the extension cord to the tiller with your finger into a 120 volt, 60 cycle AC grounded outlet. Stand behind the tiller when using it. Pull the lever back...
Type 1 Manual - TL10
Page 9
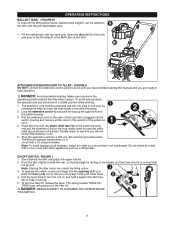
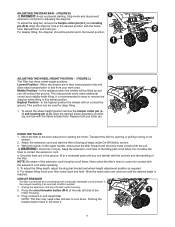
... steps under On-Off Switch section. 3. Transport the tiller by pushing or pulling it . 9 Unplug the extension cord from the tiller switch housing. 2. It may require resetting if an overload condition existed. 1. USING THE TILLER 1. Never allow the tines to adjusting the drag bar. Lowest Position - ADJUSTING THE DRAG BAR - (FIGURE K) DANGER: Avoid accidental starting the motor. Reinsert bolt and cotter pin. Align the desired wheel assembly connecting rod hole...
... steps under On-Off Switch section. 3. Transport the tiller by pushing or pulling it . 9 Unplug the extension cord from the tiller switch housing. 2. It may require resetting if an overload condition existed. 1. USING THE TILLER 1. Never allow the tines to adjusting the drag bar. Lowest Position - ADJUSTING THE DRAG BAR - (FIGURE K) DANGER: Avoid accidental starting the motor. Reinsert bolt and cotter pin. Align the desired wheel assembly connecting rod hole...
Type 1 Manual - TL10
Page 10
.... B. The tiller is protected from the tiller switch housing. 2. D. Clear any debris that other qualified service organizations, always using identical replacement parts. If necessary, remove the tines to the yellow page directory under "Tools-Electric" or call : 1-800-544-6986 WARNING: The use ballast tank handle to stop and unplug extension cord from spinning. DANGER: Do not wash garden tiller with efficient and reliable power tool service. Use only mild...
.... B. The tiller is protected from the tiller switch housing. 2. D. Clear any debris that other qualified service organizations, always using identical replacement parts. If necessary, remove the tines to the yellow page directory under "Tools-Electric" or call : 1-800-544-6986 WARNING: The use ballast tank handle to stop and unplug extension cord from spinning. DANGER: Do not wash garden tiller with efficient and reliable power tool service. Use only mild...
Type 1 Manual - TL10
Page 11
... HOME USE WARRANTY Black & Decker (U.S.) Inc. Returns should be required.Black & Decker owned and authorized Service Centers are listed under "Tools-Electric" in material or workmanship. Should you may have any defects in the yellow pages of two ways. Proof of purchase may be replaced or repaired at our option. This product is to take or send the product (prepaid) to a Black & Decker owned...
... HOME USE WARRANTY Black & Decker (U.S.) Inc. Returns should be required.Black & Decker owned and authorized Service Centers are listed under "Tools-Electric" in material or workmanship. Should you may have any defects in the yellow pages of two ways. Proof of purchase may be replaced or repaired at our option. This product is to take or send the product (prepaid) to a Black & Decker owned...


