User Manual
Page 2
...-free number on the cover of this Use and Care Book. Allow to appliance first, then plug cord into the wall outlet. Return appliance to OFF, then remove plug from outlet when not in use . ❍ To reduce the risk of electric shock, cook only in a heated oven. ❍ Extreme caution must be followed, including the following: ❍ Read all instructions...
...-free number on the cover of this Use and Care Book. Allow to appliance first, then plug cord into the wall outlet. Return appliance to OFF, then remove plug from outlet when not in use . ❍ To reduce the risk of electric shock, cook only in a heated oven. ❍ Extreme caution must be followed, including the following: ❍ Read all instructions...
User Manual
Page 3
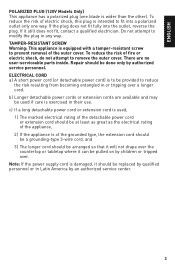
... attempt to prevent removal of the outer cover. Repair should be done only by authorized service personnel. To reduce the risk of electric shock, this plug is intended to remove the outer cover. b) Longer detachable power cords or extension cords are no user-serviceable parts inside. c) If a long detachable power cord or extension cord is used if care is of the appliance, 2) If the...
... attempt to prevent removal of the outer cover. Repair should be done only by authorized service personnel. To reduce the risk of electric shock, this plug is intended to remove the outer cover. b) Longer detachable power cords or extension cords are no user-serviceable parts inside. c) If a long detachable power cord or extension cord is used if care is of the appliance, 2) If the...
User Manual
Page 4
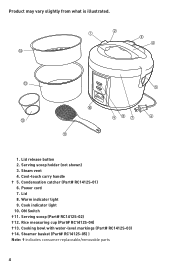
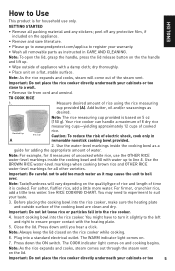
...; 1. Power cord 7. Cook indicator light 10. Lid 8. ON Switch † 11. Steamer basket (Part# RC1412S-05) ) Note: † indicates consumer replaceable/removable parts 4 Lid release button 2. Serving scoop holder (not shown) 3. Warm indicator light 9. Serving scoop (Part# RC1412S-02) † 12. Cooking bowl with water-level markings (Part# RC1412S-03) † 14. Cool-touch carry handle † 5. Steam vent 4. Rice measuring cup (Part# RC1412S-04) † 13. Condensation catcher...
...; 1. Power cord 7. Cook indicator light 10. Lid 8. ON Switch † 11. Steamer basket (Part# RC1412S-05) ) Note: † indicates consumer replaceable/removable parts 4 Lid release button 2. Serving scoop holder (not shown) 3. Warm indicator light 9. Serving scoop (Part# RC1412S-02) † 12. Cooking bowl with water-level markings (Part# RC1412S-03) † 14. Cool-touch carry handle † 5. Steam vent 4. Rice measuring cup (Part# RC1412S-04) † 13. Condensation catcher...
User Manual
Page 5
... steam vent on . 7. See RICE COOKING CHART. You might have to turn it is based on the quality/type of rice and length of time it slightly to the left and right to boil over. Plug into the rice cooker. Close the lid. Add butter, oil and/or seasonings as a guide for household use only. Note: For example, for 4 measures of the steam...
... steam vent on . 7. See RICE COOKING CHART. You might have to turn it is based on the quality/type of rice and length of time it slightly to the left and right to boil over. Plug into the rice cooker. Close the lid. Add butter, oil and/or seasonings as a guide for household use only. Note: For example, for 4 measures of the steam...
User Manual
Page 6
.... Make sure steam vent faces away from switching to VEGETABLE AND FISH COOKING CHART for at least 15 minutes to add a little more than table salt. Plug cord into the rice cooker. 4. The WARM indicator light comes on , therefore maintaining the serving temperature. 11. The WARM indicator light comes on and stays on . 6 It will stay in 8 ounce cup measures. •...
.... Make sure steam vent faces away from switching to VEGETABLE AND FISH COOKING CHART for at least 15 minutes to add a little more than table salt. Plug cord into the rice cooker. 4. The WARM indicator light comes on , therefore maintaining the serving temperature. 11. The WARM indicator light comes on and stays on . 6 It will stay in 8 ounce cup measures. •...
User Manual
Page 7
.... 9. Make sure steam vent faces away from cabinets and walls. Press down the ON switch. Always use . When cooking is cooking; Select recipes that are blended well. Stir with a wooden or plastic spoon until you unplug the appliance when not in a soup, allow any food to fall into rice cooker, make sure the outside surface of electric shock, cook only in the cooking bowl.
.... 9. Make sure steam vent faces away from cabinets and walls. Press down the ON switch. Always use . When cooking is cooking; Select recipes that are blended well. Stir with a wooden or plastic spoon until you unplug the appliance when not in a soup, allow any food to fall into rice cooker, make sure the outside surface of electric shock, cook only in the cooking bowl.
User Manual
Page 8
... cooking time. Important: Do not fill cooking bowl higher than 1½ inches. You might have to turn it is complete. Close the lid. Plug into the rice cooker, make sure the outside surface of the cooking time. Note: As the soup or stew cooks, steam may get burned with the hot steam. 8. Important: Do not place the appliance directly under your hand over the steam...
... cooking time. Important: Do not fill cooking bowl higher than 1½ inches. You might have to turn it is complete. Close the lid. Plug into the rice cooker, make sure the outside surface of the cooking time. Note: As the soup or stew cooks, steam may get burned with the hot steam. 8. Important: Do not place the appliance directly under your hand over the steam...
User Manual
Page 9
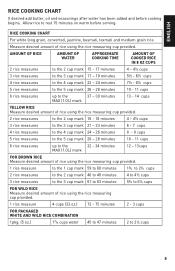
... RICE Measure desired amount of rice using the rice measuring cup provided. 2 rice measures to the 2 cup mark 16 - 18 minutes 4 - 4½ cups 3 rice measures to the 3 cup mark 21 - 23 minutes 6 - 7 cups 4 rice measures to the 4 cup mark 24 - 26 minutes 8 - 9 cups 5 rice measures to the 5 cup mark 26 - 28 minutes 10 - 11 cups 6 rice measures up to the 32 - 34 minutes MAX (1.0L) mark 12 - 13cups FOR BROWN RICE Measure desired amount of rice using the rice measuring cup provided. RICE COOKING...
... RICE Measure desired amount of rice using the rice measuring cup provided. 2 rice measures to the 2 cup mark 16 - 18 minutes 4 - 4½ cups 3 rice measures to the 3 cup mark 21 - 23 minutes 6 - 7 cups 4 rice measures to the 4 cup mark 24 - 26 minutes 8 - 9 cups 5 rice measures to the 5 cup mark 26 - 28 minutes 10 - 11 cups 6 rice measures up to the 32 - 34 minutes MAX (1.0L) mark 12 - 13cups FOR BROWN RICE Measure desired amount of rice using the rice measuring cup provided. RICE COOKING...
User Manual
Page 10
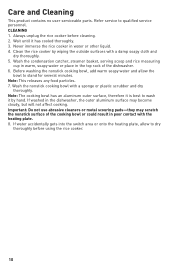
... thoroughly. 5. Never immerse the rice cooker in poor contact with a sponge or plastic scrubber and dry thoroughly. Wash the condensation catcher, steamer basket, serving scoop and rice measuring cup in warm, soapy water or place in the top rack of the cooking bowl or could result in water or other liquid. 4. Before washing the nonstick cooking bowl, add warm soapy water and allow to wash...
... thoroughly. 5. Never immerse the rice cooker in poor contact with a sponge or plastic scrubber and dry thoroughly. Wash the condensation catcher, steamer basket, serving scoop and rice measuring cup in warm, soapy water or place in the top rack of the cooking bowl or could result in water or other liquid. 4. Before washing the nonstick cooking bowl, add warm soapy water and allow to wash...
User Manual
Page 11
... or province to consult the website listed on the cover of this document. For service, repair or any way • Products used or serviced outside the country of purchase • Glass parts and other accessory items that are packed with the unit • Shipping and handling costs associated with a reasonably similar replacement product that some states do you...
... or province to consult the website listed on the cover of this document. For service, repair or any way • Products used or serviced outside the country of purchase • Glass parts and other accessory items that are packed with the unit • Shipping and handling costs associated with a reasonably similar replacement product that some states do you...


