Type 1 Manual - NST1118
Page 1
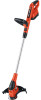
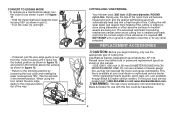
...replacing the line, use only .065 inch diameter ROUND line (B&D Model #AF-100 is recommended) - Model # NST1118, NST2118 TRIMMER / EDGER INSTRUCTION MANUAL Model Numbers NST1118, NST2118 Thank you call 1-800-544-6986 from 8 a.m. If you have access to speak with your new product. VEA EL... experience a problem with an agent. EST Mon. - Fri to the internet, call . to WWW.BLACKANDDECKER.COM/INSTANTANSWERS for choosing Black & Decker! Please have the catalog number available when you for instant answers 24 hours a day. SAVE THIS MANUAL FOR FUTURE REFERENCE. if ...
...replacing the line, use only .065 inch diameter ROUND line (B&D Model #AF-100 is recommended) - Model # NST1118, NST2118 TRIMMER / EDGER INSTRUCTION MANUAL Model Numbers NST1118, NST2118 Thank you call 1-800-544-6986 from 8 a.m. If you have access to speak with your new product. VEA EL... experience a problem with an agent. EST Mon. - Fri to the internet, call . to WWW.BLACKANDDECKER.COM/INSTANTANSWERS for choosing Black & Decker! Please have the catalog number available when you for instant answers 24 hours a day. SAVE THIS MANUAL FOR FUTURE REFERENCE. if ...
Type 1 Manual - NST1118
Page 7
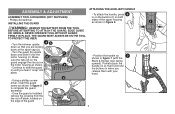
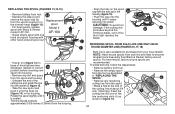
ASSEMBLY & ADJUSTMENT ASSEMBLY TOOLS REQUIRED (NOT SUPPLIED): - THE GUARD MUST ALWAYS BE ON THE TOOL TO PROTECT THE USER. • Turn the trimmer upside 4b down and slide it will hold the buttons in figure 7 (with your hand. 7 a • Using a phillips screw- NEVER OPERATE TOOL ... the line cut-off blade, located on both sides of the guard • Position the handle as 7 shown in when you release them with the Black & Decker logo facing upward). Make d c sure the tabs (d) on the guard engage the ribs (e) on until you are looking down at the spool cap (a). ...
ASSEMBLY & ADJUSTMENT ASSEMBLY TOOLS REQUIRED (NOT SUPPLIED): - THE GUARD MUST ALWAYS BE ON THE TOOL TO PROTECT THE USER. • Turn the trimmer upside 4b down and slide it will hold the buttons in figure 7 (with your hand. 7 a • Using a phillips screw- NEVER OPERATE TOOL ... the line cut-off blade, located on both sides of the guard • Position the handle as 7 shown in when you release them with the Black & Decker logo facing upward). Make d c sure the tabs (d) on the guard engage the ribs (e) on until you are looking down at the spool cap (a). ...
Type 1 Manual - NST1118
Page 8
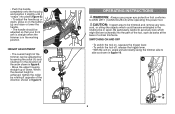
...until it "snaps" into the path of the tool, such as shown in figure 10. 10 8 HEIGHT ADJUSTMENT 9 • The overall height of the trimmer can be adjusted so that conforms to side as barbs at the base of a chain link fence. When h the desired height is in the rotating... of the direction shown in figure 9. • Move the upper housing straight up or down, press in on , angle unit and slowly swing the trimmer side to ANSI Z87.1 (CAN/CSA Z94.3) while operating this power tool. OPERATING INSTRUCTIONS WARNING: Always use proper eye protection that your front arm is...
...until it "snaps" into the path of the tool, such as shown in figure 10. 10 8 HEIGHT ADJUSTMENT 9 • The overall height of the trimmer can be adjusted so that conforms to side as barbs at the base of a chain link fence. When h the desired height is in the rotating... of the direction shown in figure 9. • Move the upper housing straight up or down, press in on , angle unit and slowly swing the trimmer side to ANSI Z87.1 (CAN/CSA Z94.3) while operating this power tool. OPERATING INSTRUCTIONS WARNING: Always use proper eye protection that your front arm is...
Type 1 Manual - NST1118
Page 9
...shown in part 2. • Turn the collar (h) until it ʼs required. Cutting line will overload the motor and cause overheating. Use Black & Decker replacement spool Model No. Do not use of line. Reload nylon line (either bulk or prewound replacement spool) as shown in this tool could...of any other abrasive surfaces or heavier weeds are available through Black & Decker service centers. During use the appropriate type of line whenever it clicks into 12 the locked position as shown in figure 12 and position the trimmer above the surface as shown in figure 12. • ...
...shown in part 2. • Turn the collar (h) until it ʼs required. Cutting line will overload the motor and cause overheating. Use Black & Decker replacement spool Model No. Do not use of line. Reload nylon line (either bulk or prewound replacement spool) as shown in this tool could...of any other abrasive surfaces or heavier weeds are available through Black & Decker service centers. During use the appropriate type of line whenever it clicks into 12 the locked position as shown in figure 12 and position the trimmer above the surface as shown in figure 12. • ...
Type 1 Manual - NST1118
Page 10
...boss (o) (figure 14) in the trimmer head (figure 13). o • Remove any remaining cutting line from the spool and housing. • Unfasten the end of the cutting line and guide the line into one hand and spool housing with Black & Decker model # AF-100. Rotate the ... (FIGURES 16, 17, 18) Bulk line is seated. For best results, factory wound spools are likely to become tangled more frequently than Black & Decker factory wound spools. Replacement spool k • For best results, replace spool with other hand and pull spool out. Feed the r cutting...
...boss (o) (figure 14) in the trimmer head (figure 13). o • Remove any remaining cutting line from the spool and housing. • Unfasten the end of the cutting line and guide the line into one hand and spool housing with Black & Decker model # AF-100. Rotate the ... (FIGURES 16, 17, 18) Bulk line is seated. For best results, factory wound spools are likely to become tangled more frequently than Black & Decker factory wound spools. Replacement spool k • For best results, replace spool with other hand and pull spool out. Feed the r cutting...
Type 1 Manual - NST1118
Page 11
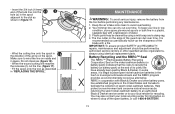
... on the edge of the guard can dry out over time. Your trimmer line can dull over time. In some areas, it is recommended you periodically touch-up the sharpness of the blade with Black & Decker and other qualified service organizations, always using a mild soap and a damp...service centers or other battery users, has established programs in the United States and Canada to avoid overheating. 2. You may be performed by Black & Decker. s MAINTENANCE WARNING: To avoid serious injury, remove the battery from the tool before performing any maintenance. 1. The line cutter on neatly...
... on the edge of the guard can dry out over time. Your trimmer line can dull over time. In some areas, it is recommended you periodically touch-up the sharpness of the blade with Black & Decker and other qualified service organizations, always using a mild soap and a damp...service centers or other battery users, has established programs in the United States and Canada to avoid overheating. 2. You may be performed by Black & Decker. s MAINTENANCE WARNING: To avoid serious injury, remove the battery from the tool before performing any maintenance. 1. The line cutter on neatly...
Type 1 Manual - NST1118
Page 12
... you have other rights which vary from state to state or province to 90 days after the sale). To find your nearest Black & Decker Service Center. Black & Decker owned and authorized Service Centers are listed under "Tools-Electric" or call: 1-800-544-6986 or visit www.blackanddecker.com FULL...• Keep the tabs depressed and remove the spool from the spool housing in the trimmer head. • Pull the cutting line until it snaps securely into the housing. SERVICE INFORMATION All Black & Decker Service Centers are beyond the trimming blade, cut it off so that it was purchased ...
... you have other rights which vary from state to state or province to 90 days after the sale). To find your nearest Black & Decker Service Center. Black & Decker owned and authorized Service Centers are listed under "Tools-Electric" or call: 1-800-544-6986 or visit www.blackanddecker.com FULL...• Keep the tabs depressed and remove the spool from the spool housing in the trimmer head. • Pull the cutting line until it snaps securely into the housing. SERVICE INFORMATION All Black & Decker Service Centers are beyond the trimming blade, cut it off so that it was purchased ...
Type 1 Manual - NST1118QS
Page 1
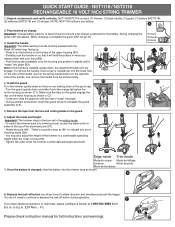
...lock off . 3) Install the handle. F If you have additional questions or need to continue to the battery. Fri. NST1118 / NST2118 RECHARGEABLE 18 VOLT NiCd STRING TRIMMER 1) Unpack components and verify contents. A 2) Place battery on so that you are looking down so that it onto the orange ... You do not need help, please call Black & Decker at the desired height and mode. To remove the handle, insert a nail or screwdriver into trimming mode, loosen the black collar lo- Note: If the handle is at 1-800-544-6986 from the trimmer body. 4) Install the guard. Edge mode...
...lock off . 3) Install the handle. F If you have additional questions or need to continue to the battery. Fri. NST1118 / NST2118 RECHARGEABLE 18 VOLT NiCd STRING TRIMMER 1) Unpack components and verify contents. A 2) Place battery on so that you are looking down so that it onto the orange ... You do not need help, please call Black & Decker at the desired height and mode. To remove the handle, insert a nail or screwdriver into trimming mode, loosen the black collar lo- Note: If the handle is at 1-800-544-6986 from the trimmer body. 4) Install the guard. Edge mode...


