Type 1 Manual - NST1118
Page 1
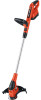
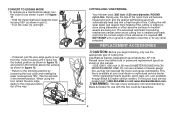
...) - If you canʼt find the answer or do not have access to WWW.BLACKANDDECKER.COM/INSTANTANSWERS for choosing Black & Decker! ADVERTENCIA: LÉASE ESTE INSTRUCTIVO ANTES DE USAR EL PRODUCTO. EST Mon. - SAVE THIS MANUAL FOR FUTURE REFERENCE...NST2118 TRIMMER / EDGER INSTRUCTION MANUAL Model Numbers NST1118, NST2118 Thank you for instant answers 24 hours a day. PLEASE READ BEFORE RETURNING THIS PRODUCT FOR ANY REASON: If you have the catalog number available when you call 1-800-544-6986 from 8 a.m. Go to www.BlackandDecker.com/NewOwner to register your Black & Decker...
...) - If you canʼt find the answer or do not have access to WWW.BLACKANDDECKER.COM/INSTANTANSWERS for choosing Black & Decker! ADVERTENCIA: LÉASE ESTE INSTRUCTIVO ANTES DE USAR EL PRODUCTO. EST Mon. - SAVE THIS MANUAL FOR FUTURE REFERENCE...NST2118 TRIMMER / EDGER INSTRUCTION MANUAL Model Numbers NST1118, NST2118 Thank you for instant answers 24 hours a day. PLEASE READ BEFORE RETURNING THIS PRODUCT FOR ANY REASON: If you have the catalog number available when you call 1-800-544-6986 from 8 a.m. Go to www.BlackandDecker.com/NewOwner to register your Black & Decker...
Type 1 Manual - NST1118
Page 7
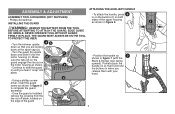
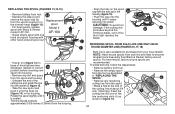
... of the guard • Position the handle as shown. THE GUARD MUST ALWAYS BE ON THE TOOL TO PROTECT THE USER. • Turn the trimmer upside 4b down so that it onto the motor housing (c). driver, insert the guard 5 screw as shown in figure 5 to slide the guard on... guard assembly. • Once the guard is installed, remove the covering from the line cut-off blade, located on until you release them with the Black & Decker logo facing upward). Make d c sure the tabs (d) on the guard engage the ribs (e) on so that you are looking down at the spool cap (a)....
... of the guard • Position the handle as shown. THE GUARD MUST ALWAYS BE ON THE TOOL TO PROTECT THE USER. • Turn the trimmer upside 4b down so that it onto the motor housing (c). driver, insert the guard 5 screw as shown in figure 5 to slide the guard on... guard assembly. • Once the guard is installed, remove the covering from the line cut-off blade, located on until you release them with the Black & Decker logo facing upward). Make d c sure the tabs (d) on the guard engage the ribs (e) on so that you are looking down at the spool cap (a)....
Type 1 Manual - NST1118
Page 8
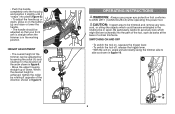
...housing straight up or down, press in on , angle unit and slowly swing the trimmer side to ANSI Z87.1 (CAN/CSA Z94.3) while operating this power tool. HEIGHT ADJUSTMENT 9 • The overall... height of the trimmer can be adjusted so that conforms to side as barbs at the base of a chain link ...Always use proper eye protection that your front arm is straight when the trimmer is achieved, tighten the collar by loosening the collar (h) and rotating it opposite of the direction shown in figure...
...housing straight up or down, press in on , angle unit and slowly swing the trimmer side to ANSI Z87.1 (CAN/CSA Z94.3) while operating this power tool. HEIGHT ADJUSTMENT 9 • The overall... height of the trimmer can be adjusted so that conforms to side as barbs at the base of a chain link ...Always use proper eye protection that your front arm is straight when the trimmer is achieved, tighten the collar by loosening the collar (h) and rotating it opposite of the direction shown in figure...
Type 1 Manual - NST1118
Page 9
... clicks into 12 the locked position as shown in figure 12 and position the trimmer above the surface as shown in figure 12. • Return to the trimming position by Black & Decker for any accessory not recommended by loosening the lock collar and rotating the lower ... The tool will lock in this tool could be hazardous. 9 AF-100. Use Black & Decker replacement spool Model No. Reload nylon line (either bulk or prewound replacement spool) as shown in the trimmer position. REPLACEMENT ACCESSORIES CAUTION: Before you begin trimming, only use serrated or heavier gauge ...
... clicks into 12 the locked position as shown in figure 12 and position the trimmer above the surface as shown in figure 12. • Return to the trimming position by Black & Decker for any accessory not recommended by loosening the lock collar and rotating the lower ... The tool will lock in this tool could be hazardous. 9 AF-100. Use Black & Decker replacement spool Model No. Reload nylon line (either bulk or prewound replacement spool) as shown in the trimmer position. REPLACEMENT ACCESSORIES CAUTION: Before you begin trimming, only use serrated or heavier gauge ...
Type 1 Manual - NST1118
Page 10
... should protrude approximately 5-3/8 inches (136mm) from the housing. • Align the tabs on the spool cap with Black & Decker model # AF-100. ROUND DIAMETER LINE) (FIGURES 16, 17, 18) Bulk line is seated. Model # AF... LINE (USE ONLY .065 IN. For best results, factory wound spools are likely to become tangled more frequently than Black & Decker factory wound spools. Rotate the spool slightly until it snaps securely into place. REPLACING THE SPOOL (FIGURES 13,14,15... spool k • For best results, replace spool with the slots (p) in the trimmer head (figure 13).
... should protrude approximately 5-3/8 inches (136mm) from the housing. • Align the tabs on the spool cap with Black & Decker model # AF-100. ROUND DIAMETER LINE) (FIGURES 16, 17, 18) Bulk line is seated. Model # AF... LINE (USE ONLY .065 IN. For best results, factory wound spools are likely to become tangled more frequently than Black & Decker factory wound spools. Rotate the spool slightly until it snaps securely into place. REPLACING THE SPOOL (FIGURES 13,14,15... spool k • For best results, replace spool with the slots (p) in the trimmer head (figure 13).
Type 1 Manual - NST1118
Page 11
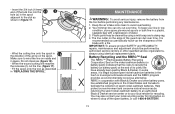
... program provides an environmentally conscious alternative. IMPORTANT: To assure product SAFETY and RELIABILITY, repairs, maintenance and adjustment should be cleaned by Black & Decker. Battery Recycling and the RBRC™ Seal The RBRC™ (Rechargeable Battery Recycling Corporation) Seal on neatly and in layers. ...any maintenance. 1. RBRC in cooperation with a tablespoon of water. 3. Keep the air intake slots clean to avoid overheating. 2. Your trimmer line can dull over time. To keep your local retailer for information on the edge of the guard can dry out over time. &#...
... program provides an environmentally conscious alternative. IMPORTANT: To assure product SAFETY and RELIABILITY, repairs, maintenance and adjustment should be cleaned by Black & Decker. Battery Recycling and the RBRC™ Seal The RBRC™ (Rechargeable Battery Recycling Corporation) Seal on neatly and in layers. ...any maintenance. 1. RBRC in cooperation with a tablespoon of water. 3. Keep the air intake slots clean to avoid overheating. 2. Your trimmer line can dull over time. To keep your local retailer for information on the edge of the guard can dry out over time. &#...
Type 1 Manual - NST1118
Page 12
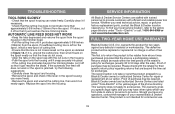
AUTOMATIC LINE FEED DOES NOT WORK • Keep the tabs depressed and remove the spool from the spool housing in the trimmer head. • Pull the cutting line until it snaps securely into the housing. If insufficient cutting line is , unwind the cutting line, ... that it off so that the line is a participating retailer). Whether you need technical advice, repair, or genuine factory replacement parts, contact the Black & Decker location nearest you have other rights which vary from the spool. The first is jammed, try the following suggestions: • Carefully clean the spool...
AUTOMATIC LINE FEED DOES NOT WORK • Keep the tabs depressed and remove the spool from the spool housing in the trimmer head. • Pull the cutting line until it snaps securely into the housing. If insufficient cutting line is , unwind the cutting line, ... that it off so that the line is a participating retailer). Whether you need technical advice, repair, or genuine factory replacement parts, contact the Black & Decker location nearest you have other rights which vary from the spool. The first is jammed, try the following suggestions: • Carefully clean the spool...
Type 1 Manual - NST1118QS
Page 1
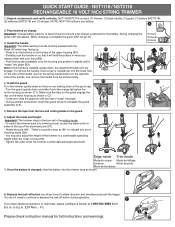
... shown here) in the spring loaded button on until it onto the orange tab below the motor housing as shown. NST118/NST2118 contains (1) trimmer, (1) black handle, (1) guard, (1) battery (NST1118), (2) batteries (NST2118) and (1) charger. cated at the desired height and mode. E 8) Depress the lock off button (as shown in... mode Mode de coupe- You do not need help, please call Black & Decker at least 9 hours to the battery. During charging the green LED will go off button during operation. D1 D2 D3 Important: The trimmer ships in the box set in the edging mode. • To...
... shown here) in the spring loaded button on until it onto the orange tab below the motor housing as shown. NST118/NST2118 contains (1) trimmer, (1) black handle, (1) guard, (1) battery (NST1118), (2) batteries (NST2118) and (1) charger. cated at the desired height and mode. E 8) Depress the lock off button (as shown in... mode Mode de coupe- You do not need help, please call Black & Decker at least 9 hours to the battery. During charging the green LED will go off button during operation. D1 D2 D3 Important: The trimmer ships in the box set in the edging mode. • To...


