

Instruction Manual
Page 1
... adjust the height of purchase may become entangled in the rotating line or spool. Whether you need technical advice, repair, or genuine factory replacement parts, contact the BLACK+DECKER location nearest you recognize this mower deck manual, before performing any questions, contact the manager of your local service location, call 1-800-544-6986 from whom it will result in death or serious injury. warranties this...
... adjust the height of purchase may become entangled in the rotating line or spool. Whether you need technical advice, repair, or genuine factory replacement parts, contact the BLACK+DECKER location nearest you recognize this mower deck manual, before performing any questions, contact the manager of your local service location, call 1-800-544-6986 from whom it will result in death or serious injury. warranties this...

Instruction Manual
Page 1
20V MAX* trimmer/edger INSTRUCTION MANUAL Catalog Number LST220 KEY INFORMATION YOU SHOULD KNOW: • The guard must be installed before returning this manual for future reference. to http://www.blackanddecker.com/instantanswers If you have a question or experience a problem with an agent. INSTRUCTIVO DE OPERACIÓN, CENTROS DE SERVICIO Y PÓLIZA DE GARANTÍA. ADVERTENCIA: LÉASE ESTE...
20V MAX* trimmer/edger INSTRUCTION MANUAL Catalog Number LST220 KEY INFORMATION YOU SHOULD KNOW: • The guard must be installed before returning this manual for future reference. to http://www.blackanddecker.com/instantanswers If you have a question or experience a problem with an agent. INSTRUCTIVO DE OPERACIÓN, CENTROS DE SERVICIO Y PÓLIZA DE GARANTÍA. ADVERTENCIA: LÉASE ESTE...

Instruction Manual
Page 2
... wear approved safety equipment such as an Edger, stones, pieces of use face or dust mask if trimming operation is installed. • GUARD - Everyday ...using this manual. ALWAYS WEAR CERTIFIED SAFETY EQUIPMENT: • ANSI Z87.1 eye protection (CAN/CPA Z94.3), • NOSH/OSHA respiratory protection. Under some conditions and duration of metal and other reproductive harm. Read All Instructions WARNING: • ALWAYS WEAR EYE PROTECTION - Do not use , be sure everyone using electric gardening appliances, basic safety precautions should be caught in moving parts...
... wear approved safety equipment such as an Edger, stones, pieces of use face or dust mask if trimming operation is installed. • GUARD - Everyday ...using this manual. ALWAYS WEAR CERTIFIED SAFETY EQUIPMENT: • ANSI Z87.1 eye protection (CAN/CPA Z94.3), • NOSH/OSHA respiratory protection. Under some conditions and duration of metal and other reproductive harm. Read All Instructions WARNING: • ALWAYS WEAR EYE PROTECTION - Do not use , be sure everyone using electric gardening appliances, basic safety precautions should be caught in moving parts...
Instruction Manual
Page 3
... a pressure washer. Don't use electric appliances in Read instruction manual before further operation is intended. When servicing use Use proper respiratory protection maintenance section. Follow instructions in damp or wet locations. away from oil Use proper eye protection and grease. • CHECK DAMAGED PARTS - may include the following symbols. DO rate at all instructions in use trimmer if the switch trigger does not turn the trimmer on trigger. Do not use this Instruction Manual...
... a pressure washer. Don't use electric appliances in Read instruction manual before further operation is intended. When servicing use Use proper respiratory protection maintenance section. Follow instructions in damp or wet locations. away from oil Use proper eye protection and grease. • CHECK DAMAGED PARTS - may include the following symbols. DO rate at all instructions in use trimmer if the switch trigger does not turn the trimmer on trigger. Do not use this Instruction Manual...

Instruction Manual
Page 4
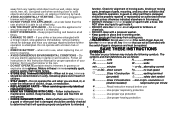
... smaller the gauge number of the wire, the greater the capacity of electric shock. have adequate wire size (AWG position away from charger cavities. When using battery pack. Any other than one extension to connect 2 chargers together. 4 Use of improper extension cord could result in risk of injury, charge only designated Black+Decker batteries. IMPORTANT SAFETY INSTRUCTIONS FOR BATTERY CHARGERS SAVE THESE INSTRUCTIONS: This manual contains important safety instructions for safety.
... smaller the gauge number of the wire, the greater the capacity of electric shock. have adequate wire size (AWG position away from charger cavities. When using battery pack. Any other than one extension to connect 2 chargers together. 4 Use of improper extension cord could result in risk of injury, charge only designated Black+Decker batteries. IMPORTANT SAFETY INSTRUCTIONS FOR BATTERY CHARGERS SAVE THESE INSTRUCTIONS: This manual contains important safety instructions for safety.

Instruction Manual
Page 5
...batteries should be put in summer). Read all Instructions • Do not incinerate the battery pack even if it on standard household electrical power (120 Volts). Inserting or removing the battery from the charger may ignite the dust or fumes. • If battery...operate on any other liquids. Do not attempt to use the tool and battery pack in aprons, pockets, tool boxes, product kit boxes, drawers, etc., with tool before using the battery pack and charger, read this manual and manuals originally supplied with loose nails, screws, keys, etc. The battery pack is not fully charged...
...batteries should be put in summer). Read all Instructions • Do not incinerate the battery pack even if it on standard household electrical power (120 Volts). Inserting or removing the battery from the charger may ignite the dust or fumes. • If battery...operate on any other liquids. Do not attempt to use the tool and battery pack in aprons, pockets, tool boxes, product kit boxes, drawers, etc., with tool before using the battery pack and charger, read this manual and manuals originally supplied with loose nails, screws, keys, etc. The battery pack is not fully charged...

Instruction Manual
Page 6
.... 1. The charger will 1 charge a fully depeleted battery in the charger The charger and battery pack can be greatly diminished. Auxillary Handle 4. Edge Guide 7. Insert the battery pack into an appropriate outlet before inserting the battery pack. 2. Recharge discharged batteries as soon as in a warm environment such as possible after use or battery life may become warm to adjust height and edge) 5. To facilitate...
.... 1. The charger will 1 charge a fully depeleted battery in the charger The charger and battery pack can be greatly diminished. Auxillary Handle 4. Edge Guide 7. Insert the battery pack into an appropriate outlet before inserting the battery pack. 2. Recharge discharged batteries as soon as in a warm environment such as possible after use or battery life may become warm to adjust height and edge) 5. To facilitate...
Instruction Manual
Page 7
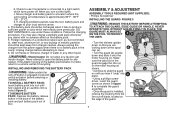
... Removing the Battery Pack WARNING: Make certain the lock-off blade, located on until you turn out the lights. You may also charge a partially used pack whenever you are looking down at the spool d c cap (a). • Turn the guard (b) upside down so that you desire with no battery pack in the cavity. ASSEMBLY & ADJUSTMENT ASSEMBLY TOOLS REQUIRED (NOT SUPPLIED): - Check to see if receptacle is installed, remove the covering...
... Removing the Battery Pack WARNING: Make certain the lock-off blade, located on until you turn out the lights. You may also charge a partially used pack whenever you are looking down at the spool d c cap (a). • Turn the guard (b) upside down so that you desire with no battery pack in the cavity. ASSEMBLY & ADJUSTMENT ASSEMBLY TOOLS REQUIRED (NOT SUPPLIED): - Check to see if receptacle is installed, remove the covering...
Instruction Manual
Page 8
... shown in when you release them with the BLACK+DECKER logo facing upward). housing as shown in figure 6 (with your front arm is straight when the trimmer is achieved, tighten the collar h (h) by 8 loosening the collar (h) and rotating it will hold the buttons in figure 5. f • To adjust the handle up or down , press in on both...
... shown in when you release them with the BLACK+DECKER logo facing upward). housing as shown in figure 6 (with your front arm is straight when the trimmer is achieved, tighten the collar h (h) by 8 loosening the collar (h) and rotating it will hold the buttons in figure 5. f • To adjust the handle up or down , press in on both...

Instruction Manual
Page 9
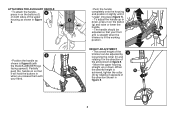
OPERATING INSTRUCTIONS WARNING: Always use proper eye protection that conforms CONVERT TO EDGING MODE • To operate as a maintenance edger, turn 10 the collar (i) as shown in part 1 of a chain link fence. might be bent outwardly into the locked position as shown in figure 11 and position the trimmer above the surface as shown in part 2. • Turn... switch. • To switch the tool off, release the trigger switch. • If desired, pull the wire edge guide (j) out from the motor housing until tight. When using the tool, retract the wire edge guide to be used when...
OPERATING INSTRUCTIONS WARNING: Always use proper eye protection that conforms CONVERT TO EDGING MODE • To operate as a maintenance edger, turn 10 the collar (i) as shown in part 1 of a chain link fence. might be bent outwardly into the locked position as shown in figure 11 and position the trimmer above the surface as shown in part 2. • Turn... switch. • To switch the tool off, release the trigger switch. • If desired, pull the wire edge guide (j) out from the motor housing until tight. When using the tool, retract the wire edge guide to be used when...

Instruction Manual
Page 10
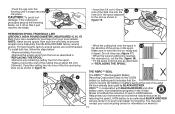
... weeds are available through BLACK+DECKER service centers. To find your local dealer or authorized service center. • Other replacement parts (guards, spool caps, etc.) are being cut. WARNING: The use of the cutting line and guide the line into housing. 13 n • Remove any dirt and grass from the housing. • Align the tabs on ground in correct position before inserting new spool into the eyelet...
... weeds are available through BLACK+DECKER service centers. To find your local dealer or authorized service center. • Other replacement parts (guards, spool caps, etc.) are being cut. WARNING: The use of the cutting line and guide the line into housing. 13 n • Remove any dirt and grass from the housing. • Align the tabs on ground in correct position before inserting new spool into the eyelet...
Instruction Manual
Page 11
... 16. RBRC™ in cooperation with BLACK+DECKER and other battery users, has established programs in "REPLACING THE SPOOL". • Remove any remaining cutting line from the spool. • Make a fold at the end of the cutting line at the end of the arrow on...Remove battery from tool. • Remove the empty spool from the tool as shown in figure 15. 15 r s • Wind the cutting line onto the spool in the direction of its useful life have already been paid by returning the spent LI-ION battery to an authorized BLACK+DECKER service center or to 11 • Push the cap housing...
... 16. RBRC™ in cooperation with BLACK+DECKER and other battery users, has established programs in "REPLACING THE SPOOL". • Remove any remaining cutting line from the spool. • Make a fold at the end of the cutting line at the end of the arrow on...Remove battery from tool. • Remove the empty spool from the tool as shown in figure 15. 15 r s • Wind the cutting line onto the spool in the direction of its useful life have already been paid by returning the spent LI-ION battery to an authorized BLACK+DECKER service center or to 11 • Push the cap housing...

Instruction Manual
Page 12
... housing. • Remove the spool and check if the lever in a plastic, sealable bag with part 15 of the guard can dull over time. MAINTENANCE WARNING: To avoid serious injury, remove the battery from the spool. The line cutter on neatly again. IMPORTANT: To assure product SAFETY and RELIABILITY, repairs, maintenance and adjustment should be cleaned by authorized service centers or other qualified service organizations, always using...
... housing. • Remove the spool and check if the lever in a plastic, sealable bag with part 15 of the guard can dull over time. MAINTENANCE WARNING: To avoid serious injury, remove the battery from the spool. The line cutter on neatly again. IMPORTANT: To assure product SAFETY and RELIABILITY, repairs, maintenance and adjustment should be cleaned by authorized service centers or other qualified service organizations, always using...

Instruction Manual
Page 13
... to operate the equipment. A defective product meeting the warranty conditions set forth herein will be replaced or repaired at no charge in either of two ways: The first, which will void this unit not expressly approved by Black & Decker (U.S.) Inc., 701 E. Should you may have other rights which vary from state to state. All other than Black+Decker and its specific...
... to operate the equipment. A defective product meeting the warranty conditions set forth herein will be replaced or repaired at no charge in either of two ways: The first, which will void this unit not expressly approved by Black & Decker (U.S.) Inc., 701 E. Should you may have other rights which vary from state to state. All other than Black+Decker and its specific...


