
Type 1 Manual - MS2000
Page 1
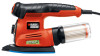
PLEASE READ Before returning this Instruction Manual for choosing Black & Decker! EST Mon. -- Smart Select Multi- Please have a question or experience a problem with an agent. If you for Future reference. ADVERTENCIA: LÉASE ESTE ...Y PÓLIZA DE GARANTÍA. to the internet, call . Go to www.BlackandDecker.com/NewOwner to register your Black & Decker purchase, go to speak with your new product. Sander INSTRUCTION MANUAL Catalog Number MS2000 Thank you can't find the answer or do not have access to 5 p.m. Fri. Save this product for instant answers...
PLEASE READ Before returning this Instruction Manual for choosing Black & Decker! EST Mon. -- Smart Select Multi- Please have a question or experience a problem with an agent. If you for Future reference. ADVERTENCIA: LÉASE ESTE ...Y PÓLIZA DE GARANTÍA. to the internet, call . Go to www.BlackandDecker.com/NewOwner to register your Black & Decker purchase, go to speak with your new product. Sander INSTRUCTION MANUAL Catalog Number MS2000 Thank you can't find the answer or do not have access to 5 p.m. Fri. Save this product for instant answers...
Type 1 Manual - MS2000
Page 3
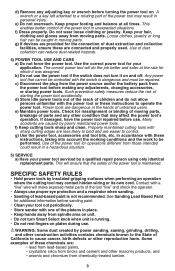
... in accordance with one of the power tool is dangerous and must be caught in a hazardous situation. 5) Service a) Have your tool out periodically. • Store sander with these are provided for misalignment or binding of the power tool may contact hidden wiring or its own cord. A wrench or a key left attached...
... in accordance with one of the power tool is dangerous and must be caught in a hazardous situation. 5) Service a) Have your tool out periodically. • Store sander with these are provided for misalignment or binding of the power tool may contact hidden wiring or its own cord. A wrench or a key left attached...
Type 1 Manual - MS2000
Page 6
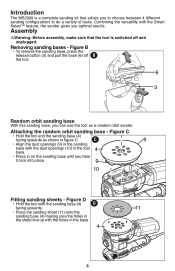
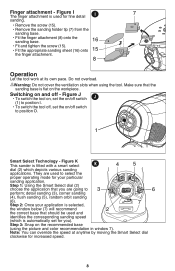
... button (3) and pull the base (6) off and unplugged. Figure C • Hold the tool and the sanding base (4) facing upwards as a random orbit sander. Figure D • Hold the tool with the sanding base (4) D facing upwards. 11 • Place the sanding sheet (11) onto the sanding base... assembly, make sure that allows you to choose between 4 different sanding configurations to do a variety of tasks. Removing sanding bases - Introduction The MS2000 is a complete sanding kit that the tool is switched off B the tool. 6 3 Random orbit sanding base With this sanding base, you can...
... button (3) and pull the base (6) off and unplugged. Figure C • Hold the tool and the sanding base (4) facing upwards as a random orbit sander. Figure D • Hold the tool with the sanding base (4) D facing upwards. 11 • Place the sanding sheet (11) onto the sanding base... assembly, make sure that allows you to choose between 4 different sanding configurations to do a variety of tasks. Removing sanding bases - Introduction The MS2000 is a complete sanding kit that the tool is switched off B the tool. 6 3 Random orbit sanding base With this sanding base, you can...
Type 1 Manual - MS2000
Page 7
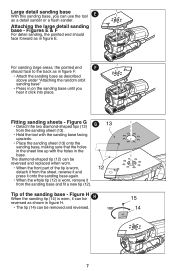
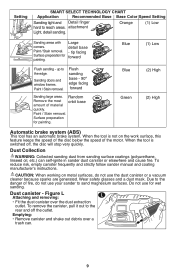
... base, making sure that the holes in the sheet line up with the holes in figure H. • The tip (14) can be H reversed as a detail sander or a flush sander. Large detail sanding base With this sanding base, you hear it click into place.
... base, making sure that the holes in the sheet line up with the holes in figure H. • The tip (14) can be H reversed as a detail sander or a flush sander. Large detail sanding base With this sanding base, you hear it click into place.
Type 1 Manual - MS2000
Page 8
... not cover the ventilation slots when using the picture and color recommendation in window 7). detail sanding (3), corner sanding (4), flush sanding (5), random orbit sanding (6). Figure K This sander is flat on the workpiece. Note: You can override the speed at its own pace. Figure I . • To switch the tool off, set for increased...
... not cover the ventilation slots when using the picture and color recommendation in window 7). detail sanding (3), corner sanding (4), flush sanding (5), random orbit sanding (6). Figure K This sander is flat on the workpiece. Note: You can override the speed at its own pace. Figure I . • To switch the tool off, set for increased...
Type 1 Manual - MS2000
Page 9
... because sparks are generated. Figure L Attaching and removing: L • Fit the dust canister over a trash can self-ignite in sander dust canister or elsewhere and cause fire. Setting SMART SELECT TECHNOLOGY CHART Application Recommended Base Base Color Speed Setting Sanding tight and Detail finger... brake system (ABS) This tool has an automatic brake system. When the tool is not on metal surfaces, do not use your sander to sand magnesium surfaces. Orange (1) Low Sanding areas with Large corners. Paint / Stain removal. up to the danger of material quickly...
... because sparks are generated. Figure L Attaching and removing: L • Fit the dust canister over a trash can self-ignite in sander dust canister or elsewhere and cause fire. Setting SMART SELECT TECHNOLOGY CHART Application Recommended Base Base Color Speed Setting Sanding tight and Detail finger... brake system (ABS) This tool has an automatic brake system. When the tool is not on metal surfaces, do not use your sander to sand magnesium surfaces. Orange (1) Low Sanding areas with Large corners. Paint / Stain removal. up to the danger of material quickly...