

Instruction Manual
Page 1
... guard must be installed before returning this manual for future reference. To register your Black+Decker purchase, go to 5 p.m. 20V max* String Trimmer INSTRUCTION MANUAL Catalog Number LSTE520 Thank you for any reason. Fri. Save this product for choosing Black+Decker! VEA EL ESPANOL EN LA CONTRAPORTADA. to http://www.blackanddecker.com/instantanswers If you...
... guard must be installed before returning this manual for future reference. To register your Black+Decker purchase, go to 5 p.m. 20V max* String Trimmer INSTRUCTION MANUAL Catalog Number LSTE520 Thank you for any reason. Fri. Save this product for choosing Black+Decker! VEA EL ESPANOL EN LA CONTRAPORTADA. to http://www.blackanddecker.com/instantanswers If you...
Instruction Manual
Page 3
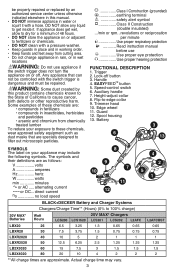
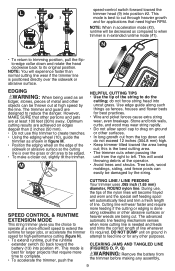
... hertz 9 10 7 5 W watts min minutes 11 or AC......alternating current or DC....direct current 12 no no load speed BLACK+DECKER Battery and Charger Systems Chargers/Charge Time** (Hours) (0% to 100% charge) 20V MAX* Batteries Watt Hours 20V MAX* Chargers...60 15 7.5 3 1.5 1.5 LB2X4020 80 20 10 4 2 2 **All charge times are specially designed to -edge collar 9. Height-adjust collar 8. Trimmer head 10. Any appliance that are approximate. Speed-control switch 6. Actual charge time may include the following symbols. WARNING: Some dust created by an ...
... hertz 9 10 7 5 W watts min minutes 11 or AC......alternating current or DC....direct current 12 no no load speed BLACK+DECKER Battery and Charger Systems Chargers/Charge Time** (Hours) (0% to 100% charge) 20V MAX* Batteries Watt Hours 20V MAX* Chargers...60 15 7.5 3 1.5 1.5 LB2X4020 80 20 10 4 2 2 **All charge times are specially designed to -edge collar 9. Height-adjust collar 8. Trimmer head 10. Any appliance that are approximate. Speed-control switch 6. Actual charge time may include the following symbols. WARNING: Some dust created by an ...
Instruction Manual
Page 6
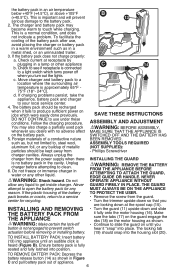
... B). Check to see if receptacle is connected to attach the guard, edge guide or handle. Always unplug the charger from the guard. • Turn the trimmer upside down and slide it fully onto the motor housing (16). B 13 C 14 SAVE THESE INSTRUCTIONS assembly and adjustment WARNING: Before assembly, make sure that...
... B). Check to see if receptacle is connected to attach the guard, edge guide or handle. Always unplug the charger from the guard. • Turn the trimmer upside down and slide it fully onto the motor housing (16). B 13 C 14 SAVE THESE INSTRUCTIONS assembly and adjustment WARNING: Before assembly, make sure that...
Instruction Manual
Page 7
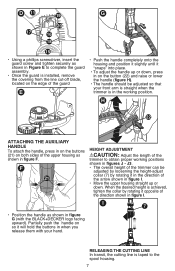
... the spool housing. 7 J3. • The overall height of the trimmer can be adjusted so that your hand. Partially push the handle on so it will hold the buttons in when you release them with the Black+Decker logo facing upward). I . • Move the upper housing straight up or down . When the desired...
... the spool housing. 7 J3. • The overall height of the trimmer can be adjusted so that your hand. Partially push the handle on so it will hold the buttons in when you release them with the Black+Decker logo facing upward). I . • Move the upper housing straight up or down . When the desired...
Instruction Manual
Page 8
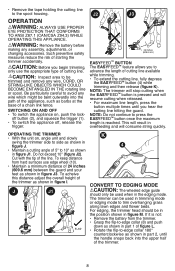
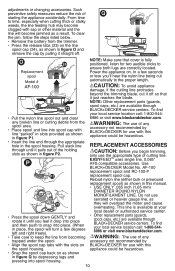
... of figure L. • Rotate the flip-to ANSI Z87.1 (CAN/CSA Z94.3) while operating this distance adjust the overall height of the trimmer. 8 To acheive this appliance. off button (2), and squeeze the trigger (1). • To switch the appliance off • To switch the...CONVERT TO EDGING MODE CAUTION: The wheeled edge guide should be trimmed and remove any assembly, adjustments, or changing accessories. NOTE: The trimmer will stop cutting when the EasyfeedTM button is pressed and will consume string quickly. Operation WARNING: Always use the appropriate type of a ...
... of figure L. • Rotate the flip-to ANSI Z87.1 (CAN/CSA Z94.3) while operating this distance adjust the overall height of the trimmer. 8 To acheive this appliance. off button (2), and squeeze the trigger (1). • To switch the appliance off • To switch the...CONVERT TO EDGING MODE CAUTION: The wheeled edge guide should be trimmed and remove any assembly, adjustments, or changing accessories. NOTE: The trimmer will stop cutting when the EasyfeedTM button is pressed and will consume string quickly. Operation WARNING: Always use the appropriate type of a ...
Instruction Manual
Page 9
... CLEARING JAMS AND TANGLED LINE (figures O, P, Q) WARNING: Remove the battery from the right to extend the runtime for larger jobs, or accelerate the trimmer speed for high-performance cutting (figure N). • To extend runtime, pull the runtime extender switch (5) back toward the battery (13) into position #1....or other persons and pets are designed to cut ; This mode is the best cutting area. • The trimmer cuts when passing the unit from the trimmer before making any other abrasive surfaces or heavier weeds are achieved on the edge of line whenever it's required. However...
... CLEARING JAMS AND TANGLED LINE (figures O, P, Q) WARNING: Remove the battery from the right to extend the runtime for larger jobs, or accelerate the trimmer speed for high-performance cutting (figure N). • To extend runtime, pull the runtime extender switch (5) back toward the battery (13) into position #1....or other persons and pets are designed to cut ; This mode is the best cutting area. • The trimmer cuts when passing the unit from the trimmer before making any other abrasive surfaces or heavier weeds are achieved on the edge of line whenever it's required. However...
Instruction Manual
Page 10
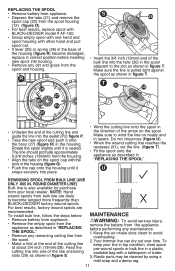
... compatible accessories. In a few degrees left and right freely). • Take care to keep the line from the trimmer. • Press the release tabs (23) on Black+Decker for use the appropriate type of Q starting the appliance accidentally. any broken line or cutting debris from the spool area...clear 6986 or visit www.blackanddecker.com. WARNING: The use with this appliance could be hazardous. • Insert the line end through Black+Decker service centers. P CAUTION: Before you feel it pulls out of the holding slots as shown in figure O and remove the cap ...
... compatible accessories. In a few degrees left and right freely). • Take care to keep the line from the trimmer. • Press the release tabs (23) on Black+Decker for use the appropriate type of Q starting the appliance accidentally. any broken line or cutting debris from the spool area...clear 6986 or visit www.blackanddecker.com. WARNING: The use with this appliance could be hazardous. • Insert the line end through Black+Decker service centers. P CAUTION: Before you feel it pulls out of the holding slots as shown in figure O and remove the cap ...
Instruction Manual
Page 11
... the slots in the housing (figure Q). • Push the cap onto the housing until it onto the boss (27) (figure R) in the housing. Your trimmer line can dry out over time. Plastic parts may be cleaned by using a mild soap and a damp rag. 11 Rotate the spool slightly until it... hand and pull spool out. • If lever (25) or spring (26) in the base of the housing (figure R) become tangled more frequently than black+Decker factory wound spools. U REWINDING SPOOL FROM BULK LINE (use only .065 in "Replacing the spool." • Remove any dirt and grass from the spool and...
... the slots in the housing (figure Q). • Push the cap onto the housing until it onto the boss (27) (figure R) in the housing. Your trimmer line can dry out over time. Plastic parts may be cleaned by using a mild soap and a damp rag. 11 Rotate the spool slightly until it... hand and pull spool out. • If lever (25) or spring (26) in the base of the housing (figure R) become tangled more frequently than black+Decker factory wound spools. U REWINDING SPOOL FROM BULK LINE (use only .065 in "Replacing the spool." • Remove any dirt and grass from the spool and...
Instruction Manual
Page 13
... slowly. If damaged, replace spool. • Pull the cutting line until it snaps securely into the housing. Imported by Black & Decker (U.S.) Inc., 701 E. Solution • Remove battery from trimmer. • Check that the line is maintained. • Ensure you are using correct line size and diameter (0.065 inch (1.65 mm.... • Inspect tracks at the bottom of the auto feed system. • Remove the spool and check if the lever in the trimmer head. • Ensure that the spool housing can move freely. • Remove the spool and unwind the cutting line, then wind it...
... slowly. If damaged, replace spool. • Pull the cutting line until it snaps securely into the housing. Imported by Black & Decker (U.S.) Inc., 701 E. Solution • Remove battery from trimmer. • Check that the line is maintained. • Ensure you are using correct line size and diameter (0.065 inch (1.65 mm.... • Inspect tracks at the bottom of the auto feed system. • Remove the spool and check if the lever in the trimmer head. • Ensure that the spool housing can move freely. • Remove the spool and unwind the cutting line, then wind it...


