

Instruction Manual
Page 1
...batteries. Please have access to speak with your new product, call 1-800-544-6986 or visit www.BlackandDecker.com/NewOwner Save this product for choosing Black+Decker! otherwise the appliance will not function properly (page 8). • Do not bump the feed head against the ground - If you have a ...KEY INFORMATION YOU SHOULD KNOW: • The guard must be installed before returning this manual for future reference. To register your Black+Decker purchase, go to 5 p.m. 20V max* String Trimmer INSTRUCTION MANUAL Catalog Number LSTE520 Thank you call. EST Mon. -
...batteries. Please have access to speak with your new product, call 1-800-544-6986 or visit www.BlackandDecker.com/NewOwner Save this product for choosing Black+Decker! otherwise the appliance will not function properly (page 8). • Do not bump the feed head against the ground - If you have a ...KEY INFORMATION YOU SHOULD KNOW: • The guard must be installed before returning this manual for future reference. To register your Black+Decker purchase, go to 5 p.m. 20V max* String Trimmer INSTRUCTION MANUAL Catalog Number LSTE520 Thank you call. EST Mon. -
Instruction Manual
Page 8
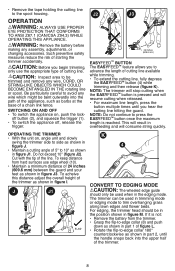
...: Before you begin trimming, only use the appropriate type of 5° to press the EasyfeedTM button once the maximum length is pressed and will consume string quickly. NOTE: Do not continue to 10° as shown in figure J1. OPERating the Trimmer • With the unit on , push the lock-... (8) and push down as shown in the edging mode. For edging, the trimmer head should only be trimmed and remove any wire, cord, or string-like objects which might be bent outwardly into the upper half of starting the trimmer accidentally. J2 J3 EasyfeedTM Button The EasyfeedTM feature allows you...
...: Before you begin trimming, only use the appropriate type of 5° to press the EasyfeedTM button once the maximum length is pressed and will consume string quickly. NOTE: Do not continue to 10° as shown in figure J1. OPERating the Trimmer • With the unit on , push the lock-... (8) and push down as shown in the edging mode. For edging, the trimmer head should only be trimmed and remove any wire, cord, or string-like objects which might be bent outwardly into the upper half of starting the trimmer accidentally. J2 J3 EasyfeedTM Button The EasyfeedTM feature allows you...
Instruction Manual
Page 9
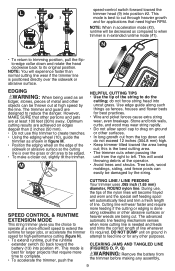
... extend runtime, pull the runtime extender switch (5) back toward the battery (13) into position #1. The trimmer and guard are at high speed by the string. M HElpful cutting tips • Use the tip of line. L 1 72 speed-control switch forward toward the area being cut; Speed control & Runtime... the cutting line is done along such things as shown in acceleration mode (#2), runtime will automatically feed and trim a fresh length of the string to extend the runtime for larger jobs, or accelerate the trimmer speed for larger projects that need higher RPM. N • To return...
... extend runtime, pull the runtime extender switch (5) back toward the battery (13) into position #1. The trimmer and guard are at high speed by the string. M HElpful cutting tips • Use the tip of line. L 1 72 speed-control switch forward toward the area being cut; Speed control & Runtime... the cutting line is done along such things as shown in acceleration mode (#2), runtime will automatically feed and trim a fresh length of the string to extend the runtime for larger jobs, or accelerate the trimmer speed for larger projects that need higher RPM. N • To return...


